Dual coil on single post technique

Status
Not open for further replies.

Murphy2278

Senior Member
Sep 2, 2018
92
88
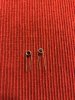
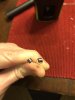
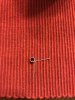
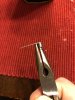
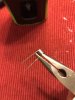
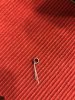
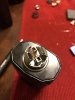
I stumbled across something when being a little frustated with trying to position 2 coils into a single post. I can’t be the first to do this, but I’m going to share anyhow. The particular rda I was using is the Hellvape Rebirth, but this could be done on any. First off, wrap your coils in different direction. One will be clockwise and the other will be ccw. Have both legs facing down, and then give one leg a quarter turn more. They will be at 6 and 9 or 6 and 3, whichever way you are looking at it. Now bend the leg that isn’t facing down back so it is facing down. This puts both legs on the same side. Do this with both coils and they will naturally face opposite of each other with the legs lining up nicely in the post holes. It will be easy to get them set into the post and very little adjusting once they are in. Like I said, I can’t imagine this is new territory, but I tried it and it made life a lot easier.
 
  • Informative
Reactions: bombastinator

Murphy2278

Senior Member
Sep 2, 2018
92
88
Some pictures might be a good idea to help one understand what you are describing.
I knew someone was gonna say this. Lol. I posted the day after I had built it. I’ll put pics up soon. I hoped the description would be enough, but I know pics help. I almost didn’t even post it at all thinking this just can’t be new information, but perhaps someone sees it and it helps.
 

greek mule

Unresolved Status
ECF Veteran
Feb 2, 2018
1,397
2,514
Athens,Greece
Yes we need to see those pictures
th
 

Murphy2278

Senior Member
Sep 2, 2018
92
88
From there, give a leg of each coil a 1/4 turn more until you this. You’ll bend a leg down so that both legs are straight down on the same side. I just use the pliers with a light touch so as not to mash up the coil.
 

Attachments

  • 73824740-6B02-4B78-8049-7C95345128B6.jpeg
    73824740-6B02-4B78-8049-7C95345128B6.jpeg
    2.2 MB · Views: 18
  • D91AEF4E-38F7-4D29-9681-3E10F1DD21E7.jpeg
    D91AEF4E-38F7-4D29-9681-3E10F1DD21E7.jpeg
    1.4 MB · Views: 17
  • D58A0FFB-9DB0-41C0-B4D7-2015EC0CE958.jpeg
    D58A0FFB-9DB0-41C0-B4D7-2015EC0CE958.jpeg
    1.4 MB · Views: 17
  • CCF0E42D-F116-4B6F-8149-9C1E1EC8FC9F.jpeg
    CCF0E42D-F116-4B6F-8149-9C1E1EC8FC9F.jpeg
    2.3 MB · Views: 17

Murphy2278

Senior Member
Sep 2, 2018
92
88
And you end up with this. In the pic where they are in the deck, nothing is tightened down or been moved at all. That’s just them dropped in. Tighten down and do whatever little positioning is left. If you’ve built on decks like this, you know it’s a bit of a pain. This makes it pretty easy.
 

Attachments

  • 0BCCB225-26F0-4883-8BFF-40AAF0E71D34.jpeg
    0BCCB225-26F0-4883-8BFF-40AAF0E71D34.jpeg
    2.7 MB · Views: 31
  • 33BB095F-8158-43F7-A821-93F2475DCE25.jpeg
    33BB095F-8158-43F7-A821-93F2475DCE25.jpeg
    1.3 MB · Views: 32
  • Like
Reactions: sonicbomb
Status
Not open for further replies.

Users who are viewing this thread