
You are using an out of date browser. It may not display this or other websites correctly.
You should upgrade or use an alternative browser.
You should upgrade or use an alternative browser.
- Status
- Not open for further replies.
Hi Ricks. I remove the silicone upper, the silicone lower, the centering spacer(metal thing) from the top. Then rinse the whole thing under hot water, blow excess water off, rinse(repeat until the wicks look clean) then attach to a battery and do a few dry burns until the coil begins to glow evenly. I usually dont stop dry burning until I can see each individual coil loop clearly. Then reassemble, fill and vape away.
Thanks, sounds easy enough, ill give it a shot. I didn't dry burn them the first cleaning and they didn't taste as good as new..
Last edited:
I heard about new aluminum mouth pieces are out for these???
I just sent you a PMI heard about new aluminum mouth pieces are out for these???
")
How do you clean your T2 coils?
My preferred way of cleaning is to remove the drip tip and rinse out the old juice under warm/hot tap water. I then unscrew the coil and remove the top silcone cup and small metal nib at the end. (Note, I do not use the lower silicone cup at all - I find them useless).
I then immerse the coil unit in water for about 12 hours in a shot glass. I let the wicks air dry until completely dry and then perform dry burns, blowing into the end until the charred residue is gone. Sometimes, if extremely charred, I will use the thread-hole end of a very small needle to gently break up the charred gunk to remove it.
I like to clean my units after about two tankfulls - the charred stuff is kept to a minimum.
I also rebuild the coils myself - they are very easy to work on. I use 34 or 36 gage NiChrome and 3mm Silica rope - I prefer about 2.2 - 2.4 Ohms for vaping at Ego voltages (3.7V or so). I make my wicks long, almost touching the bottom of the tank.
I have also used three 1mm Silica ropes together as wicks and they seem to work fine. I feel that the 3mm rope seems to eliminate any threat of leaking into the center post, as I have had no leaking whatsoever.
Wow, I didn't know that you could rebuild the coils. Got any pics of your work? I'd love to see it. Thanks for your help in the cleaning method. I try to clean my coils every 5 refills and I'm getting poor taste from them. I hope the dry burning will help.My preferred way of cleaning is to remove the drip tip and rinse out the old juice under warm/hot tap water. I then unscrew the coil and remove the top silcone cup and small metal nib at the end. (Note, I do not use the lower silicone cup at all - I find them useless).
I then immerse the coil unit in water for about 12 hours in a shot glass. I let the wicks air dry until completely dry and then perform dry burns, blowing into the end until the charred residue is gone. Sometimes, if extremely charred, I will use the thread-hole end of a very small needle to gently break up the charred gunk to remove it.
I like to clean my units after about two tankfulls - the charred stuff is kept to a minimum.
I also rebuild the coils myself - they are very easy to work on. I use 34 or 36 gage NiChrome and 3mm Silica rope - I prefer about 2.2 - 2.4 Ohms for vaping at Ego voltages (3.7V or so). I make my wicks long, almost touching the bottom of the tank.
I have also used three 1mm Silica ropes together as wicks and they seem to work fine. I feel that the 3mm rope seems to eliminate any threat of leaking into the center post, as I have had no leaking whatsoever.
[The other day I had my first new and improved drip tip crack. It cracked in the same place as the old ones did - along the seam. It is odd though that all the cracks I've had aren't just in the seam but rather along side of it, too.
Well I decided I've had enough of this and made my own tip as suggested by AG51. Instead of using a metal tube, I used the tube from an old CE2 clearomiser - it is plastic and a tighter fit than a metal one. I also cut down an old Ego cone and press fitted the original drip tip threads into the cone - makes for a rather nice aesthetic look. I then superglued a delrin drip tip into the end so that it would not push out when engaging the silicon cup on the coil assembly when screwed into the tank. When I find my camera I will post a pic.
ATTACH=CONFIG]133268[/ATTACH]
Attachments
Last edited:
COOL ! I never even thought of using the original threads in an ego cone. Yeah, when you can I'd like to see a pic of what you madeThe other day I had my first new and improved drip tip crack. It cracked in the same place as the old ones did - along the seam. It is odd though that all the cracks I've had aren't just in the seam but rather along side of it, too.
Well I decided I've had enough of this and made my own tip as suggested by ???. Instead of using a metal tube, I used the tube from an old CE2 clearomiser - it is plastic and a tighter fit than a metal one. I also cut down an old Ego cone and press fitted the original drip tip threads into the cone - makes for a rather nice aesthetic look. I then superglued a delrin drip tip into the end so that it would not push out when engaging the silicon cup on the coil assembly when screwed into the tank. When I find my camera I will post a pic.
I do save my old coils and have taken them apart just to see if I could re-coil them. They come apart like the heads of a nova (which I do re-coil myself). I have plenty to still use so I just saved them but haven't re-coiled any as of yet. I'm glad to hear you have been successful at it tho. That makes me happy
COOL ! I never even thought of using the original threads in an ego cone. Yeah, when you can I'd like to see a pic of what you made
I do save my old coils and have taken them apart just to see if I could re-coil them. They come apart like the heads of a nova (which I do re-coil myself). I have plenty to still use so I just saved them but haven't re-coiled any as of yet. I'm glad to hear you have been successful at it tho. That makes me happy
I edited my previous post with a picture of the entire unit - my camera is not that great and the picture of the tip itself was quite blurry. I'll try to get some decent close-ups and post them later. Your idea was certainly a winner!
Here is a photot of the tip I made for the Ego 2.4 clearo...

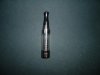
Here is a picture of one of the coils I rebuilt using 3mm Silica rope and NiChrome 34ga...

Here is a picture of one of the coils I rebuilt using 3mm Silica rope and NiChrome 34ga...
Yours is much Prettier then mine !!I edited my previous post with a picture of the entire unit - my camera is not that great and the picture of the tip itself was quite blurry. I'll try to get some decent close-ups and post them later. Your idea was certainly a winner!
Nice Job  Thank you for showing us all that
Nice ! I like the long wick there. Some people like short wicks but I like the longer onesHere is a photot of the tip I made for the Ego 2.4 clearo...
View attachment 133273
Here is a picture of one of the coils I rebuilt using 3mm Silica rope and NiChrome 34ga...
View attachment 133274
Yeah, the short ones seemed to work good with the Vision Stardusts, but with these guys, I like the longer wicks too. I also did away with that lower silicone cup, since I thought it starved the wicks rather than provided a reservoir for them (and it obstructs the longer wicking). And there doesn't appear to be any less performance or leaks without it.
One more close-up shot...

Here is a tip with a 'shorty' delrin drip tip...

One more close-up shot...
Here is a tip with a 'shorty' delrin drip tip...
Last edited:
I've tried the longer wicks and always go back to the short ones with the cup. I find it's easier to adjust the wicking by moving the lower cup up or down depending on the thickness of the juice. The long ones have been hit or miss for me.
I've tried the longer wicks and always go back to the short ones with the cup. I find it's easier to adjust the wicking by moving the lower cup up or down depending on the thickness of the juice. The long ones have been hit or miss for me.
i think the silicone cup is what makes the t2's blow the vision / stardust away. i have been rocking the 1.8Ω for almost 2 months now, and prefer them to everything i have tried, save for dripping on a lr atty ... and that is just too much trouble unless you are testing new juices at home. i have yet to have dry hit issues even with 95 % vg ... i do get some flooding with thinned vg juices, but nothing unmanageable.
Glad to hear most are getting good use out of their CE4 CCs
I have not spent much time with the long wicks, and I think I am with getz on this one...I do like the bottom silicone cup.
It suits my needs, but I dont really adjust it much since I stick with mostly the same liquids. GP/DK 95% of the time.
We wil be getting in metal tips for them in the next couple weeks, but a few sites already have them.
For cleaning, my steps are here (regularly typed in emails for people asking)
I remove the mouthpiece
Remove the silicone sleeve
remove the metal insert
(I leave everything else intact)
I rinse the unit in warm water and make sure all liquid is out and is clean inside
I then shake it well to remove all water
I then screw onto battery and start powering
This sometimes takes a minute or two to get the water off the coil/wick and start producing vapor
I pulse a good 10 seconds (normally coils only need 3-5 sec pulses) these coils will take a beating and not even phase them.
Keep pulsing until coils starts glowing and switch to about 5-7 second pulses with blowing gently on coil to spread vapor.
Should be good to go.
I fill up with liquid after cooled and piece back together.
Nothing else recommended, however many other ways to do the job.
I would say a rinse would be ok after dry buring, and then let to dry.
First hit or two I "bill clinton" it as it may be dry for a few hits.
But then back to normal and great.
Last edited:
Hi there,
Thanks for the cleaning tips. Can someone tell me why you do a dry burn? If I let the coil sit several days without use, wouldn't that suffice? I've tried dry burning, but after that, I get a burnt taste with the new fill up.
Are there any videos showing how to recoil? I don't have the materials but am curious to see how it is done.
Thank you!
Hello Nadine,
We should start seeing DIY for atom material soon on the website.
Dry burning actually gets the coil glowing RED hot to burn off all the buildup that is on the coil.
THis is just byproducts and leftovers from vaporizing but they carry a less satisfying taste....BUT
mainly they are an insulator of sorts, so the coil can not get hot enough to vaporize properly.
If you do not do a full dry burn and remove this material.. then it was not successful,
and perhaps that is the reason you are tasting a bad taste.
Letting the coil sit would not do anything at all.
unless it is sitting in a cleaner of sorts...vodka or grain alcohol is what some use.
But not necessary if dry burning anyway.
Hello Nadine,
We should start seeing DIY for atom material soon on the website.
Dry burning actually gets the coil glowing RED hot to burn off all the buildup that is on the coil.
THis is just byproducts and leftovers from vaporizing but they carry a less satisfying taste....BUT
mainly they are an insulator of sorts, so the coil can not get hot enough to vaporize properly.
If you do not do a full dry burn and remove this material.. then it was not successful,
and perhaps that is the reason you are tasting a bad taste.
Letting the coil sit would not do anything at all.
unless it is sitting in a cleaner of sorts...vodka or grain alcohol is what some use.
But not necessary if dry burning anyway.
Ah, I see!
I look forward to the updated DIY stuff on the site.
I was afraid that dry burning would damage the wick. I have soaked in vodka though.
- Status
- Not open for further replies.
Similar threads
- Replies
- 0
- Views
- 1K
- Replies
- 16
- Views
- 36K
- Locked
- Replies
- 8
- Views
- 11K
- Replies
- 0
- Views
- 2K
Users who are viewing this thread
Total: 2 (members: 0, guests: 2)