New USB Passthrough I got was DOA, so I improvised...

Status
Not open for further replies.

first2di3

Senior Member
ECF Veteran
Feb 17, 2009
92
0
Oklahoma
Meet the SmokeBox :p

OK, so, I got a USB Passthrough from David Yang at Eastmall (2 actually) and when I got them, one was DOA (couldn't get the switch to activate).

I've been wanting to do some mods for some time now, but now seemed like the best time as I had some spare parts...

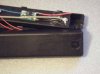
What I did was take the battery box and open it up, drill out some holes, and remade it as a Manual Switch Battery holder...

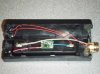
Well, last night the misses decided that it would be better if the cord wasnt attached, so I disconnected it, in picture 1 you can see (if you look closely) the red and black wires that go to nothing at the left side of the circuit board (which I also left in so that it could be used as a passthrough that would charge the battery just like it originally would have...)

I added a click button from an old mouse for the manual switch, and this thing hits like a champ!!! My second Passthrough is now the battery charger/usb passthrough, so it works out really well as larger capacity battery (Plus the Manual switch is great!)

Here are the pictures!

attachment.php


attachment.php


attachment.php


attachment.php
 

Attachments

  • PassMod1.jpg
    PassMod1.jpg
    38.7 KB · Views: 846
  • PassMod2.jpg
    PassMod2.jpg
    34.6 KB · Views: 821
  • PassMod3.jpg
    PassMod3.jpg
    38.7 KB · Views: 835
  • PassMod4.jpg
    PassMod4.jpg
    34.7 KB · Views: 797
Last edited:

first2di3

Senior Member
ECF Veteran
Feb 17, 2009
92
0
Oklahoma
You get it with the manual switch usb kit that is sold by David or Kevin Ecigmall - Your #1 Source for Electronic Cigarettes or www.eastmall.net - Eastmall International Co.,Ltd

The circuit board in the box is a battery charging circuit. There is no need to keep it in there.
Good Idea, I have 3 of them

Actually, they are the 15$ Automatic (Suction activated) USB Passthroughs for 801's... (edit: I did buy them from Eastmall.net - David Yang)

I left the charging PCB there because I did have a USB cord attached to it, but it worked so good my wife and I were passing it back and forth on the couch and got tired of the cord in a very short time... (acctually I took pictures of the insides and made this post because I removed the cord...)

Since I have another USB passthrough attached to my computer Im using that one to charge the batterys for this one... :p

I used an old mouse tact button for a switch, and soldered it all together, then kept the battery connector in place with hotglue...

Glad you guys like it, it's a beast!! It didn't require anything but a soldering iron, hot glue gun, and screwdrivers of various sizes (to carve out the hole for the button)

The hardest part was getting the 801 connector out of the original metal tubing, I ended up having to use a Butane torch to get the end hot, then screwed on an atomizer and wiggled it back and forth till it came off...(learned that after breaking the first one....)
 

first2di3

Senior Member
ECF Veteran
Feb 17, 2009
92
0
Oklahoma
This looks awesome, and easy! Can you give us some more info on how you built it?

Where did you get the battery box?

And what size are the batteries? It looks like a AAA but it's a "special lithium battery" so I'm not sure if it's standard.

I want one!!! :p

I bought one of the 15$ USB Passthroughs for 801's at Eastmall.net with no intention of modding it, but when I received on DOA I decided to mod it...

DSE801 USB passthrough-Black - e-Cigs Penstyle e-Cig 801 - Eastmall International Co.,Ltd

The only thing I needed besides the passthrough itself was Hot Glue, and a electronic switch (that I stole from an old Mouse... but you can get bigger ones from radio shack or something... just make sure its small enough to fit in the casing..)


Here is what I did though...

1: Got the Battery connector out of the battery tube by heating it up with a lighter, then connecting an Atomizer to it and gently but firmly pulling on it... It is super glued in there, but it does not have threads, so you just pull till it comes out..

2: I opened up the battery holder and disconnected the wiring after drawing a diagram to where stuff went..

3: I took varying size screw drivers and carved out a hole the size of the manual button I was going to use into the plastic in the back end... but before I could do that, I had to carefully remove the little piece of plastic that the screw goes into... (I was using a button from an old mouse that was having problems...saved it so one day I would have parts for something, good thing! lol)

4: I then carved out the end the USB adapter was sticking out of to be more round to accept the battery conntector.

5: I hot glued the circuit board down, hot glued the button in place (after soldering the wires in place), then soldered the wires the same way they were before, but instead of a USB plug on the end I had the Battery Connector. Then I hot glued the battery connector in on one side of the plastic after soldering the connections, and tried it out...success!

6: Put more hot glue all around the connector and closed it shut.

Also, at this point I still had the USB cable coming out of the other end so I could use it as a passthrough (you can see the black and red wires in the first picture), but I ended up cracking the thing back open to remove the cable. Then hot glued everything again and closed it up.

The Battery came with the USB Passthrough, it is about the same size as a AAA, but its rated at 3.6 volts like the batteries in an E-cig are.


Been using it for 5 days now and its awesome!
 

Slender

Full Member
ECF Veteran
Nov 2, 2008
42
0
Odessa

first2di3

Senior Member
ECF Veteran
Feb 17, 2009
92
0
Oklahoma
Hi first2di3! You have done a great job!:thumb: I have made something similar some time ago: http://www.e-cigarette-forum.com/forum/modders-forum/9397-intellicig-evo-janty-kb-usb-mod.html

It gets power directly from my laptop and I'm happy with it's performance...:)

Your device is more sophisticated. I'm just curious what is advantage of using the battery in it? Is it just for some protection of atomiser overheating?:confused:

Hi there!

Actually the way the USB Passthrough comes when you buy one is that the USB plug recharges the battery, and the battery supplies the power for the atomizer. If you take the battery out, you will get no power to the Atomizer.

The reason it works like that is that without the battery, the usb could burn out the port on your computer... so the battery acts as a transformer (if you will) that stores power until it is needed, instead of being always on...

I imagine as long as you don't over do it, getting power directly from the USB port wouldnt hurt anything, but, it might fry your USB port, or even worse, your motherboard...(rendering your computer useless until you replace the motherboard..)

I build all my own computers out of custom parts (Im a gamer :p) and I don't want to risk burning out my 170$ motherboard...

In all honesty, mine is very uncomplicated... it looks that way because of the circuit board being there, but it is actually more like this...
IZ8M7.jpg


The gray wire goes to the outside casing (Negative)

The red wire goes from the positive on the battery, to one side of the switch, out the other, and to the middle of the battery connector (Positive)
 

jdm-chard

Unregistered Supplier
Mar 7, 2009
19
0
Chicago
www.isovape.com
  • Deleted by Misty
  • Reason: posts for unregistered supplier site 2009

Slender

Full Member
ECF Veteran
Nov 2, 2008
42
0
Odessa
first2di3 thanks a lot for explanation and for picture. I will try to modify my device...
Just one more clarifying question (may be stupid question as I'm weak in electricity): how do the usb wires go? Should I solder them to "+" and "-" of the battery box? And what about the circuit board? Does the last picture mean the device can work without circuit board? Thanks
 
Last edited:

first2di3

Senior Member
ECF Veteran
Feb 17, 2009
92
0
Oklahoma
first2di3 thanks a lot for explanation and for picture. I will try to modify my device...
Just one more clarifying question (may be stupid question as I'm weak in electricity): how do the usb wires go? Should I solder them to "+" and "-" of the battery box? And what about the circuit board? Does the last picture mean the device can work without circuit board? Thanks

Actually, the box I got had the Red(+) and Black(-) Wires going to one side of the circuit board, and wires going from the other side of the circuit board to the battery Positive and Negative... I just kept it that way and removed the USB cable when I turned it into a battery only box. The circuit board goes inbetween the USB cable and the battery terminals and the internal programming of the chips only allows current to the battery if the battery is under a certain voltage (to keep it from over charging)

I would say that if you want it to be a "battery usb passthrough" whereas, you want it to charge the battery/use usb power while you have it plugged in, but have the battery still supply power if you go to the restroom or make a sandwich (lol), you will have to have the circuit board because it is what limits the battery from getting over charged and blowing up!8-o

The reason Im getting away with using mine without the circuit being used is I purchased 2 of the same USB Passthroughs, so one is modded and pictured in this thread, the other hasnt been modified and is currently used as a battery charger for the mod... (since I have 2 batteries I can swap)

Basically, you could get these: DealExtreme: $4.32 Ultra Fire 10440 3.6V 500mAh 2Pack (but you might want to get a charger with them from there as well, just look around)

And a Battery Holder from Radio Shack: Enclosed "AAA" Battery Holder - RadioShack.com

Mix that with a dead battery for whatever devise you use (I use an 801, you might use a 901 or something, and in that case, look for Madog's posts as he was able to use a Tire Valve as the battery connector for the Atomizer) and get some kind of pushbutton switch ( Mini SPDT 3-Amp Momentary Pushbutton Switch - RadioShack.com or 3-Amp Soft-Touch Momentary Switch - RadioShack.com ... Basically a small Momentary Switch)

Anyhow if you have any questions let me know, I check here fairly often, but I cant lurk all day like I would like to :p
 

Slender

Full Member
ECF Veteran
Nov 2, 2008
42
0
Odessa
Anyhow if you have any questions let me know, I check here fairly often, but I cant lurk all day like I would like to :p
Thanks first2di3. Now I understand. As I crapped out the circuit board when "created" my usb device I expected that just including a battery will save my laptop from burning and reduce a voltage a bit as producing loads of vapor it eats gallons of liquid and I have to top up the cart after every 10 puffs :p
 

Txrider

Senior Member
ECF Veteran
Apr 3, 2009
176
86
Also, at this point I still had the USB cable coming out of the other end so I could use it as a passthrough (you can see the black and red wires in the first picture), but I ended up cracking the thing back open to remove the cable. Then hot glued everything again and closed it up.

The Battery came with the USB Passthrough, it is about the same size as a AAA, but its rated at 3.6 volts like the batteries in an E-cig are.


Been using it for 5 days now and its awesome!

Is there room to put a female USB connector in the battery box? Or a short cord with a female on the end maybe?

That way your cordless but you could just use any USB cable to plug into it to charge the battery.
 

first2di3

Senior Member
ECF Veteran
Feb 17, 2009
92
0
Oklahoma
Is there room to put a female USB connector in the battery box? Or a short cord with a female on the end maybe?

That way your cordless but you could just use any USB cable to plug into it to charge the battery.


There is definitely room for a short cord to stick out with a female USB port...


As far as putting in a female plug, you would need to use that Mini USB port you gave the part number for for sure, and it would be a tight fit...

What I had to do to give me room for the mouse button was take a pair of needle nose pliers and break off the screw post in the bottom of the plastic box... I actually used a small screw driver (think glasses repair kit small) to make the hole in the screw post go all the way through, that way I had a start for my switch hole.

Since the other side just had a hole for where you put in the screw, there might be room enough for the female mini usb port, but I didnt have a multimeter to see which pin was positive and which one was negative, so I didnt bother adding one...

The pictures I posted in the first post show exactly how to wire it for what you are wanting, you just have to look closely...

The Blue and Dark Gray go to the battery terminals to charge the battery..

The Light Gray and Thin Red wires to the switch/atomizer

The Thick Red (that is cut off short) and Black(very hard to see, but its sorta under the Light Gray/Dark Gray wires) go from the USB adapter to the Circuit board...

The power from the USB comes into the Circuit board, from the circuit board (which is a limiter for charging the battery) the Blue and Dark Gray wires go to the Positive and Negative terminals for the battery (it is labeled on the circuit board). Also soldered to the terminals for the battery is the Light Gray and Thin Red wires that go to the atomizer...

all you would need to do is wire up the circuit board with your female plug (should be easy, as Ive never seen a USB cable with incorrectly labeled wires (red = power, black = negative, green and white = data in and out)

good luck :D
 
Status
Not open for further replies.

Users who are viewing this thread