Dark Chrome 6V Xenon Tailcap Flashlight Torch w/CR123A - eBay Handheld Torches, Lamps, Torches, Camping, Hiking, Sport. (end time 17-Jan-10 23:38:00 AEDST)
Here is a DX version
DealExtreme: $8.37 Police Waterproof 7.2V Flashlight
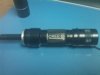
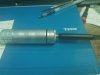
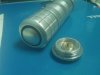
Unscrew the lens from this flash light.
Unscrew the top piece that holds the bulb.
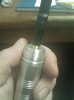
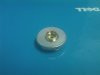
Pull the bulb out and use a stepped drill bit to bore out the hole big enough to press fit a 510 battery connector.
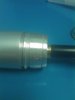
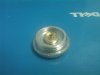
Use a pipe cutter to cut off most of the bottom of the battery connector so that the center post is exposed enough to make contact with the battery when pressed into the light bulb holder.
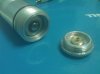
Press the battery connector in the bulb holder you bored out and your set.
Edit
Part and Tool list that I used to make things easier for people
Parts needed
Flashlight (of course)
battery connector (i used 510) but im sure you could easily use a 901, not sure about a 801 though.
2 3v RCR123A batteries and charger (I used the tenergy ones)
Tools
stepped drill bit
Cord less drill ( go slow keep it straight. I held the piece in my hand while drilling)
small pipe cutter to trim bottom of battery connector (eyeball where to cut, use a old atty to spin it while cutting)
solder and soldering iron to seal battery connector
small piece of metal pipe or pvc to place on bottom of light bulb holder when press fitting the connector in. I used the open end of an aluminum pill bottle
Vice or c clamp to press the connector in
It a very solid mod for 10 bucks if you have the tools.
It should take you about 10 minutes from opening the box.
Only down side to it is that the tube does not fit 18650 batteries. So its a 6 volt device unless you use a blank battery spacer and a 3.7 volt rcr123.
Jason
Here is a DX version
DealExtreme: $8.37 Police Waterproof 7.2V Flashlight
Unscrew the lens from this flash light.
Unscrew the top piece that holds the bulb.
Pull the bulb out and use a stepped drill bit to bore out the hole big enough to press fit a 510 battery connector.
Use a pipe cutter to cut off most of the bottom of the battery connector so that the center post is exposed enough to make contact with the battery when pressed into the light bulb holder.
Press the battery connector in the bulb holder you bored out and your set.
Edit
Part and Tool list that I used to make things easier for people
Parts needed
Flashlight (of course)
battery connector (i used 510) but im sure you could easily use a 901, not sure about a 801 though.
2 3v RCR123A batteries and charger (I used the tenergy ones)
Tools
stepped drill bit
Cord less drill ( go slow keep it straight. I held the piece in my hand while drilling)
small pipe cutter to trim bottom of battery connector (eyeball where to cut, use a old atty to spin it while cutting)
solder and soldering iron to seal battery connector
small piece of metal pipe or pvc to place on bottom of light bulb holder when press fitting the connector in. I used the open end of an aluminum pill bottle
Vice or c clamp to press the connector in
It a very solid mod for 10 bucks if you have the tools.
It should take you about 10 minutes from opening the box.
Only down side to it is that the tube does not fit 18650 batteries. So its a 6 volt device unless you use a blank battery spacer and a 3.7 volt rcr123.
Jason
Attachments
Last edited:
")