
I have seen many people sand the finish off their provari. This is something have wanted to do but just could not bring myself to do it at first. Now my first born is loosing color so I thought it was about time to look into this. I don't have a work shop and any fancy tools. I live in an apartment so will have to do this all by hand. I have a mini and don't want to loose the color in the tear drops rings and name. I have seen people say they use different size sand paper. What would you start with and move up to? I was gonna start with the extension and see how it goes from there. I plan on taping up the screen button and top cap. I just don't feel comfortable taking my baby apart. Would love some tips and advice. Appreciate your help.
You are using an out of date browser. It may not display this or other websites correctly.
You should upgrade or use an alternative browser.
You should upgrade or use an alternative browser.
Sanding method
- Thread starter Vicshalls
- Start date
- th_trl_thread_readers 0
- Status
- Not open for further replies.
Scotch bright pad.
Sent from my Nexus 10 using Tapatalk
Sent from my Nexus 10 using Tapatalk
Chuck that bad boy on a drill, Spin it and hit it with scotch bright pads, and then finish it off with a light sand paper.. Just be careful with the screen and button, Touch up the spots around the button and screen if need be ") Mask off the screen and button!
Mask off the screen and button!
Ken
Mask off the screen and button!Ken
Chuck that bad boy on a drill, Spin it and hit it with scotch bright pads, and then finish it off with a light sand paper.. Just be careful with the screen and button, Touch up the spots around the button and screen if need be
Ken
I'd be even more careful of that thing not spinning off the drill & going flying...

I'd be even more careful of that thing not spinning off the drill & going flying...
Chuck it with an old carto & run the drill forward so that the force is causing the carto to tighten. It's not going anywhere.
MonsterKenny:13426373 said:Chuck that bad boy on a drill, Spin it and hit it with scotch bright pads, and then finish it off with a light sand paper.. Just be careful with the screen and button, Touch up the spots around the button and screen if need be
Ken
Thanks for the help. Guess I will go find some Scotch Brite pads today.
If you dont take out the button and the screen you'll make a mess of it. The paint is extremely hard. Taking it apart is very easy. Its press fitted so you just tap it with a screw driver and off it comes. After that you just fasten it to a drill (you can do this using an old screwdriver) and sand the hell out of it.
I did this with a series of sandpapers. I started with 80 to take the color off and then 150 220 600 1200 and finished it off with 2000. The result is mirror finish.
Then you reattach everything and press it back together under a bed or a sofa. Check out my thread where i explain how i did this. Its easier than it looks.
http://www.e-cigarette-forum.com/forum/provape/571486-brushed-stainless-steel-provari-project.html
Chuck it with an old carto & run the drill forward so that the force is causing the carto to tighten. It's not going anywhere.
Man... I would be Kinda Leery of Chucking Up my Provari using the 510 Treads of the Atty Connector. And then Spinning it with a Drill.
Seems like a Lot of Load to put on about 3 Threads.
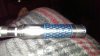
Well it is coming along nicely. No drill just sand paper and tape over the button and Window. Only done one round of sand paper. Had to stop to run errands but will get back to it after lunch. Looks good with the blue in there.
Well it is coming along nicely. No drill just sand paper and tape over the button and Window. Only done one round of sand paper. Had to stop to run errands but will get back to it after lunch. Looks good with the blue in there.
sweet ... we want to see pics please
I usually get Santa's elves to sand down my Provaris

I hope they load cause they never do for me. It turned out so much better than I even thought it could. I never have much luck doing projects like this. I love it. Ya kept giving me a connection error. Ugh sorry guys would love to show it off.
I sold the red one off.. Still have blue.


It is not perfect, but i think it looks pretty dang good. I am sure i could sand it down a little more. Around the window there is still a little blue, but nothing i cant live with. I coevered the window with packing tape and that worked out good. Did not care that much about the button. Figured it would give it kinda a dull look on the light. 


Attachments
Oh and i forgot. Yall let me know what yall think. I would love any feedback on it. Makes me want to get ahold of my wifes purple one.lol She said no though. lol
Oh and i forgot. Yall let me know what yall think. I would love any feedback on it. Makes me want to get ahold of my wifes purple one.lol She said no though. lol
Looks good but I would do more sanding to remove scuffs. Dissemble and try it with 3m 320 grit super fine paper. Use 1/4in foam pad behind the sand paper so you dont get uneven sanding and also do not apply too much pressure. You can just hand turn holding the sandpaper/foam in your hand. Then use microfiber cloth and some mothers polish and you will get more a smooth finish that looks more original.
I am on the fence about stripping my white 2.5 mini. Probably do it soon though.
Last edited:
Ya i was thinking of doing more sanding to it. I started with some metal sand paper. The package did not say the grit size on it other than fine and super fine. I found that odd, but it really was easy with it to take the paint off. Then i went down to a 600. That was the smallest i could find at home depot. I did it by hand. I did not use a drill or anything. I will probably go back after it again this weekend and see what happens.
Nice job ... looks great.
You have given it a unique look and can always sand it more over the next 20 years while vaping it.
Cheers
Sent via iPhone
You have given it a unique look and can always sand it more over the next 20 years while vaping it.
Cheers
Sent via iPhone
- Status
- Not open for further replies.
Similar threads
- Replies
- 17
- Views
- 4K
- Replies
- 1
- Views
- 981
- Replies
- 7
- Views
- 2K
Users who are viewing this thread
Total: 2 (members: 0, guests: 2)