The worst flashlight to mod ever...

Status
Not open for further replies.

Kobudo

Super Member
ECF Veteran
Jan 16, 2010
399
18
Evansville, IN
Hi all!

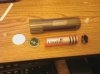
I got the bug to make another mod, and figured I'd try a tube this time. So, I went to the store and found this 3AAA LED flashlight in the camping section at the walmart:

xm8qbd.jpg


Only problem is, as illustrated by the PCB, the case isn't ground. The switch activates it against the outer ring, with the center conductor on that PCB hitting the positive on the battery holder, which was permanently affixed to the switch (until I broke the whole assembly). Luckily, I have another switch that I can "make" work for a tail-mounted kill switch (to the right of the battery above). The only downside is I'm wearing my fingers out sanding and rubbing the anodizing off the threads and other parts that need continuity for ground. After a few evenings, I do now have continuity... though I need some coarser steel wool to finish things up.

On the plus side, two pieces of plastic card stock, about 1mm thick and cut to the length of the battery, will make sure the 18650 never touches anything it shouldn't:

29mm3j6.jpg


It won't even come out without a little coercion... which I am kind of stoked about.

This isn't what I had in mind when looking to build another mod, but I WILL make this work! Back to sanding paint/anodizing/whatever this coating is...
 

Attachments

  • 0909102328.jpg
    0909102328.jpg
    17.6 KB · Views: 14
  • 0909102325.jpg
    0909102325.jpg
    18.1 KB · Views: 26

Kobudo

Super Member
ECF Veteran
Jan 16, 2010
399
18
Evansville, IN
After writing and complaining last night, I found the perfect tool for cleaning the paint out of those pesky threads: a flat, pointed needle file. I'm pretty sure this thing is just painted at this point, anodizing is supposed to be a pretty hard finish.

Gotta shop for a switch and a few other parts tonight, it's amazing how much happier everything else looks when you're not trying to sand inside a tight space :)

Oh, and roadrash, the paper towel/toilet paper tube idea sounds pretty nifty. If I didn't already have the plastic card cut out and shoved in there, I would definitely check that out! Plastic card can get expensive, which is its only real downside as a material.
 

Kobudo

Super Member
ECF Veteran
Jan 16, 2010
399
18
Evansville, IN
A lot of cutting and scraping tonight. Got everything done but the soldering, which will have to wait because my soldering iron finally died.

Major components, ready for glue/wiring. The top piece is a steel washer I drilled out and etched the top of with a dremel bit so it's less reflective.

2rnae04.jpg


Everything fitting together nicely... this is the top without the atty connector or plate installed, so you can see where the switch and positive terminal are situated. The white plastic insulator that the post is in will just be clamped in place between the lamp bezel and the tube, so I can service it later if necessary. This adds just under 1/16" to the overall length.

2jg9iy8.jpg


I am happy with how it's coming along, but this is more work than I thought a flashlight mod would be. :p One more night and I think I'll have this thing done and making clouds!
 

Kobudo

Super Member
ECF Veteran
Jan 16, 2010
399
18
Evansville, IN
Well, this is disappointing.

On the plus side, I fixed my soldering iron.

On the downside, I either can't get a good ground or I have a short when I assemble the whole thing.

Time to find a different flashlight to mod...

EDIT: I found a few problems with everything as I was checking everything over again.

First, I can't get a good ground for the switch in the tail cap. I have removed it (against my own wishes regarding a kill switch) and replaced it with the metal plate and retainer that the original battery holder was attached to. I've added a spring for the negative battery contact, and it works pretty well.

Due to the extremely tight spaces in the lamp housing, I'm having several shorts and faults, in part due to the screw I'm using as a positive being too long. Every time I re-assemble, it forces things around and even shoves the center conductor around in the 901 connector.

I'm feeling better now that I know what is going wrong, a screw is going to be getting cut down tomorrow.

Pics when it's done :)
 
Last edited:

Kobudo

Super Member
ECF Veteran
Jan 16, 2010
399
18
Evansville, IN
Tonight, I got a new package of mini-switches and a new soldering iron as the old one still wasn't working right. Looking at new ones in Radio Shack showed me just how worn the tip was, and the set screw was stripped -- I guess they only last about ten years or so. A little while later and it's done!

2mmxq85.jpg


A few notes about the final design.

There is NO room in the top cap for everything. I had to go in with bits of electrical tape to kill all the shorts I had. I hope it all holds up in there, as I had to use it to protect the ground ring of the atty connector from positive wires. The screw was a major offender, so it got ditched in favor of a flat, thin piece of sheet aluminum cut out that I had set aside from a previous project. I cut a slit in the top of the plastic circle I made to bend a tab through to solder on.

The tail cap could not be retrofit with the tail switch I had. This means I don't have a kill switch. I'm not happy about that. I like the looks, but this little Coleman LED light is not the best candidate for a project. On the plus side, once all the bugs are addressed it vapes really nicely.
:smokie::thumbs:
 
Status
Not open for further replies.

Users who are viewing this thread