-
Locked
Think Vape Auxo DNA 250C Mod | Aspire Guroo Tank
- By Ema
- Sourcemore
- 0 Replies
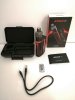
Think Vape Auxo DNA 250C Mod
Auxo DNA 250C Mod is a box mod that comes with perfect shape, small size and reasonable weight. Using dark gunmetal color with genuine leather, it looks elegant and luxury, and feels really comfortable at hand. Monitored by the advanced DNA 250C chip, it provides multiple vaping settings and customization options. For example, it supports VW/VV/TC/TCR/Bypass modes. With the most durable chip, it is powered by dual 18650 batteries for a stable and long-lasting vaping experience. And it is charged via safe and fast 2A USB charging port. Besides, it adopts 510 adapter for the compatibility of most regular tank.
Details:
1. Elegant and luxury design
2. Dark gunmetal color with Genuine leather
3. Powered by DNA 250C chip and dual 18650 batteries
4. Adopts 510 connector
5. 2A USB charging port
6. A screen for clear data

Aspire Guroo Tank
Guroo Tank is a sub ohm tank that features easy top filling system. It has 4ml or 5ml (with the extra extension glass tube) e-juice capacity. With bottom adjustable airflow, it will provide you intense flavor and dense vapor. Adopting 0.3ohm/0.15ohm mesh coil, it can bring you great sub-ohm vaping experience.
Details:
1. 810 replaceable drip tip
2. 4ml and 5ml (with the extra extension glass tube) e-juice capacity
3. Convenient top fill system
4. "pop-up" coil replacement
5. Bottom adjustable airflow
6. Provides intense flavor and dense vapor

Auxo DNA 250C Mod is a box mod that comes with perfect shape, small size and reasonable weight. Using dark gunmetal color with genuine leather, it looks elegant and luxury, and feels really comfortable at hand. Monitored by the advanced DNA 250C chip, it provides multiple vaping settings and customization options. For example, it supports VW/VV/TC/TCR/Bypass modes. With the most durable chip, it is powered by dual 18650 batteries for a stable and long-lasting vaping experience. And it is charged via safe and fast 2A USB charging port. Besides, it adopts 510 adapter for the compatibility of most regular tank.
Details:
1. Elegant and luxury design
2. Dark gunmetal color with Genuine leather
3. Powered by DNA 250C chip and dual 18650 batteries
4. Adopts 510 connector
5. 2A USB charging port
6. A screen for clear data
Aspire Guroo Tank
Guroo Tank is a sub ohm tank that features easy top filling system. It has 4ml or 5ml (with the extra extension glass tube) e-juice capacity. With bottom adjustable airflow, it will provide you intense flavor and dense vapor. Adopting 0.3ohm/0.15ohm mesh coil, it can bring you great sub-ohm vaping experience.
Details:
1. 810 replaceable drip tip
2. 4ml and 5ml (with the extra extension glass tube) e-juice capacity
3. Convenient top fill system
4. "pop-up" coil replacement
5. Bottom adjustable airflow
6. Provides intense flavor and dense vapor


 so I was hoping maybe some of you experts could help me learn how to properly clean these mechs and properly use them safely as far as I'm aware I know my ohms law and battery safety well enough to be using a mech