I honestly don't think I really need this, but I've been wanting to make my own mod (too much time on my hands at the moment) and the idea came in my head for a mod on my PCC that might appeal to those power vapers out there. I don't think this exact mod has been done before, but if it has, I apologize.
Overview:
This mod converts the atomizer compartment of a 510 PCC into a usable atomizer port. Thus, you can screw on an atomizer, insert a cart and vape right off the main PCC battery. Having just finished this, I can't tell you how many hours you will get, but someone else did a mod using the innards from a PCC and I think he said that he gets a day and a half on a charge.
To sweeten the deal, not only can you vape right off of this thing (think of it as a "box mod" or nicostick from this perspective) but you can ALSO continue to use it to charge a normal 510 battery * (and use the normal battery) and carry 2 carts, or 1 cart and and extra atty. And of course, it should also be up to the task of being used as a passthrough.
* As I mention at the end, as I built it, you would not be able to charge a battery and use the built-in vaping capabilities simultaneously. If you desire this ability, all you need to do is drill a hole into the top (lid) of the PCC in line with the atty. The reason for this is because the PCC doesn't charge a battery unless the lid is closed, and the design per my instructions requires the lid to be open in order to use it to vape with. I may make this change to mine in the future, but for now I wanted it this way.
(A wink to other modders out there..... I have reason to believe that if you are willing to give up the battery charging and one of the cart holes, you may be able to cram some type of small juice bottle in here and come up with a way to feed the atty for dripping. But that is for another day.)
Note:
Although this is my first real "mod", I am no stranger to doing goofy things like this. This is a bit of a project and will require a steady hand, some soldering skills and some luck. Do this at your own risk. There is potential to destroy your PCC or passthrough and have literally nothing to show for it!
What you need (in no particular order):
* 510 PCC (Should be working! At least the main battery part)
* 510 USB Passthrough (the cheapo with the inline battery. If yours is broken, you may still be able to use it depending on WHAT is broken on it. The switch definitely needs to work.) Alternatively, you MAY be able to use parts from a dead battery. If so, you would need to remove the battery and most definitely lengthen the wiring from the switch.
* Sandpaper (med grit)
* Dremel with a cutting wheel and small grinding bit
* Tubing Cutter (If you don't own one, you might get away with a dremel or hacksaw but you will have to be more careful when cutting up the PT or dead battery).
* Drill & bits (around 1/8" to 5/32" along with your dremel should work)
* Small (jeweler's) philips screwdriver
* Soldering gun & solder
* Some type of tough glue (I used toughened acrylic adhesive)
* Krazy Glue may come in handy
* You may need a small clamp (vice-type clamp)
* A lot of patience and a bit of luck
How To:
It will help to look at the pics to see what I mean for some of this. I didn't really intend to write out step by step instructions but I suspect it would be requested. I did try to take pictures at critical moments. I will do my best.")
First, take your PCC apart (one small philips screw on each side).
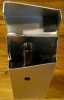
1) Using your dremel, cut away the outside of the atty compartment. Be careful not to mess up the top side. There should be a rubber cap from a 510 cart in there. Take that out as well and set it aside. If it isn't there, you may need to locate one for later. You want the entire compartment cleared out from top to bottom, leaving the top and bottom intact.
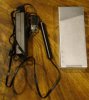
2) Remove the battery from your passthrough and do what you want with it. Using your tubing cutter, cut the bottom of the passthrough off. You want to make the cut 1 1/4" from the atty side. Watch the switch as you are rotating the PT through the cutter. I ended up cutting through all I could get to without messing up the switch then I just 'snapped' the bottom off later. You can clean the "break" with your dremel. Once you have the PT in two pieces, carefully slide the bottom down along the wire. At this point, you can then cut the wire completely just after the knot.
3) Cut the 510 cart cap in half and trim it so you just have two small roundish pieces. These will be used to space the PT towards the front of the case, making the PT button easier to press (per these instructions, the button just barely protrudes from the front of the case and is pretty resistant to accidental pressing). You might not need to do this, but if you don't, it might make it harder to press the button when using it to vape. I used Krazy glue to glue the small pieces inside the atty compartment of the PCC. You may not need to do that, but I didn't want them to move when I glued the PT piece in place.
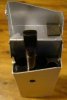
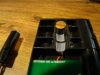
4) After a dry fit test, use your super-tough adhesive and mount the PT piece into the atty compartment of your PCC. You will slide it up through the hole then press it down. Do not get your adhesive too close to the hole at the top or you will get it into the PT threads when you put it into place. Also, make sure that the PT button is facing straight out! At this point, I used a small vice clamp to hold this PT piece in place for an hour to let the adhesive dry. You want to make sure this doesn't move.
5) You will notice that the wires from the PT appear to have a bare spot in them. One appears green, the other appears blue. The "green" one is the negative wire coming from the PT and the "blue" one is the positive. This is some kind of coating, and if left alone, it shouldn't short (but I wonder about that and why so many of these seem to die). I didn't like this, so I cut the original PT wires just after these colored sections. HOWEVER, this then caused me to have to extend the wires later on going to the circuit board in the PCC. In hindsight I may have been able to avoid it, maybe not. Just warning you. So, you can either do it the way I did, or leave the PT wires longer and strip off the rubber sheath at the end. Either way, you need to get that colored coating off of the wires otherwise you will not get a good electrical connection. Using your sandpaper, gently remove the coating from each colored wire (blue & green). In the end they should look mostly copper. Make sure you keep track of which is which so you know where to hook them up. Remember, the green one is negative and the blue one is positive.
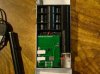
6) You need to wire the PT directly to the PCC's main battery. I figured it would be easier to remove the circuit board in order to hook up the wiring, but in the end, I wound up breaking the positive wire going from the board to the charging area. After practicing a lot of "french", I was able to repair it. But it made things harder. In hindsight, it may be easier to go the to back side and tie into the battery wires there. I am going to leave this up to you, and if you are not comfortable doing this, then this isn't the project for you. You need to solder the "green" wire from the PT to the black (neg) wire going to the main PCC battery and the "blue" wire from the PT to the red (pos) wire going to the main PCC battery.
If you've gotten this far, you can go ahead and screw an atty into the PT threads and give it a try to see if it works. Take a break, and enjoy. The hard part is over, but you still need to make it look good in the end, so on to the next step when ready.
7) You need to create a hole in the front of the PCC that aligns with the button on the PT. I would give you MY measurements, but I think it's best for you to figure it out yourself in case your button is in a slightly different spot. To give a starting hint, I used a piece of masking tape and stuck it over the approximate area, then used a pencil to make a cross where I wanted to drill the hole. It should be obvious, but do not drill into the guts of your PCC! I removed the guts every time I messed with this hole, then put them back in to see where I was at. The more patient you are with this step, the better it will look when finished. I started with an 1/8" drill bit. After your initial hole, put the PCC guts back in (make sure it is fully in place) then see how things are looking. From here, I used the small grinding bit on my dremel to slowly stretch the hole to a slightly oval shape. If your hole is not perfectly centered from square one, don't worry. Just use your dremel to widen the hole where it needs to be in order for you to access the button and have it centered as best you can.
When your happy with the button hole, just close up the bottom of the PCC and put the screws back in. If you're like most people, the small one will strip (if it wasn't stripped already).
That's about it. One thing I didn't do that you might want to do is to drill a hole into the top of the PCC. As it is, you can close the lid with an atty attached, but not a cart. If you actually want to use the vaping abilities of this mod, you need to first pop the lid open and place a cart on it and vape with the lid open. (Tip: button side down, lid side up over your nose). Some of you will think this appears a bit silly. It probably does, but other than the small hole for the button, I wanted my PCC to look stock. BUT, if you plan on using the built-in vaping power of this mod often (and will also be using the stock battery charger often), then I recommend you drill a hole in the top of the lid. This will allow you to close the lid with an atty attached, then just push a cart through the hole in the lid and into the atty. From there, it will pretty much look like any other box mod. ;-) Since I didn't do this step, I can't tell you what size drill bit to use or where to drill the hole, but I am certain it can be done with little effort.
Another thing worth mentioning is that while I chose to use a 510 passthrough, there seems to me quite a few spots where one could mount a small store-bought switch and use an RCA connector rather than the 510 batt connector. This would allow the universal adapter thing that is gaining popularity. I originally was going to go that route, but I really don't think I will get any other PVs. I'm happy with the 510. If you do decide to install an RCA jack, be sure to consider the length of the atty when attached and how that may affect things with the lid.
That's about it. I hope you all like it. I thought it'd be a fun project and that some of you heavy vapers out there might get a kick out of it.
Overview:
This mod converts the atomizer compartment of a 510 PCC into a usable atomizer port. Thus, you can screw on an atomizer, insert a cart and vape right off the main PCC battery. Having just finished this, I can't tell you how many hours you will get, but someone else did a mod using the innards from a PCC and I think he said that he gets a day and a half on a charge.
To sweeten the deal, not only can you vape right off of this thing (think of it as a "box mod" or nicostick from this perspective) but you can ALSO continue to use it to charge a normal 510 battery * (and use the normal battery) and carry 2 carts, or 1 cart and and extra atty. And of course, it should also be up to the task of being used as a passthrough.
* As I mention at the end, as I built it, you would not be able to charge a battery and use the built-in vaping capabilities simultaneously. If you desire this ability, all you need to do is drill a hole into the top (lid) of the PCC in line with the atty. The reason for this is because the PCC doesn't charge a battery unless the lid is closed, and the design per my instructions requires the lid to be open in order to use it to vape with. I may make this change to mine in the future, but for now I wanted it this way.
(A wink to other modders out there..... I have reason to believe that if you are willing to give up the battery charging and one of the cart holes, you may be able to cram some type of small juice bottle in here and come up with a way to feed the atty for dripping. But that is for another day.)
Note:
Although this is my first real "mod", I am no stranger to doing goofy things like this. This is a bit of a project and will require a steady hand, some soldering skills and some luck. Do this at your own risk. There is potential to destroy your PCC or passthrough and have literally nothing to show for it!
What you need (in no particular order):
* 510 PCC (Should be working! At least the main battery part)
* 510 USB Passthrough (the cheapo with the inline battery. If yours is broken, you may still be able to use it depending on WHAT is broken on it. The switch definitely needs to work.) Alternatively, you MAY be able to use parts from a dead battery. If so, you would need to remove the battery and most definitely lengthen the wiring from the switch.
* Sandpaper (med grit)
* Dremel with a cutting wheel and small grinding bit
* Tubing Cutter (If you don't own one, you might get away with a dremel or hacksaw but you will have to be more careful when cutting up the PT or dead battery).
* Drill & bits (around 1/8" to 5/32" along with your dremel should work)
* Small (jeweler's) philips screwdriver
* Soldering gun & solder
* Some type of tough glue (I used toughened acrylic adhesive)
* Krazy Glue may come in handy
* You may need a small clamp (vice-type clamp)
* A lot of patience and a bit of luck
How To:
It will help to look at the pics to see what I mean for some of this. I didn't really intend to write out step by step instructions but I suspect it would be requested. I did try to take pictures at critical moments. I will do my best.
First, take your PCC apart (one small philips screw on each side).
1) Using your dremel, cut away the outside of the atty compartment. Be careful not to mess up the top side. There should be a rubber cap from a 510 cart in there. Take that out as well and set it aside. If it isn't there, you may need to locate one for later. You want the entire compartment cleared out from top to bottom, leaving the top and bottom intact.
2) Remove the battery from your passthrough and do what you want with it. Using your tubing cutter, cut the bottom of the passthrough off. You want to make the cut 1 1/4" from the atty side. Watch the switch as you are rotating the PT through the cutter. I ended up cutting through all I could get to without messing up the switch then I just 'snapped' the bottom off later. You can clean the "break" with your dremel. Once you have the PT in two pieces, carefully slide the bottom down along the wire. At this point, you can then cut the wire completely just after the knot.
3) Cut the 510 cart cap in half and trim it so you just have two small roundish pieces. These will be used to space the PT towards the front of the case, making the PT button easier to press (per these instructions, the button just barely protrudes from the front of the case and is pretty resistant to accidental pressing). You might not need to do this, but if you don't, it might make it harder to press the button when using it to vape. I used Krazy glue to glue the small pieces inside the atty compartment of the PCC. You may not need to do that, but I didn't want them to move when I glued the PT piece in place.
4) After a dry fit test, use your super-tough adhesive and mount the PT piece into the atty compartment of your PCC. You will slide it up through the hole then press it down. Do not get your adhesive too close to the hole at the top or you will get it into the PT threads when you put it into place. Also, make sure that the PT button is facing straight out! At this point, I used a small vice clamp to hold this PT piece in place for an hour to let the adhesive dry. You want to make sure this doesn't move.
5) You will notice that the wires from the PT appear to have a bare spot in them. One appears green, the other appears blue. The "green" one is the negative wire coming from the PT and the "blue" one is the positive. This is some kind of coating, and if left alone, it shouldn't short (but I wonder about that and why so many of these seem to die). I didn't like this, so I cut the original PT wires just after these colored sections. HOWEVER, this then caused me to have to extend the wires later on going to the circuit board in the PCC. In hindsight I may have been able to avoid it, maybe not. Just warning you. So, you can either do it the way I did, or leave the PT wires longer and strip off the rubber sheath at the end. Either way, you need to get that colored coating off of the wires otherwise you will not get a good electrical connection. Using your sandpaper, gently remove the coating from each colored wire (blue & green). In the end they should look mostly copper. Make sure you keep track of which is which so you know where to hook them up. Remember, the green one is negative and the blue one is positive.
6) You need to wire the PT directly to the PCC's main battery. I figured it would be easier to remove the circuit board in order to hook up the wiring, but in the end, I wound up breaking the positive wire going from the board to the charging area. After practicing a lot of "french", I was able to repair it. But it made things harder. In hindsight, it may be easier to go the to back side and tie into the battery wires there. I am going to leave this up to you, and if you are not comfortable doing this, then this isn't the project for you. You need to solder the "green" wire from the PT to the black (neg) wire going to the main PCC battery and the "blue" wire from the PT to the red (pos) wire going to the main PCC battery.
If you've gotten this far, you can go ahead and screw an atty into the PT threads and give it a try to see if it works. Take a break, and enjoy. The hard part is over, but you still need to make it look good in the end, so on to the next step when ready.
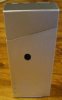
7) You need to create a hole in the front of the PCC that aligns with the button on the PT. I would give you MY measurements, but I think it's best for you to figure it out yourself in case your button is in a slightly different spot. To give a starting hint, I used a piece of masking tape and stuck it over the approximate area, then used a pencil to make a cross where I wanted to drill the hole. It should be obvious, but do not drill into the guts of your PCC! I removed the guts every time I messed with this hole, then put them back in to see where I was at. The more patient you are with this step, the better it will look when finished. I started with an 1/8" drill bit. After your initial hole, put the PCC guts back in (make sure it is fully in place) then see how things are looking. From here, I used the small grinding bit on my dremel to slowly stretch the hole to a slightly oval shape. If your hole is not perfectly centered from square one, don't worry. Just use your dremel to widen the hole where it needs to be in order for you to access the button and have it centered as best you can.
When your happy with the button hole, just close up the bottom of the PCC and put the screws back in. If you're like most people, the small one will strip (if it wasn't stripped already).
That's about it. One thing I didn't do that you might want to do is to drill a hole into the top of the PCC. As it is, you can close the lid with an atty attached, but not a cart. If you actually want to use the vaping abilities of this mod, you need to first pop the lid open and place a cart on it and vape with the lid open. (Tip: button side down, lid side up over your nose). Some of you will think this appears a bit silly. It probably does, but other than the small hole for the button, I wanted my PCC to look stock. BUT, if you plan on using the built-in vaping power of this mod often (and will also be using the stock battery charger often), then I recommend you drill a hole in the top of the lid. This will allow you to close the lid with an atty attached, then just push a cart through the hole in the lid and into the atty. From there, it will pretty much look like any other box mod. ;-) Since I didn't do this step, I can't tell you what size drill bit to use or where to drill the hole, but I am certain it can be done with little effort.
Another thing worth mentioning is that while I chose to use a 510 passthrough, there seems to me quite a few spots where one could mount a small store-bought switch and use an RCA connector rather than the 510 batt connector. This would allow the universal adapter thing that is gaining popularity. I originally was going to go that route, but I really don't think I will get any other PVs. I'm happy with the 510.
If you do decide to install an RCA jack, be sure to consider the length of the atty when attached and how that may affect things with the lid.That's about it. I hope you all like it. I thought it'd be a fun project and that some of you heavy vapers out there might get a kick out of it.
Attachments

Last edited: