DISCLAIMER: I am not responsible for any personal (including mental anguish) and/or property damage. Try this AT YOUR OWN RISK! There is no warranty or guarantee of ANY KIND! If you have any question at all to the safety or validity (or anything kind of concerns) of any steps/procedure, STOP NOW AND DO NOT TRY ANYTHING!
Here is a simple pictorial guide to making your own DSE-901 Pass through. The whole process probably will take about 20-60 minutes depending on your skill.
Difficulty: 2 out of 5
What you need:
DSE-901 Battery (Dead or Alive)
DSE-901 Atomizer (Dead preferred)
Solder/Solder Gun
Disposable Nail Filer
Electrical Tape
30 Gauge wire (preferred)
Shrink tubing (preferred)
Radio Shack Tact Switch 5mm or 9.5mm (275-0002 or 275-0003)
Small wire cutter
Disposable Lighter
Gloves (handling hot items)
Goggles (So you won't go blind if something happens)
Patience
Steady hands (Not necessary but helpful. I personally have crack hands)
Lets begin.
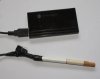
First, connect the battery to the atomizer and get ready to use the lighter. Your goal is to melt the glue that is holding the gold color adapter and the battery together.
Holding on to the atomizer side, slowly ROTATE the e-cig over the flame of the lighter on the battery side of the e-cig for 10 seconds(Silver part is the atomizer, black is the battery).

With medium strength, slowly wiggle and pull the atomizer away from the battery. If this fails, don't force it, just heat it for another 5 second and try again. It should come apart without too much force. Repeat if necessary. I have destroyed 3 connectors by forcing or wiggling too hard.

Next, you want to unsolder the red and green wire from the battery connector.

Now do the same lighter trick on the other end of the battery but with 3-5 second duration over the flame. Then use a screw driver and try to punch the end cap out.


Now we are going to prepare the tactile switch. You can use the shorter 5mm instead of this one. It a personal preference.


Cut the two end off as shown in the picture below with the small wire cutter. Then file the remaining stubs (with the disposable nail filer) so we won't have issue with shorting later.


Now prepare two length of wire about 1 inch longer then the battery tube itself along with 1/2 inch of shrink tubing (can use small piece of duck tape as replacement)


Bend the remaining two pins on the tactile switch underneath, then put a small bit of solder onto both end of the wire and the switch.

Here is a simple pictorial guide to making your own DSE-901 Pass through. The whole process probably will take about 20-60 minutes depending on your skill.
Difficulty: 2 out of 5
What you need:
DSE-901 Battery (Dead or Alive)
DSE-901 Atomizer (Dead preferred)
Solder/Solder Gun
Disposable Nail Filer
Electrical Tape
30 Gauge wire (preferred)
Shrink tubing (preferred)
Radio Shack Tact Switch 5mm or 9.5mm (275-0002 or 275-0003)
Small wire cutter
Disposable Lighter
Gloves (handling hot items)
Goggles (So you won't go blind if something happens)
Patience
Steady hands (Not necessary but helpful. I personally have crack hands)
Lets begin.
First, connect the battery to the atomizer and get ready to use the lighter. Your goal is to melt the glue that is holding the gold color adapter and the battery together.
Holding on to the atomizer side, slowly ROTATE the e-cig over the flame of the lighter on the battery side of the e-cig for 10 seconds(Silver part is the atomizer, black is the battery).

With medium strength, slowly wiggle and pull the atomizer away from the battery. If this fails, don't force it, just heat it for another 5 second and try again. It should come apart without too much force. Repeat if necessary. I have destroyed 3 connectors by forcing or wiggling too hard.

Next, you want to unsolder the red and green wire from the battery connector.

Now do the same lighter trick on the other end of the battery but with 3-5 second duration over the flame. Then use a screw driver and try to punch the end cap out.


Now we are going to prepare the tactile switch. You can use the shorter 5mm instead of this one. It a personal preference.


Cut the two end off as shown in the picture below with the small wire cutter. Then file the remaining stubs (with the disposable nail filer) so we won't have issue with shorting later.


Now prepare two length of wire about 1 inch longer then the battery tube itself along with 1/2 inch of shrink tubing (can use small piece of duck tape as replacement)


Bend the remaining two pins on the tactile switch underneath, then put a small bit of solder onto both end of the wire and the switch.

Last edited: