Homemade USB Passthrough (m401).

Status
Not open for further replies.

Zep--

Senior Member
ECF Veteran
Mar 21, 2009
198
0
SW Florida
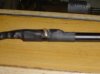
I ripped the top off an m401 battery. Vice grip on battery shell, small needle nose vice grip on connector. twist and pull. off in seconds.

Pulled the little black thing off the bottom of the connector.

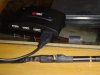
Cut the USB cord on an old USB mouse.

Soldered red wire to inside center.

Soldered black Wire to inside side. Put little black thing back into bottom of connector (it holds the wire I guess from moving about after you've soldered them)

Screwed on an atomizer.

Plugged it into laptop for a second hoping I didn't hear a snap crackle pop as my laptop blew up....

And it worked, saw the atomizer glowing!

I have to figure out how i'm gonna add the manual switch. The 401 battery shell is pretty thin, don't know if I can find something to fit inside the shell with the battery removed.

I'll probably do a switch on the wire at first so I can start using it, but man, it was pretty simple to do this.

Zep--
 
Last edited:

Zep--

Senior Member
ECF Veteran
Mar 21, 2009
198
0
SW Florida
Got the switch on, here's some pics.

Used heat shrink tubeing to hold the micro switch on.
 

Attachments

  • 001.jpg
    001.jpg
    20.4 KB · Views: 405
  • 004.jpg
    004.jpg
    21.8 KB · Views: 381

Zep--

Senior Member
ECF Veteran
Mar 21, 2009
198
0
SW Florida
Parts used:

1 m401 (or m402) (ie: A Puresmoker Pilot Hybrid battery)
I used a brand new battery, since I'm new to this and it's all I had.

1 9.5mm High Tact Switch - $3.99 for a package of 4 from Radio Shack (Part # 275-0003).

2 small pieces (1.5") of wire to solder to switch, then cut usb cable a bit below the battery shell on the opposite end of the threaded part, trim of the cover off on the usb wire, clip the red wire and solder to the little wires you solder onto the switch.

1 piece of heat shrink tube a little bigger than the battery casing.

1 old USB cable cut from a mouse.

Some thin rosin core electronics solder.

Tools used
vice grips (on battery body) and needle nose vice grips (needle nose use to grab the battery connector at the base of it to pull it from the battery tube, be careful of damaging the threads!)

Soldering Iron.

a bic lighter to heat up the shrink tubing.

Total time to make, about 1 hour (excluding times I made a mistake and had to redo something).

Take care not to fill the hole up in the center of the connector with solder (i did this the first time and could not drag off it! oops!)

I also wire the switch wrong the first time, you have 2 choices with the switch I bought, normally on or normally off, but it came with no directions which prong was which...and of course, i soldered the always on ones first. d'oh! If you buy the switch I had you want to solder the switch prong that are diagonal to each other for the normally off option)

Zep--
 
Last edited:

wyzardd

Unregistered Supplier
ECF Veteran
Mar 24, 2009
301
1
Broomfield, CO
wyzardd.com
It should be possible to wire the USB power so that it only comes on when you pull a drag, shouldn't it? The battery provides power constantly but doesn't burn out the atomizer.

Anyone have a schematic handy? You know, because I have 25 posts and therefore I'm sure I can do this better than all the people who have been modding forever :(
 
Last edited:

wyzardd

Unregistered Supplier
ECF Veteran
Mar 24, 2009
301
1
Broomfield, CO
wyzardd.com
I popped the end off and there was the disk with LED & 3 wires arrayed along the side - red, black, blue. Aha! I thought to myself; red is +, black is ground, and blue must be signal. I touched the end of the usb wires 6 different ways and never did get the atomizer to do anything. Eventually I managed to work the red wire totally free from the battery and the board and my soldering iron just isn't fine enough to fix it.
The fact that I was running on about 4 hours sleep and it was already past my bedtime (I can't sleep on Vicodin) couldn't have anything to do with it, I'm sure

If you know which I should connect where I'll try again. Well, I'll try again anyway - at least until my 801 arrives
 

Zep--

Senior Member
ECF Veteran
Mar 21, 2009
198
0
SW Florida
For a USB passthru, you need to pop off the battery connection end, not the LED end.

Well, you need to pop off both ends because all you want to be left with is an empty battery tube and the battery connector (the part the atomizer screws onto). When you got both ends off push the battery and the rest of the junk in there out of the tube.

On the battery connector you will have 2 wires, a red and a black. You do your soldering onto the inside of the battery connector. Red wire from USB cable to center post (careful not to clog the hole with solder!) and solder the black wire of the USB cable to the inside side of the battery connector.

Zep--
 

Zep--

Senior Member
ECF Veteran
Mar 21, 2009
198
0
SW Florida
It may be easier, if you can manage it, is to leave the 2 wires already soldered to the connector on there, and solder those wire to your usb cable. I did have a ..... of a time because I removed those wires then soldered my usb wires and it was hard because of the space available, if I had to do it all over again I would have done that (use the existing wire to solder to.)

Zep--
 
Status
Not open for further replies.

Users who are viewing this thread