
Has anybody done a teardown on the innokin itaste VTR? Or even tried to put microUSB charging capabilities in? Mine will be coming in the mail tomorrow and I want to see if any one knows if there is enough room inside to add components? I was also thinking about putting a DNA20 board in if I dont like whats in it.
You are using an out of date browser. It may not display this or other websites correctly.
You should upgrade or use an alternative browser.
You should upgrade or use an alternative browser.
iTaste VTR modding/teardown?
- Thread starter Kyle Chamberlain
- Start date
- th_trl_thread_readers 0
- Status
- Not open for further replies.
Has anybody done a teardown on the innokin itaste VTR? Or even tried to put microUSB charging capabilities in? Mine will be coming in the mail tomorrow and I want to see if any one knows if there is enough room inside to add components? I was also thinking about putting a DNA20 board in if I dont like whats in it.
I'm not sure whats been done but if you're going to be the first I'm very intrigued. Would love to know how all that goes.
i have a damaged VTR in my shop to tear down so maybe i can get the pics. also i mioded mine to remove the retaining ring for the tank its seriously does beitifull putting 6v into my 1 ohm RSST build , so no complaints on the board so far.
I'll let you know!I'm not sure whats been done but if you're going to be the first I'm very intrigued. Would love to know how all that goes.
i have a damaged VTR in my shop to tear down so maybe i can get the pics. also i mioded mine to remove the retaining ring for the tank its seriously does beitifull putting 6v into my 1 ohm RSST build , so no complaints on the board so far.
Oh that would be so awesome if you could get pics. you are talking about the spinning ring for the ring right? I don't really like that ring either.
Sent from my EVO using Tapatalk 2
I'm about to remove my case and powder coat it black, can't stand the finger print magnet.
I got the painted green one so its not bad, have you taken apart before? I think I'm gonna dive in hopefully by this weekend its just my 12 hour work days make me so tired
Sent from my EVO using Tapatalk 2
Sent from my EVO using Tapatalk 2
I got the painted green one so its not bad, have you taken apart before? I think I'm gonna dive in hopefully by this weekend its just my 12 hour work days make me so tired
Sent from my EVO using Tapatalk 2
I didn't even know there was a painted green one... just thought there was the polished..
Havn't taken it apart yet, but doesn't look complex.... I'm more worried about it going back together with the powder coat layer, sometimes the tolerances are too tight.
I didn't even know there was a painted green one... just thought there was the polished..
Havn't taken it apart yet, but doesn't look complex.... I'm more worried about it going back together with the powder coat layer, sometimes the tolerances are too tight.
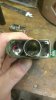
I think the green came out after the polished. I'm about to post some pictures of my tear down. its very simple to take apart, you need a t6 torx driver to take the external screws out. the bottom polished piece fits pretty snug. the top polished piece seems to fit not as snug as bottom. The two side screws that hold the top piece in I think have high strength or permanent thread locker so make sure you have the t6 driver otherwise you will mess up the head of the screw.
Sent from my EVO using Tapatalk 2
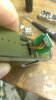
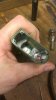
Tear down progression
Sent from my EVO using Tapatalk 2
Sent from my EVO using Tapatalk 2
Attachments

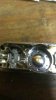
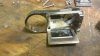
Tear down progression continued
Sent from my EVO using Tapatalk 2
Sent from my EVO using Tapatalk 2
Attachments

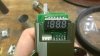

I have some measurements I took with my calipers that I will post tomorrow.
Sent from my EVO using Tapatalk 2
Sent from my EVO using Tapatalk 2
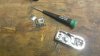
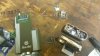
So it looks like the tank extension piece is a solid piece but I don't know how they could make with it being hollow, at least a way that would be cost effective. I'm thinking it must be two pieces at least. in one of the pictures you can see a dent from trying to see if it was press fit style after I tried to unscrew each side from where the knurls are but that didn't work.
Sent from my EVO using Tapatalk 2
Sent from my EVO using Tapatalk 2
Last edited:

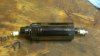
Ok so the two end pieces are pressed into thinner tube. What I did to take it apart was hold one end with pliers and hit it on the bench. LOL. I was able to get one side off but when I went to get the other side off the center tube flew somewhere and I can't find it but here's some pictures.
As you can see the center tube is not in the picture due to losing it. I'm thinking you can cut the tube down and size it to say a RDA or shorter tank.
Sent from my EVO using Tapatalk 2
As you can see the center tube is not in the picture due to losing it. I'm thinking you can cut the tube down and size it to say a RDA or shorter tank.
Sent from my EVO using Tapatalk 2
Last edited:
So What kind of metal is the shiny outer layer of the body? Does it look like it is chromed brass or stainless?
Also It looks as if you could slide it off yet you have not so I am assuming it is glued?
I really would like to give a brushed steel look to the body of my VTR and leave the trimming shiny but I need to know it will come off and assuming I get it off that I wont just be scraping off chrome to see brass.
Any chance you have pics of how the 510 base comes off?
Im thinking of shaving off the top ring so I use any thank I want. if you could post vids on how to break it down step by step it would be appreciated.
I sanded my ring to fit Aqua and Steam Turbine:


Can anyone tell what the top and bottom pieces are made of? I have a green one coming Monday and was thinking of giving the shiny bits a brushed look if they are indeed made of stainless steel.
- Status
- Not open for further replies.
Similar threads
- Replies
- 4
- Views
- 2K
- Replies
- 6
- Views
- 3K
- Replies
- 1
- Views
- 2K
- Replies
- 6
- Views
- 6K
Users who are viewing this thread
Total: 2 (members: 0, guests: 2)