Making An E-Pipe.

Status
Not open for further replies.

Mstr Mashnst

Unregistered Supplier
ECF Veteran
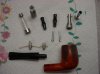
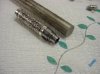
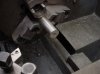
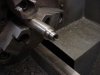
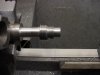
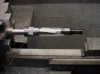
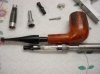
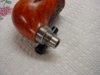
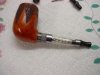
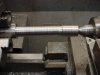
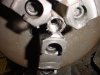
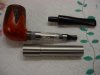
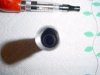
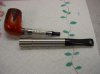
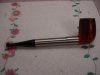
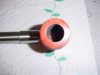
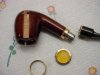
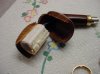
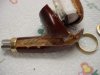
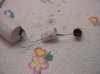
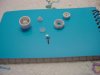
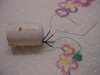
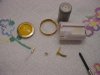
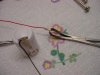
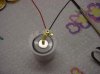
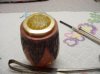
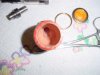
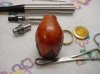
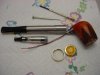
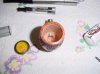
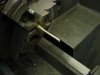
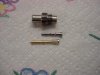
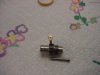
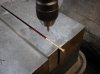
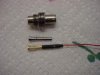
Wanted to do this for awhile now. Have some parts but not a full plan. Going to start with the battery adapter. I have a piece of 0316 stainless that I will turn down, cut some 12mm x .50mm threads, put a spring pad contact point in it and find a way to mount it. The pipe is an old one that I have had for years. Never been smoked, just sat in a box in the back of the closet. I have a 601 pipe now, it works OK for short runs. 99% of my pipes are straight pipes because I like a straight pipe. Going to need some help on the battery setup. I think for the first run I may just make a contact switch on top. Who knows where this will end up. I'll post pics of all the lathe and mill work as I go. I have found over the years the best way to finish a project is to just start, so that is what I'm going to do. If I break something or screw up I'll share that too. It's all part of having fun. Enjoy.:)
 

Attachments

  • Pipe Build 003.jpg
    Pipe Build 003.jpg
    21.9 KB · Views: 191
  • Pipe Build 004.jpg
    Pipe Build 004.jpg
    22.3 KB · Views: 136
  • Pipe Build 005.jpg
    Pipe Build 005.jpg
    21.9 KB · Views: 137
  • Pipe Build 007.jpg
    Pipe Build 007.jpg
    22.5 KB · Views: 148

gwbruce

Senior Member
ECF Veteran
Sep 13, 2012
128
79
Oklahoma, USA
Good luck with the build. Just remember don't make it harder than it actually is. Sometimes it's easier to buy some of the parts than to actually make them. However there is quite a bit of satisfaction at the end when you say "I built it myself". I have done a couple of the cheap Chinese pipe conversions that turned out pretty well. Also made one from scratch, nothing fancy because I don't have a lot of neat tools, but it vapes pretty well and was a hit at the last vape meet. So I'm happy with it. Can't wait to see your progress.
 

Mstr Mashnst

Unregistered Supplier
ECF Veteran
Good luck with the build. Just remember don't make it harder than it actually is. Sometimes it's easier to buy some of the parts than to actually make them. However there is quite a bit of satisfaction at the end when you say "I built it myself". I have done a couple of the cheap Chinese pipe conversions that turned out pretty well. Also made one from scratch, nothing fancy because I don't have a lot of neat tools, but it vapes pretty well and was a hit at the last vape meet. So I'm happy with it. Can't wait to see your progress.

I'll try to keep it simple but, sometimes it gets away from me. Post up some pics of your pipes on this thread. I would like to see them.:D

if you need any help holler at us! My avatar is the pipe I converted. I had the etsy maker drill very specifically so it was simple to add the electronics. The epipemods push button is excellent for a top button switch. I built mine based on their design taking ideas from here and another place.

Post up some pics or links. I want to put a push button on this pipe. Thank you:D
 

Mstr Mashnst

Unregistered Supplier
ECF Veteran
Turned down the battery adapter tonight. I'm going to cut off the stem, drill the bowel, cut and glue in the battery adapter to it. Next will be the pos post that goes inside the battery adapter. There will be a stainless steel sleeve that goes over the tank to cover it. I'll have to shorten the mouth piece some. Looks like the pipe will be just a half inch longer then stock.
 

Attachments

  • Pipe Build 2 001.jpg
    Pipe Build 2 001.jpg
    21.4 KB · Views: 100
  • Pipe Build 2 002.jpg
    Pipe Build 2 002.jpg
    21.2 KB · Views: 98
  • Pipe Build 2 010.jpg
    Pipe Build 2 010.jpg
    21.4 KB · Views: 102
  • Pipe Build 2 011.jpg
    Pipe Build 2 011.jpg
    21.6 KB · Views: 105
  • Pipe Build 2 015.jpg
    Pipe Build 2 015.jpg
    22.7 KB · Views: 104

Mstr Mashnst

Unregistered Supplier
ECF Veteran
A little time after dinner tonight to cut the stem off the bowel. Drill a 3/8' hole in it with an end mill so the battery adaptor will fit in it. I'll glue that in after I get the pos post installed. Started to turn the shield that will go over the tank. You can see in the last photo how that is going to look. I'll finish that tomorrow if I can. Are we having fun yet.:D
 

Attachments

  • Pipe Build 3 001.jpg
    Pipe Build 3 001.jpg
    20.2 KB · Views: 81
  • Pipe Build 3 002.jpg
    Pipe Build 3 002.jpg
    19.8 KB · Views: 84
  • Pipe Build 3 003.jpg
    Pipe Build 3 003.jpg
    20.3 KB · Views: 86
  • Pipe Build 3 004.jpg
    Pipe Build 3 004.jpg
    21.7 KB · Views: 85
  • Pipe Build 3 005.jpg
    Pipe Build 3 005.jpg
    21.7 KB · Views: 90

Mstr Mashnst

Unregistered Supplier
ECF Veteran
Finished the shield today and turned down the mouth piece to fit in the end. The tank will have an o-ring seal that it fits up to so I can cut a slot for a sight glass inthe bottom of the shield. Took all the weight I could out of the shield. It is strong but still very lite. Getting close to being able to put power to it for a test.:D
 

Attachments

  • Pipe Build 4 002.jpg
    Pipe Build 4 002.jpg
    21.6 KB · Views: 68
  • Pipe Build 4 003.jpg
    Pipe Build 4 003.jpg
    22.6 KB · Views: 72
  • Pipe Build 4 004.jpg
    Pipe Build 4 004.jpg
    22.3 KB · Views: 71
  • Pipe Build 4 005.jpg
    Pipe Build 4 005.jpg
    21.8 KB · Views: 73
  • Pipe Build 4 007.jpg
    Pipe Build 4 007.jpg
    21.8 KB · Views: 75

Mstr Mashnst

Unregistered Supplier
ECF Veteran

Mstr Mashnst

Unregistered Supplier
ECF Veteran
So I was able to spend half the afternoon working on my pipe. My 601 e-pipe gave up the ship so I cut it apart to see if there was any useable parts in it. I found a few that should work. It turned out that the board was bad. I had it for a year and I vaped it almost every day. I took 32 pictures today as I was working. I'm going to have to do a few post and cut some out.
 

Attachments

  • Pipe Build 5 001.jpg
    Pipe Build 5 001.jpg
    21.7 KB · Views: 374
  • Pipe Build 5 002.jpg
    Pipe Build 5 002.jpg
    22.5 KB · Views: 99
  • Pipe Build 5 003.jpg
    Pipe Build 5 003.jpg
    22.7 KB · Views: 95
  • Pipe Build 5 008.jpg
    Pipe Build 5 008.jpg
    21.7 KB · Views: 90
  • Pipe Build 5 005.jpg
    Pipe Build 5 005.jpg
    22.1 KB · Views: 102

Mstr Mashnst

Unregistered Supplier
ECF Veteran
Going to use the battery, battery holder, top ring and yellow top. The switch was in good shape but without the board, what good is it. That tiny part that the arrow is pointing to is the contact plate in the switch. I soldered a new wire to the spring and the test post stud on the battery holder. I think some how I will use the test point stud and the pos screw to make my manual switch out of. Not sure how yet but, I'll cross the bridge when I get there.
 

Attachments

  • Pipe Build 5 013.jpg
    Pipe Build 5 013.jpg
    20.2 KB · Views: 59
  • Pipe Build 5 014.jpg
    Pipe Build 5 014.jpg
    21.5 KB · Views: 60
  • Pipe Build 5 015.jpg
    Pipe Build 5 015.jpg
    21.9 KB · Views: 61
  • Pipe Build 5 016.jpg
    Pipe Build 5 016.jpg
    21.9 KB · Views: 63
  • Pipe Build 5 017.jpg
    Pipe Build 5 017.jpg
    22.2 KB · Views: 61

Mstr Mashnst

Unregistered Supplier
ECF Veteran
Now to fit this all into my pipe bowl. I set the bowl in the mill and bored it 1 1/2" deep. That was that max I could go before the bottom of the bowl started to turn back in. Had to take the bottom out by hand. Nice and slow like. You can see were the the top ring will set in. It is a slight press fit. When I put it all together I'll put a little glue on it
 

Attachments

  • Pipe Build 5 020.jpg
    Pipe Build 5 020.jpg
    22 KB · Views: 57
  • Pipe Build 5 021.jpg
    Pipe Build 5 021.jpg
    22.4 KB · Views: 56
  • Pipe Build 5 022.jpg
    Pipe Build 5 022.jpg
    22.4 KB · Views: 62
  • Pipe Build 5 023.jpg
    Pipe Build 5 023.jpg
    22.2 KB · Views: 62
  • Pipe Build 5 024.jpg
    Pipe Build 5 024.jpg
    22.3 KB · Views: 60
Last edited:

Mstr Mashnst

Unregistered Supplier
ECF Veteran
You can see the bottom of the bowl has been cut out so the battery holder will fit in. The top ring fits in nice and flush. Just to show you that I didn't cut through I took a pic of the botom of the bowl. There was more meat there then I thought. I could even put a switch on the side if I wanted to. It's coming right along.
 

Attachments

  • Pipe Build 5 026.jpg
    Pipe Build 5 026.jpg
    22.1 KB · Views: 59
  • Pipe Build 5 027.jpg
    Pipe Build 5 027.jpg
    22.6 KB · Views: 62
  • Pipe Build 5 028.jpg
    Pipe Build 5 028.jpg
    22.3 KB · Views: 72
  • Pipe Build 5 030.jpg
    Pipe Build 5 030.jpg
    21.6 KB · Views: 66
  • Pipe Build 5 025.jpg
    Pipe Build 5 025.jpg
    22 KB · Views: 62
Last edited:

Mstr Mashnst

Unregistered Supplier
ECF Veteran
Now for the first ah S_ _ _. The battery adaptor comes into the bowl by about .050 to far. Just enough to keep the battery holder from going all the way down. Like I said from the start, I'll show you the mistakes too. This was the first one and there will be more. I'll put it back in the lathe and turn the end off and all will be back on track.
 

Attachments

  • Pipe Build 5 031.jpg
    Pipe Build 5 031.jpg
    21.7 KB · Views: 57
  • Pipe Build 5 032.jpg
    Pipe Build 5 032.jpg
    21.8 KB · Views: 58
Last edited:

duckie_44

Senior Member
ECF Veteran
Dec 13, 2011
239
279
DFW-TX
199527d1365981487-making-e-pipe-pipe-build-5-001.jpg

Too bad you had to destroy that pretty bowel. :)

Sometimes a bowel has to be sacrificed for the greater good......

Mstr.......This bowel movement has been a great "Show and Tell".....Keep up the good work.....

duckie...........

P.S......Sorry Mstr.......I couldn't help myself......Your doing a great job man.........
 

Mstr Mashnst

Unregistered Supplier
ECF Veteran
Sometimes a bowel has to be sacrificed for the greater good......

Mstr.......This bowel movement has been a great "Show and Tell".....Keep up the good work.....

duckie...........

P.S......Sorry Mstr.......I couldn't help myself......Your doing a great job man.........

Yes, a little fruit ejuice should keep things moving along. LOL:laugh:
Dam auto correct.:blush:


Made the pos post for the battery adaptor. Turned the .050 off the end of the adaptor too. Drilled a hole all the way through it and soldered a red wire on the end. Then drilled a cross hole through the adaptor. After that I put some heat shrink around the back end and cut the cross hole out. The front has a rubber gasket that has some give to it. I will glue in the pos post with some soft glue so it won't turn but, will have some give.
 

Attachments

  • Pipe Build 6 001.jpg
    Pipe Build 6 001.jpg
    21.1 KB · Views: 60
  • Pipe Build 6 002.jpg
    Pipe Build 6 002.jpg
    22.1 KB · Views: 62
  • Pipe Build 6 004.jpg
    Pipe Build 6 004.jpg
    21.7 KB · Views: 66
  • Pipe Build 6 005.jpg
    Pipe Build 6 005.jpg
    21.6 KB · Views: 60
  • Pipe Build 6 007.jpg
    Pipe Build 6 007.jpg
    21.7 KB · Views: 61
Status
Not open for further replies.

Users who are viewing this thread