My Mini Mag Magnum

Status
Not open for further replies.

SuperSteph

Senior Member
ECF Veteran
Oct 20, 2008
81
8
42
California, USA
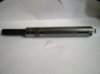
I've been working on this one for a while, mainly because it's nearly impossible to find anything with 401/402 battery threads. I ended up destroying a battery to be able to get the threads, but it was worth it.
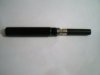
So far, I don't have a switch, and it doesn't look as pretty as i want. I twist the atomizer on-off to turn it on-off, but the results are good.
I'm using a maglight mini, drilled out the top and press fit the battery connector. Used a 1/8" rivet about 5/8" long to connect the battery to the tip of the connector. took a little filing and fitting with a dremel, but that wasn't too hard. I drilled a hole on a side of the light for ventilation, and so far i have a hole in the back for where i plan on putting the power switch. The battery is an ultrafire 3.6v 500ma. about double the battery life of the standard battery.
I'm going to make another one once i figure out how to do the switch.
alas, a picture is worth 1000 words.
 

Attachments

  • 2009-04-29 20-43-21.047.jpg
    2009-04-29 20-43-21.047.jpg
    11.9 KB · Views: 3,857
  • 2009-04-29 20-44-45.309.jpg
    2009-04-29 20-44-45.309.jpg
    16.5 KB · Views: 3,071

SuperSteph

Senior Member
ECF Veteran
Oct 20, 2008
81
8
42
California, USA
Second revision is done! I made a switch, and cleaned up the build. In all, parts cost me 7$ + Doner battery and AAA 3.6v battery.

Materials used:
1x Mini Maglite Solitare
3x Aluminum 1/8" x 1/2" Rivets
1x R401/402 Doner battery
1x Ultrafire rechargable aaa 3.6v Battery
1x Piece of sheet metal, or large flat Fender washer with 1/8" hole. You can probably use plastic or anything else here too.
1x "clicky" Pen (for spring) or 1/8 ID spring

The build:
First fully disassemble the Flashlight. Use some tweezers to remove the plastic piece inside. (or just punch it out with a screwdriver). Use a screwdriver to punch out the lense assembly. With everything removed from the flashlight, use a drill press with a 5/16 drill bit to drill down the top (aka tip) of the flashlight. Then use a 1/4" drill (i need to check the size, it needs to be just big enough to fit the rivet), and drill down from the top of the end cap, but be careful not to drill all the way. you will see a little ledge near the bottom, stop drilling when your drill hits here. Switch to a 1/8" drill bit, and drill through the bottom all the way.
Finally, screw on what used to be the lense assembly all the way, and drill through one side.
remove the lense assembly, get your battery connector, and press fit it in the top.
take a rivet, remove the sleave from the nail with some pliers and fit it inside the battery connector. you will need to file down the sides to get it to the right diameter, and file down the tip to get it to fit flush. pop a battery in and look to see how far the battery is sticking out. the battery won't fit in all the way it should. you will need to file down the length of the rivet until it fits properly.
now to get the switch. if you found a washer then it's likely you'll need to file down the diameter. otherwise you will need to cut out a circle of sheet metal and file it down. i drilled a 1/8" hole in the middle, cut out a rough circle about 1/2" around it, then used my dremel to round it out until it was small enough. the idea is to get it to press fit inside the ledges on the end cap.
remove the outer sleave from another rivet, cut the length to 1/4" and turn it around on the nail so the head of the nail is in the head of the rivet. hammer the nail into the rivet so the nail stays. remove another rivet and turn it around and place it in the end cap upside down. take the rivet with the nail and slide it through the bottom of the end cap, through the other rivet. take the spring and place it around that, then take the "washer", and press fit it in the end cap, until it's all together. congratulations you have built a button. :) you will need to file down the excess nail+ rivet so it's almost flush with the end cap.
and thats it. you'll need to do some fitting and filing so it works right. I'm thinking a plastic washer might make it a little easier.
pictures to follow, it will explain it a lot more.
 

SuperSteph

Senior Member
ECF Veteran
Oct 20, 2008
81
8
42
California, USA
Very nice... How's the battery life on that?

-Jim

Don't know yet... we'll see, i need to find my charger to recharge my batteries. also need some epoxy to glue the rivet onto the switch. I'm thinking I might make another one of these just for kicks. :D

High res pictures!
IMG_0281_1.jpg


IMG_0282_1.jpg


IMG_0285_1.jpg
 
Last edited:

SuperSteph

Senior Member
ECF Veteran
Oct 20, 2008
81
8
42
California, USA
So far it's working great. I was worried for a bit because it seems I burned out my first atomizer. Drilling the air hole where it was turned out to be great, by rotating the old lense assembly i can vary the airflow. more airflow=stronger hit but goes through the liquid faster. I think this mod could be easily adapted to a 901 atomizer.
I found a way to permenantly attach the switch by finding the right size screw. The aluminum rivet was maluable enough to just screw it in.

here is a diagram i drew of the button.
the RED is rivet #1
Blue is Rivet #2
Gray is the spring.
Green is the "washer" press fit in.
Orange is the screw that holds the two rivets together.
Black is the housing for the switch.
 

Attachments

  • switch.jpg
    switch.jpg
    11.3 KB · Views: 745

SuperSteph

Senior Member
ECF Veteran
Oct 20, 2008
81
8
42
California, USA
when vapor protection lowers, it's time to recharge. Other then that you'd need to find protected aaa batteries.
I'm sure I can make one for a 901, just need to find out how to put in the battery connector. Thoough i'm not interested in making these and selling them, the design is simple enough that anyone with a drill should be able to make it.
 

SuperSteph

Senior Member
ECF Veteran
Oct 20, 2008
81
8
42
California, USA
It's been a while, and it's still going strong. I'm averaging about 2 days of use per battery, finding myself dripping directly on the atomizer, it seems to give the best results.
It is definately a nice design, no soldering, just some drilling, and a little bit of dremel work or sanding.
I have an 801 and I'm thinking if i can find the time, i'll try doing the same mod for that atomizer. It's a shame that for the 401 it requires destroying a bettery, it's just too hard to find an alternative. i'd love to see if anyone else tries it or any improvements they might have. I'm still looking for a protected battery in that size but i'm not having any luck. :(
 

ichaya

Senior Member
ECF Veteran
Mar 26, 2009
107
0
Central Pennsylvania
OK, this one has me very interested. Basically because I have been thinking of the same sort of thing, but have about zero electrical knowledge.


Got a question.

Can you drop a "standard" battery in this mod, and it will work?

Say you're on a road trip, and find your smoke dies.
Stop at any handy truck stop, convience store, etc buy a pack of cheap AA's and your good until you can recharge. (Yes I know it is more expensive than recharge but we're talk emergency here)

Just a thought on it, but I was curious.
 
Status
Not open for further replies.

Users who are viewing this thread