Nemesis clone magnet switch

Status
Not open for further replies.

Bob4156

Full Member
Jul 28, 2014
44
6
WA State
IMG_20140812_083438.jpgIMG_20140812_083942.jpgIMG_20140812_083613.jpgIMG_20140812_083844.jpg
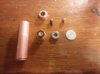
I see a lot of people paying extremely high prices for these magnets and end screws. I went to my local hardware store, found magnets that fit perfectly for $4 for three of them, and a longer top screw that is stainless steel with a flat top for good contact for about 25 cents, grand total $4.25. I checked with a volt meter, 0 voltage loss after I installed magnets and new top screw. I checked the battery out of the nemesis, 4.18 volts, when I install the 18650 in the nemesis and test middle firing pin and ground 4.18 volts. The bottom screw should not need to be replaced with the right top screw but play around with it. Be creative that is why it is called a mod. So before spending $20-$30 for a kit maybe check out your local hardware store or somewhere similar. It does not have to be name brand just to do the job. And yes It can stand upright great without firing the magnets are almost to strong lol.
 

Attachments

  • IMG_20140812_083452.jpg
    IMG_20140812_083452.jpg
    21.2 KB · Views: 61
Last edited:

Bob4156

Full Member
Jul 28, 2014
44
6
WA State
IMG_20140812_084101.jpg Finished. It truely is a simple concept, two magnets and possibly a longer screw, and plenty of people sell magnetic washers of all sizes, you just need to know where to look and they are usually much cheaper then online vendors selling them specifically for this mod or that mod. The screw does not need to be solid gold or copper for good contact either, although copper is ideal.
 
Last edited:

Bob4156

Full Member
Jul 28, 2014
44
6
WA State
I went to home depot in specific, they had the exact size magnets I needed, and for the top screw (the one that connects to your atty) they are 8mm wide thread and I chose 10mm and 12mm in length just to make sure i got the right length. Try to find like an allen head style screw, they generally provide the flattest surface to your positive post on your battery. If you cannot find a stainless steel screw that is not coated, just sand off the top and bottom of the screw and it should make fine contact..
 

Bob4156

Full Member
Jul 28, 2014
44
6
WA State
The magnets are very strong and make for a sturdy switch, but be careful when testing polarity, if the plung into eachother they can break, as with most mod magnet kits included magnets. Again shouldn't be a need to replace bottom screw, in fact I get to thread the post on the bottom in further now thanks to the longer top screw, making for a more sturdy feel
 

Bob4156

Full Member
Jul 28, 2014
44
6
WA State
The clicking or snapping feeling you feel when pressing the firing button is because with some batterys you have to unscrew the bottom post so far, that the little rod that holds the assembly in place actually begins to slide out of the bottom of where it is positioned, so adding a longer top post you can screw in the bottom one more into the base and eliminate that issue of hard to push, or clicky firing.
 

Bob4156

Full Member
Jul 28, 2014
44
6
WA State
Either way just trying to help people save a few bucks you don't always need the shiniest or name brand to get a great vape.My nemesis' switch felt terrible and wobbly when I got it and could hardly make connection without batttery rattle with a panasonic 18650. Now connection issues or battery rattle are the least of my worrys and the switch feels solid no clicking :)
 
Last edited:

Maurice Pudlo

Ultra Member
ECF Veteran
Verified Member
Nov 27, 2013
1,601
2,232
United States
The bottom contact screw is supposed to be fully tightened at all times. A longer or shorter positive post screw only sets the switch height, travel remains unchanged. To adjust travel a taller negative post head is required or a longer rice pin.

Permanent mods include:
It is possible to reduce throw by reducing the height of the switch delrin, doing so will also reduce the switch height.

The center post on the switch body can be reduced along with a corosponding shortening of the rice pin to permanently lower switch height without altering the throw (the negative post screw may need to be shortened). This will slightly increase spring load as well.

The only way to effectively reduce switch wobble is to drill out the threaded switch housing and have a new center pressed in that has a tighter fit. Any skilled machinest with a good lathe and drill press can do this. Or make a new threaded switch housing for a non permanent fix.

Maurice
 

Bob4156

Full Member
Jul 28, 2014
44
6
WA State
I apologize I did not keep either the receipt or the packages for the magnets. Take your switch into the store and see which magnet fits there is only one size that fits. And Maurice I have 0 switch wobble now. Make sure you "clone" came with a correct fitting set pin, sometimes this can cause wobble. If you can somehow manage to get the kick ring off of the center of the mod (for me it took a vice grip and channel locks to budge the ring, you can screw the two same size tubes back together again without the ring and it should eliminate battery wobble, at least for an 18650. And yes the base screw should not be used to compensate for battery size, as instructed in the in the magnet kit you can purchase from fatdaddyvapes.com, the switch screw is not there for adjusting, it should be firmly screwed down. I found no need to replace either screw without the kick ring in the middle of the mod. If you decide to purchase fatdaddyvapes magnet mod, you will need the center ring if you intend on using his aftermarket (longer top) screws.
 
Last edited:

Phone Guy

Vaping Master
ECF Veteran
Verified Member
Sep 25, 2013
3,202
5,826
Arlington, Texas - USA
I have a question, I found this thread by searching for click switch nemesis... My nemesis clone has the fasttech magnets, 3 of them in the switch... this gives me enough resistance so the mod will not fire when put down unlocked. However, the switch sometimes locks (cant press) or clicks when I fire it...like something is stopping the action until I apply enough force to click it in to firing mode...not every time but happens a lot.

I am not using the kick ring or thin beauty ring, just the 2 tubes, switch and top cap. No battery rattle, and I get about a .20 voltage drop according to my battery meter testing with a 1ohm load. (4.2v no load, then 4.0v with 1 ohm load)

The lower pin, the one in the switch, is screwed in as tight as it can be...but I know the rice pin moves some up and down, and I think thats what is causing the occasional clicking . are you saying a new pin might stop this? Or can anyone reading this make any suggestions as to why the fire switch sometimes clicks or sticks when firing?

btw: when the switch clicks, if I unscrew the fire switch a little the switch fires on after that.... it pretty much only happens when the switch is securely tightened to the tube.... (sorry if this question is inappropriate for this thread)
 

Sgt.Rock

Ultra Member
ECF Veteran
Verified Member
Mar 13, 2014
1,476
1,645
The Poconos
Where do you get a bigger rice pin?

btw: I used noalax to lube the switch, figured it would help with conductivity at the same time.
I had a look at some romex electric cable and found the right size wire (#12 I think it was)

Just clipped a piece and cleaned up the ends with some fine sandpaper..experimented with differing lengths and came up with slightly longer than "stock" but not as long as the entire channel--seems to work the best for me.
 
Status
Not open for further replies.

Users who are viewing this thread