Provari P3 Dissasembly

Status
Not open for further replies.

Pukkita

Full Member
Sep 3, 2015
24
32
53
Hello,

My one year and couple months old P3 started to have problems with the 510 contact (reading OP on all atomizers, al contacts are pristine clean).

I checked the upper 510 pin with my fingernail to check it "adjustability" and it suddenly popped and came loose. Despite my nick, I'm a man and my nails are rather soft, so it was pretty loose already.

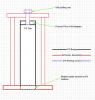
I inserted it again (top 510 is a female part which pressure-fits a male pin coming out from the board and top cap) and it worked again... for two tanks, returning to the dreaded OP error again.

Has anyone dissasembled a P3? I cannot see any obvious way to dissasemble the top cap so that I can access the PCB in order to fix it.

Have asked provari but apart from telling me no special tooling is required, they provided no other hints about how should it be removed. Just sending it to them will cost me $100 in shipping, I'm not not going to spend any additional dime on what ended up being the worst vaping gear investment I've done so far.

I'm proficient with electronics, and know how to work with lithium batteries, not going to blow myself up.
 

ENAUD

Resting In Peace
ECF Veteran
Verified Member
Jul 23, 2013
9,810
64,089
Bordertown of ProVariland and REOville
With the P3 there is no room inside to feed a rod up through the bottom and tap off the top cap, but in the linked post, ? for ProVape, is it possible to adapt the tapered ProVari to P3 threading?
you can see how to make a top cap extractor, if this is beyond your understanding or capabilities, perhaps you could find a local machinist or other mechanically inclined person to do it. I am guessing that the lead to your center pin came loose, it should be soldered to a wire if they built the P3 the same as previous models designs. Good luck.
 

Pukkita

Full Member
Sep 3, 2015
24
32
53
Thanks AstroTurf.

But repair + shipping (I live in Spain) is going to cost the same as a brand new, mint P3.

I admit I haven't found anything that reaches a P3+Kabuki performance regarding taste, but I cannot justify it to myself when even a measly and beaten-up Innoking iTaste SVD is still working after almost three years with tons of dropping around in the street. A Wismec + Nautilus is "almost there" in taste, while costing 1/4th.

Funnier thing being this P3 has only sit on my desk, or my van. I have dropped it exactly two times, and this device is suppossed to be the more robust in the market.

I admit one fault by my part however, I didn't fully "screw in" the bottom cap spring last cleaning time, resulting in the 18350 battery pushing the inner contact too much.

Dunno why, but this made coil resistance read by the P3 to be much higher (about 1Ohm more).

The OP has happened to me since day 0, I thought it was due to eliquid leaked from the Kabuki/Nautilus and cleaned and cleaned until it eventually made the OP to go away; now I realize it should be a cold solder joint or similar.

I just want to refrain myself from opening-it-no-matter-how as I will probably damage it or ruin its finish.
 
  • Like
Reactions: AstroTurf

ENAUD

Resting In Peace
ECF Veteran
Verified Member
Jul 23, 2013
9,810
64,089
Bordertown of ProVariland and REOville
Thanks a lot ENAUD, I have seen that video by Zen, but as you said I can't see room to insert rods to use a similar method as in the P2.5. Going to have a more thorough look at the post, is there specific info for the P3 there?
No, but in the video you can see the device Zen built to remove the top caps. The bottom cap can be used to attach to a plate, and that plate could have either holes tapped or nuts attached to it so the bolts could go up to engage the top cap removal plate. The specs for 510 threads are readily available if you search for them. ( 7mmX.5mm) . If I ever go to make such a thing I will simply use one of the ProVape 510/Ego adaptors that I have as they are stainless steel, and I'm sure it would be relatively easy to make a plate from some scrap steel to capture that adaptor and allow the bolts to apply leverage to that plate and loosen the top cap.

I've never seen a photo of a loose P3 board and top cap assembly outside the tube, so my input is merely speculation, so proceed at your own risk.

Also I read your other post regarding over pressuring the battery into the mod, don't know if maybe that might have caused some minor damage to the board or the terminal on the base of it or not...I understand why you'd be hesitant to ship it at the cost in your case, so just offering some thoughts to you in the hopes you can maybe repair your mod locally and get some more use and enjoyment from it. Again, good luck to you!
 

ENAUD

Resting In Peace
ECF Veteran
Verified Member
Jul 23, 2013
9,810
64,089
Bordertown of ProVariland and REOville
P.S. I would ONLY use one of the ProVape 510/Ego adapters, they are the only ones that I have seen that are made from SS, the others are either brass or some kind of pot metal and they might deform or break if used in such a manner.
 

Pukkita

Full Member
Sep 3, 2015
24
32
53
Thanks again ENAUD, I think I got it now. Do you mean something like the attached file? Or something simpler?
 

Attachments

  • Captura de pantalla 2016-12-03 a la(s) 13.07.42.png
    Captura de pantalla 2016-12-03 a la(s) 13.07.42.png
    158.4 KB · Views: 128
  • Like
Reactions: iBloke

ENAUD

Resting In Peace
ECF Veteran
Verified Member
Jul 23, 2013
9,810
64,089
Bordertown of ProVariland and REOville
Thanks again ENAUD, I think I got it now. Do you mean something like the attached file? Or something simpler?
NO, You either didn't watch the video in the post I linked, or just don"t get it. The top cap needs to be attached to a plate that is then pushed off in a strait line away from the bottom plate with the bolts that come up.

Again, click on this link >>>> ? for ProVape, is it possible to adapt the tapered ProVari to P3 threading?

and watch the video again. If you don't understand after that, I don't know how to help you. Good luck.
 

ENAUD

Resting In Peace
ECF Veteran
Verified Member
Jul 23, 2013
9,810
64,089
Bordertown of ProVariland and REOville
Looking at your diagram again, the part you named pulling rod, is just an attachment point for the ProVari.

The actual work of pushing should be the posts which connect the two plates, basically the plates are just spread away from each other, which will remove the top cap.
 

Pukkita

Full Member
Sep 3, 2015
24
32
53
I'm afraid I just didn't get it :)

I had in fact watched the video, but when I did I also watch other methods for P2.5 using internal rods and had both mixed up, thinking it should be different for a P3, whereas the only difference would be having to use the Provari P3 to 510 adapter.

You're right, what I need is exactly the same assembly (provided P3 has top cap pressure-fitted also), thanks!
 
Last edited:
  • Like
Reactions: AstroTurf

ENAUD

Resting In Peace
ECF Veteran
Verified Member
Jul 23, 2013
9,810
64,089
Bordertown of ProVariland and REOville
By what I have seen at 0:58 of the Making Of the Provari video, and the fact that Zen replaced P2.5 with P3 top caps, it's pretty clear P3 top cap is also pressure fitted.

I'm afraid my neurons are on strike for the lack of vape... :rolleyes:
the old adage, measure twice, cut once always applies. The P3 top is definitely pressure fit. necessity is the mother of all invention, and I am personally rooting for your success in this endeavor. It would please me greatly to read that you successfully resurrected your P3. :)
 
Status
Not open for further replies.

Users who are viewing this thread