SS is the wick AND resistance wire

Status
Not open for further replies.

Bagazo

Senior Member
ECF Veteran
Feb 19, 2009
278
86
I just found this which answered a doubt I had ever since I saw a 9v battery setting some steel wool aflame:

Nichrome is a trade name for a particular alloy of stainless steel. (Roughly 60% nickel and 40% chromium.) Type 316 stainless is almost exactly the same. Even type 308 or 18-8 can be used in a pinch, though they won’t last as long because they contain iron which freely oxidizes when hot.

How about just making the wick with one end in a reservoir and the current flowing across the top.
 

KYFlyer67

Senior Member
ECF Veteran
Verified Member
Mar 20, 2010
243
5
Ky
I've been playing with different sizes and shapes of SS wicks/heating elements and I now have a design that's working pretty well. I've made several of these and I'm consistently getting resistance values between 1.5 and 2.5 Ohms. I can adjust between these 2 values by making the middle part of the SS heating element narrower (higher Ohms) or wider (lower Ohms). Most importantly, this design vapes great - clean taste, good flavor, lots of vapor, and good TH.

The pictures:

Wick1.jpg - The SS strip on the bottom (with narrow center part) is the heating element. The SS strip on the top is the wick.

Wick2.jpg - Roll about half of the wick strip to form the "leg". This is the part that will hang down into the e-liquid and wick it up to the heating element.

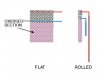
Wick3.jpg - "Oxidize" the wick strip by heating it several times with a lighter.

Wick4.jpg - Roll the SS heating element into a very tight tube shape.

Wick5.jpg - Twist the narrow center part of the SS heating element to make it shaped more like a wire.

Wick6.jpg - Wrap the unrolled part of the oxidized wick around the center, narrow part of the SS heating element. Leave the oxidized leg hanging down, forming a "T" shape.

I'm using a variation of a Boertjie-style "needles & pins" atomizer. If you're not familiar with Boertjie's atomizer, you can read about it here: http://www.e-cigarette-forum.com/forum/atomizer-mods/120072-atomizer-cartomizer-life.html

Push the ends of the SS heating element into the tube-leads on the atomizer and secure with pins.

WickOnAtomizer.jpg - This picture shows the SS heating element/wick mounted in the atomizer.

WickInAction - Lots of vapor!

Note: I'm using #325 stainless steel mesh. If you're using different mesh, you may have to adjust the size/shape of the heating element. If your atomizer is drying out too quickly, you need more wick (the oxidized part). If you're getting strong, wet vapor, you need less wick.

I know this looks like a lot of work to make a wick. However, it gets pretty quick and easy after you've made a few.


Bagazo

Senior Member
ECF Veteran
Feb 19, 2009
278
86
That should work. It would be similar to Dan's design, except Dan is making the wick with one end going up into a cartridge with filler - at least I think that's what he's doing.

No Dan seems to have made the atomizer and bridge one piece. Mi idea is this
SS Wick-omizer.jpg

I know that it's easier to work with the contacts that are already in an e-cig but since I don't have one I'm more apt to think about what would be easier if making one from scratch.
 

Bagazo

Senior Member
ECF Veteran
Feb 19, 2009
278
86
It should work. You just have to think about how you'll make your lead connections. There are lots of choices in how to do that. I recommend that you connect in some way other than solder. It's difficult to solder SS mesh.

The way I have seen it done is forming a closed loop of copper around a couple of strands of of SS and letting the solder fill the center of the copper loop this way even if the SS want to slide up or down it will not come loose.
 

VWFringe

Senior Member
ECF Veteran
Jan 7, 2011
243
32
South Orange County, CA
this reminds me of the magic flight launch tube, for vaping ......... concentrates...ss mesh heated by a single AA battery, could power control be the issue with the ss wicks? I saw a video of something like the pic below being powered on by tapping a switch to throttle the electricity, and remember pailpoe's design using electronics.

DSCF0183.JPG
 
Last edited:

slopes

Super Member
ECF Veteran
Jul 19, 2009
616
210
London, UK
On the straight SS wick. The potential problem with connecting the wires is that the connections might hamper the free capillary action of the juice up the wick. That's why I think it would be best to have a connection at the very top and bottom of the wick. At the ends, the connectors won't obstruct the movement of juice in the rest of it. If the larger middle section of the wick is oxidised with the bottom and top tips exposed, this might work.

A wick could be constructed by sewing the connector wires into the flat mesh before rolling. This could be done wherever the wires are positioned...

rolledmesh.jpg
 

Bagazo

Senior Member
ECF Veteran
Feb 19, 2009
278
86
On the straight SS wick. The potential problem with connecting the wires is that the connections might hamper the free capillary action of the juice up the wick. That's why I think it would be best to have a connection at the very top and bottom of the wick. At the ends, the connectors won't obstruct the movement of juice in the rest of it. If the larger middle section of the wick is oxidised with the bottom and top tips exposed, this might work.

A wick could be constructed by sewing the connector wires into the flat mesh before rolling. This could be done wherever the wires are positioned...

I do like the sewn wire in the mesh but the idea of placing the wires only in the top of the wick is so that current only flows through the tip. In the drawing below (which is yours with the wires connected only to the tip) the black part of the mesh would be the only part that gets hot The red part would only wick the ejuice up to the tip.

Kinda looks like a lit cigarette standing on its filter.
 

Attachments

  • Straight wick.jpg
    Straight wick.jpg
    18.7 KB · Views: 77
Last edited:

slopes

Super Member
ECF Veteran
Jul 19, 2009
616
210
London, UK
I do like the sewn wire in the mesh but the idea of placing the wires only in the top of the wick is so that current only flows through the tip. In the drawing below (which is yours with the wires connected only to the tip) the black part of the mesh would be the only part that gets hot The red part would only wick the ejuice up to the tip.

Kinda looks like a lit cigarette standing on its filter.

I suppose either way has benefits. I'm in the belief that the oxidised part of my suggested design would not heat up, whilst the raw metal would. I might be wrong in believing this. The reason I placed the wire at the bottom is to keep the design as simple as possible and this would eliminate one wire having to pass up through the cap of the juice chamber. asdaq's suggestion of a holder at the top and bottom is a good one (as I illustrated in my previous drawing).. this could be rather like how a fuse is clipped into a ceramic holder.
 
Last edited:

KYFlyer67

Senior Member
ECF Veteran
Verified Member
Mar 20, 2010
243
5
Ky
KY, this looks really impressive.

You say the TH and taste is good? Better than the original genesis setup?

I'm following this thread - think it's going in an interesting direction.

Keep up the good work!

Cheers!

Thanks l3oertjie. I had to take a time-out to build another atomizer because the one I was using was leaking like crazy. Now that that's done I'm able to test further... Time will tell, but right now I'll say that this design and the original genesis are pretty much equal in terms of TH and taste. The good news is that I've put together an atomizer that can handle a variety of wicks: this one (2-part ss mesh), genesis ss mesh, silica & nichrome, etc. I'm testing them all for comparison. I'll post the details of the atomizer I'm using soon. I'm still using your "needles and pins" atty design regardless of the wick. It's the only efficient way, in my opinion, to have a quick-change wick in a small (510 or 901 size) atty.
 

perlionsmitnick

Super Member
ECF Veteran
Sep 14, 2010
459
135
TX
Hey Slopes. Good ideas you have here. I have tried your SS wick method and am pleased with the results.
I posted to give you an idea of a type of connector I use. I took mine from an electronic hvac thermostat but I found something very similar here. Look at the bottom 2 connectors, Rivet type and metric.

I soldered mine directly to a rca male plug and you only have to shove the SS through the hole and tighten the screw. Couldn't be simpler.:)
 
Last edited:

KYFlyer67

Senior Member
ECF Veteran
Verified Member
Mar 20, 2010
243
5
Ky
On the straight SS wick. The potential problem with connecting the wires is that the connections might hamper the free capillary action of the juice up the wick. That's why I think it would be best to have a connection at the very top and bottom of the wick. At the ends, the connectors won't obstruct the movement of juice in the rest of it. If the larger middle section of the wick is oxidised with the bottom and top tips exposed, this might work.

A wick could be constructed by sewing the connector wires into the flat mesh before rolling. This could be done wherever the wires are positioned...

rolledmesh.jpg

I'm sure there are a lot of ways to skin this cat, and I've tested quite a few of them - most failed. In order to run this on low voltage, such as a single 3.7 volt lipo cell, the SS heating element has to be very narrow - 1/16th of an inch or so. Otherwise, the resistance of the element is so low that it will drain your battery quickly... or it may just kill your battery. Trust me, I know - I blew a $20 ego battery. If you make at least part of the SS heating element narrow, you can get the resistance to a reasonable number like 2 ohms, give or take. However, this introduces a problem - now the SS heating element is too narrow to wick enough juice. This is why I'm using a 2-part ss wick in my pictures above. I'm using a very narrow UNoxidized SS heating element wrapped by a wider OXidized SS wick. The unoxidized part produces the heat, while the oxidized part wicks the juice. This makes the setup a little more complicated, but it works well and it works on a single 3.7 volt lipo battery. It's not necessarily any better than a genesis (SS & kanthal/nichrome) wick - it's just another alternative.

One moral of this story... or one lesson learned, is that you should test new designs using cheap standard lipo batteries and NOT $20 ego batteries. :)
 

Bagazo

Senior Member
ECF Veteran
Feb 19, 2009
278
86
I suppose either way has benefits. I'm in the belief that the oxidised part of my suggested design would not heat up, whilst the raw metal would. I might be wrong in believing this. The reason I placed the wire at the bottom is to keep the design as simple as possible and this would eliminate one wire having to pass up through the cap of the juice chamber. asdaq's suggestion of a holder at the top and bottom is a good one (as I illustrated in my previous drawing).. this could be rather like how a fuse is clipped into a ceramic holder.

I think we are each looking at it differently. The way I see it the ejuice chamber is at the bottom with the wick hanging in the ejuice and both cables outside of the chamber (above the cap) heating only the mesh between the two wires. The part hanging in the juice would not heat up because their is no current flowing through it.
 

KYFlyer67

Senior Member
ECF Veteran
Verified Member
Mar 20, 2010
243
5
Ky
I think we are each looking at it differently. The way I see it the ejuice chamber is at the bottom with the wick hanging in the ejuice and both cables outside of the chamber (above the cap) heating only the mesh between the two wires. The part hanging in the juice would not heat up because their is no current flowing through it.

EXACTLY! The oxidized part hanging in the juice will heat only slightly from conduction. If you compare this to a traditional Chinese atomizer, the unoxidized SS plays the role of the nichrome coil, and the oxidized ss (hanging in the juice) plays the role of the silica wick. The bottom line is that it works.
 

asdaq

Vaping Master
ECF Veteran
Verified Member
Feb 23, 2010
4,570
1,845
poland, and the brassy lands of google
One moral of this story... or one lesson learned, is that you should test new designs using cheap standard lipo batteries and NOT $20 ego batteries. :)

Yeah, I've managed to do in an ego batt and a hello016 while testing, so I'll be observing this project with a bit of distance ;)
 

KYFlyer67

Senior Member
ECF Veteran
Verified Member
Mar 20, 2010
243
5
Ky
EXACTLY! The oxidized part hanging in the juice will heat only slightly from conduction. If you compare this to a traditional Chinese atomizer, the unoxidized SS plays the role of the nichrome coil, and the oxidized ss (hanging in the juice) plays the role of the silica wick. The bottom line is that it works.

I need to qualify this a bit. When I say the oxidized part will only heat from conduction (and not from current/resistance), I'm referring to my 2-part wick design pictured in post #42. That's because the current can't get thru the oxidation "skin" on the oxidized part of the wick. The oxidized part of my 2-part wick is a separate piece - that's important. Slopes' design is a different story entirely. If I understand correctly, Slopes is using a single piece of SS mesh with a portion of it oxidized. In this case, current will flow from the top wire to the bottom wire, heating all the SS mesh in between. The oxidized portion of the mesh will carry just as much current as the unoxidized part. Oxidation on SS mesh is just like insulation (skin) on a wire. If you strip the insulation off a wire, just leaving some in the middle, current will flow unobstructed from one end of the wire to the other and will be unaffected by the insulation - this is no different than oxidizing part of a piece of SS mesh. The only reason I can think of for oxidizing part of a single piece of SS mesh, is that the oxidized part can touch conductive material without transferring current (shorting). This is getting deep...
 
Status
Not open for further replies.

Users who are viewing this thread