Hi everyone!
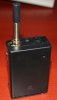
First off, thanks to Petercro, Highping, Dreams N Chains, Hoog, and everyone that ever posted info on modding. Even though I am personally unhappy with my first box, I could not have done this without all of you!
Ever since I found this forum, I have been intrigued with all the mods that people have created in an attempt to improve upon the ecig design. I had ordered mods off the internet but always found them lacking in some way (even the famous juice Box, which works but not to my personal satisfaction). So, when I started this I had several needs that I figured a handmade mod would have to meet. They would be…
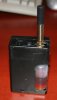
Have a juice feeding system
Run at 5 volts using two 18650 2600 mah batteries for extended battery life
Use common 510 attys
I’ve never attempted to build anything like this before and am not what you would call “handy.” So, after months of research (which only makes the final product appear that much more pathetic), I settled on the components that I would need and ordered them all from Mapvapes. I am including the list of parts below with the cost per item so anyone new can realize just how cheap this is compared to purchasing a pre-made mod for $100 or more.
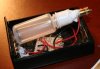
510CONNB, 510 Battery Connector, Gold, $2.49
MVSWTACBB, Tactile Switch with Round actuator, $1.79
2XCBOX, 2 x C Battery Box with on/off switch, $2.89
MVLEDBL3MM, 3mm Blue LED, $0.49
MV5VREG1, LDO 5 volt, 3.0 amp regulator with control pin, $2.29
MV5VREG3, D2Pak, LDO 5 volt, 3.0 amp regulator with control pin, $2.49
MVR470, 470 Ohm Resister, $0.20
MVCBPCB, Interconnect Project Circuit Board, $1.99
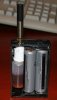
10MLMT, Empty 10ml Bottle with Childproof cap, $0.49
Other items used…
Drill, Dremel, Glue Gun, Silicon, Epoxy, Exacto knives, and 1/16” brass tubing (from local hobby shop)
I had a "tutorial" in Word that I was going to upload but its too large with all of the photos embedded into it. If anyone is really interested, let me know and I will try to post it in pieces. Or, if anyone is interested in a particular part of the box, I can put up individual pictures.
I am already looking forward to my next mod which will be a lot slicker looking. I have finalized a design that will use the same components as this one, but in a custom made box. Now I just need to figure out how to make the box and I'll be on my way!
Have a good one!
Greg
First off, thanks to Petercro, Highping, Dreams N Chains, Hoog, and everyone that ever posted info on modding. Even though I am personally unhappy with my first box, I could not have done this without all of you!
Ever since I found this forum, I have been intrigued with all the mods that people have created in an attempt to improve upon the ecig design. I had ordered mods off the internet but always found them lacking in some way (even the famous juice Box, which works but not to my personal satisfaction). So, when I started this I had several needs that I figured a handmade mod would have to meet. They would be…
Have a juice feeding system
Run at 5 volts using two 18650 2600 mah batteries for extended battery life
Use common 510 attys
I’ve never attempted to build anything like this before and am not what you would call “handy.” So, after months of research (which only makes the final product appear that much more pathetic), I settled on the components that I would need and ordered them all from Mapvapes. I am including the list of parts below with the cost per item so anyone new can realize just how cheap this is compared to purchasing a pre-made mod for $100 or more.
510CONNB, 510 Battery Connector, Gold, $2.49
MVSWTACBB, Tactile Switch with Round actuator, $1.79
2XCBOX, 2 x C Battery Box with on/off switch, $2.89
MVLEDBL3MM, 3mm Blue LED, $0.49
MV5VREG1, LDO 5 volt, 3.0 amp regulator with control pin, $2.29
MV5VREG3, D2Pak, LDO 5 volt, 3.0 amp regulator with control pin, $2.49
MVR470, 470 Ohm Resister, $0.20
MVCBPCB, Interconnect Project Circuit Board, $1.99
10MLMT, Empty 10ml Bottle with Childproof cap, $0.49
Other items used…
Drill, Dremel, Glue Gun, Silicon, Epoxy, Exacto knives, and 1/16” brass tubing (from local hobby shop)
I had a "tutorial" in Word that I was going to upload but its too large with all of the photos embedded into it. If anyone is really interested, let me know and I will try to post it in pieces. Or, if anyone is interested in a particular part of the box, I can put up individual pictures.
I am already looking forward to my next mod which will be a lot slicker looking. I have finalized a design that will use the same components as this one, but in a custom made box. Now I just need to figure out how to make the box and I'll be on my way!
Have a good one!
Greg