
Hey everyone kmk here with another tank modification. I do love my protankII's but with the small coil bodies you are rely limited to how far you can push the airflow, I recently purchased a tobeco kayfun lite clone because I saw a lot of potential in the way it works, as I was looking at it at my local vape shop completely disassembled, the man behind the counter kept telling me it has very limited airflow and how I would not like it. he knows me, I am not a cloud chaser but I enjoy my vape rich,thick and smooth, with little effort,although I do on rare occasion pull out the 40 amp sony imr and do ridiculous things, that is not what I enjoy most about vaping.
as he was mumbling about how it won't work for me I was putting together a plan in my head how I was going to "fix" this neat little RBA tank and make it shine as a great on the go tank feed vaping machine.
here is what I did , and let me tell ya this thing is working something fierce, and I have been using it for three days on the go and at home non stop.
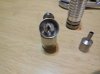
First thing I did was remove the set screw that adjusts air flow. that gave it alot more air but not what enough for me.
next I began drilling the air hole in the bottom piece out bigger and bigger in small increments I got to a point were I knew I was going to break the center pin and it still did not have the airflow I was looking for, so I went ahead and broke the center pin.
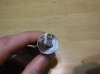
dang, so moving on I unscrewed the center pin from the offset positive terminal and with a bit of force pushed the broken pieces out and began hunting for a replacement. the most suitable replacement candidate I found was a stainless steel needle from a turkey flavor injection syringe, I am not sure what gauge it is but it is large gauge and the most common used for flavor injectors.
this would work quiet well, because the inside diameter was much bigger then the stock pin, outside diameter was dang close,and it was stainless steel so good conductor, I noticed right off that it was a little too big to push onto the positive terminal(coil side) so after i cut it to the required length I cut a notch on one end and gave it a ever so slight crimp, Perfect!! it actualy screwed on to the terminal with a bit of force! great so then I was gona drill a hole in it to meet up with the other air holes but instead I just got the dremel with a tiny diamond cut of wheel and took out a good section of it around about were it would intersect the hole in the bottom piece. put it all together and was about to try it.
then I notice because it was hallow all the way through , if it ever flooded I was gonna have juice all over the battery connector and probably all over my batt mod as well , so back to the shop to plug the bottom of the tube with a bit of aluminium foil wrapped around a peice of a finish nail.\
now I thought it was done . but very quickly ran into another problem. because there was no screw at the battery end of the tube ,as was the original design, when I screwed the battery mod (k100) onto the clone it moved the pin up and lost contact. dang!!! well that was a good time to very carefully introduce are good friend Super Glue. a bit inbetween the tube and the 510 terminal did the trick . I got a little bit on the end of the tube so I had to sand it off after it set to get good contact.
then it was just a matter of making and placing a coil and testing, I went right ahead with a .7 ohm micro coil wicked with cotton. i could not believe how great this thing is, very open airflow for a bottom draw. and best of all it can roll around go upside down and never leaks or floods yet always has a wet wick ready for vapin. I did flood it once because i unscrewed the cap to show a friend the insides when it had a little bit of juice in it . but every kayfun owner knows that will happen and is why you always add juice from the bottom when there is still a bit of juice in it.
tech info:: bottom plate set screw out, air hole bored to 1/8 inch
center pin replaced with large gauge stainless steel flavor injection needle
super glue was used, but far far away from the coil at the bottom only were the plastic bushing is were the battery connects
pictures coming soon there is over half a tank of juice in it right now and I don't want to make a mess so ill take it apart and snap photos after I vape up all the juice in the tank")

as he was mumbling about how it won't work for me I was putting together a plan in my head how I was going to "fix" this neat little RBA tank and make it shine as a great on the go tank feed vaping machine.
here is what I did , and let me tell ya this thing is working something fierce, and I have been using it for three days on the go and at home non stop.
First thing I did was remove the set screw that adjusts air flow. that gave it alot more air but not what enough for me.
next I began drilling the air hole in the bottom piece out bigger and bigger in small increments I got to a point were I knew I was going to break the center pin and it still did not have the airflow I was looking for, so I went ahead and broke the center pin.
dang, so moving on I unscrewed the center pin from the offset positive terminal and with a bit of force pushed the broken pieces out and began hunting for a replacement. the most suitable replacement candidate I found was a stainless steel needle from a turkey flavor injection syringe, I am not sure what gauge it is but it is large gauge and the most common used for flavor injectors.
this would work quiet well, because the inside diameter was much bigger then the stock pin, outside diameter was dang close,and it was stainless steel so good conductor, I noticed right off that it was a little too big to push onto the positive terminal(coil side) so after i cut it to the required length I cut a notch on one end and gave it a ever so slight crimp, Perfect!! it actualy screwed on to the terminal with a bit of force! great so then I was gona drill a hole in it to meet up with the other air holes but instead I just got the dremel with a tiny diamond cut of wheel and took out a good section of it around about were it would intersect the hole in the bottom piece. put it all together and was about to try it.
then I notice because it was hallow all the way through , if it ever flooded I was gonna have juice all over the battery connector and probably all over my batt mod as well , so back to the shop to plug the bottom of the tube with a bit of aluminium foil wrapped around a peice of a finish nail.\
now I thought it was done . but very quickly ran into another problem. because there was no screw at the battery end of the tube ,as was the original design, when I screwed the battery mod (k100) onto the clone it moved the pin up and lost contact. dang!!! well that was a good time to very carefully introduce are good friend Super Glue. a bit inbetween the tube and the 510 terminal did the trick . I got a little bit on the end of the tube so I had to sand it off after it set to get good contact.
then it was just a matter of making and placing a coil and testing, I went right ahead with a .7 ohm micro coil wicked with cotton. i could not believe how great this thing is, very open airflow for a bottom draw. and best of all it can roll around go upside down and never leaks or floods yet always has a wet wick ready for vapin. I did flood it once because i unscrewed the cap to show a friend the insides when it had a little bit of juice in it . but every kayfun owner knows that will happen and is why you always add juice from the bottom when there is still a bit of juice in it.
tech info:: bottom plate set screw out, air hole bored to 1/8 inch
center pin replaced with large gauge stainless steel flavor injection needle
super glue was used, but far far away from the coil at the bottom only were the plastic bushing is were the battery connects
pictures coming soon there is over half a tank of juice in it right now and I don't want to make a mess so ill take it apart and snap photos after I vape up all the juice in the tank
Attachments

Last edited: