Vivi Nova Rebuild tutorial

Status
Not open for further replies.

Errol

Ultra Member
ECF Veteran
Verified Member
Dec 4, 2010
1,281
823
Salt lake City, Ut
Errol,

I ordered some innards for vivi stone v3 @ discountvapers & also found out V3 has stainless top & bottom(v2 is aluminum, very nice too). Thanks for turning me on to it ;)

I hope you figure out a way to recoil the ceramic cup. I still have a couple of refills for the V3 but it appear from my limited tampering that the wires are either molded into the ceramic (doesn't seem likely) or glued or whatever but they are too tight to pull out with the amount of pressure I've put on them.

Errol
 

gdeal

Moved On
ECF Veteran
Aug 4, 2012
2,324
7,271
( -_-) Ω~
I am so glad "on behalf of the power grids across the globe" that BJ43 was using toothpicks & not my skewers. I just tested my "way too big for the vivi head" monster coil that I had earlier posted & that thing would have needed some serious energy to power it.

Whoa that looks like a 7mm high coil compare to the vivi head! Did the cap even fit on top of it? BJ has some crafty coiling techniques, I cant come close...

I wish those walls were ceramic.

Second that wish.... Note to all Chinese manufacturers.."Make a bigger ceramic cup. 8-9MM wide...5-7 mm deep. Give it three holes at the bottom. One for air..two for wires. Put it in any crappy $2 disposable; sell many to US consumers"

Nice pics and layout MISTer E! I need to study the graphic arts.
 

gdeal

Moved On
ECF Veteran
Aug 4, 2012
2,324
7,271
( -_-) Ω~
I hope you figure out a way to recoil the ceramic cup. I still have a couple of refills for the V3 but it appear from my limited tampering that the wires are either molded into the ceramic (doesn't seem likely) or glued or whatever but they are too tight to pull out with the amount of pressure I've put on them.

Errol


Errol

What is the inner diameter of the V3 ceramic cup?

BTW if the v3 are similar in design to other ceramic cups, the wire is held in by either a bit of silicon or a thin insulator wire covering. Gentle pulls should release it.
 

gdeal

Moved On
ECF Veteran
Aug 4, 2012
2,324
7,271
( -_-) Ω~
One of the nice features of the Vivi Nova is the replaceable atty head. While the stock head design is good (sic) for the intended production performance, it is somewhat lacking with respect to wicking. (IMO) A number of rebuild tutorials here in this thread and elsewhere have focused on changing the wick material (cotton, bamboo, SS mesh, etc) or altering the head design (bigger slots, boring out a hole, etc), or coil designs or a combinations of these more or less with the original design intent.

I have tried a number of these and while some were really great, each had trade offs. The following approach, a bit different that previous approaches has provided me the best performance yet with a Vivi and I and I wanted to share with you.

The core of the design concept is not new, but I want to share what I did for those that may wish to try it on a Vivi.

The basic concept was to replicate a carto within the Vivi head. My objective was to maximize wick on coil, maintain proper airflow and allow for rebuild using "safer than silica" material.

Here goes:

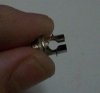
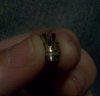
Using the "machine screw method", you form an appropriate coil for target ohm resistance. Here I used a 2mm screw. I double twisted the 32g kanthal leg that goes through the center of the grommet. I left the top leg as a single wire. I placed the coil with the screw still in the coil into the head and secured the bottom leg. I brought the top leg through the slot and wrapped it clockwise securing it through the bored out opening and then around the top lip of the head. (This was a head that was previously bored out for a cheesecloth coil) After centering the coil, I removed the screw and achieved a perfect glow. Resistance was higher than I wanted at 3.1 ohms, but the coil was perfect so I proceeded with the build.


I then chose to use cheesecloth as the wick material, but you can most likely use Bamboo or cotton yarn as well. I did try cotton batten and will share some thoughts on that shortly.

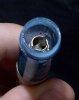
To maintain coil integrity during the wick placing process, I insulated the coil with a plastic straw, cut down the middle to accommodate the coil size the and the top wire. I placed ten strand twists of cheescloth at a time on both sides of the coil through the slot and incrementally built up wick around the coil.


I alternated placing the twisted cheesecloth on each side of the coil to have it overlap in the slot. The plastic straw worked great to keep the coil shape. Note here that you have a very clear channel down to the air inlet of the base.


After placing all the cheesecloth twists, I gently removed the straw to see very nice coil coverage and a nice wide opening to the air inlet.


I placed a few more cheesecloth twists to cover the expose coils., then trimmed the wick legs and placed the head in the Vivi tank and primed it with juice.


The result were great. Compared to all other vivi set ups, this has produced the best overall vape so far. :vapor:

After 5mls, this set up is still going strong. No decrease in airflow, no flooding, no funky taste...etc. The cottony flavor has diminished as well.


I still need to see how long this wick will last and how easy a change of wick material will be to really feel compelled here, but so far really outstanding.

--------------------------

A couple of additional thoughts...On my first try, I used a 1.5 mm coil and cotton batten. The vapor production was incredible. However, the wick failed, because the batton is so absorbent it expanded into the coil, became too wet and air flow was reduced. When I disassemble, it was a PITA to remove the batten. On this try, I increased the coil to 2mm and used cheesecloth to solve for both issues. Given performance so far, my next try (if/when this gives out) will be to use cheesecloth and a 1.5mm coil and/or perhaps incorporate some layers of batten. I may also revisit the top leg with a double twist down the center or perhaps some silver NR wire, but this really is not an issue so far.

So the short version here is:

1) Use the inner channel of the coil as the pathway for air flow.
2) Maximize wick on coil by using the outside of the coil for greater wick to coil surface area.
3) Use stranded material to facilitate removal during a wick change out.
4) Minimize the vapor chamber as much as possible.

Now back to my Grand Marnier...enjoy.
 
Gdeal once again shows he is the real deal(AAA+++). Excellent vertical coil set up! I have tried a vertical setup in the ViVi Nova with laughable vapor success. I may need to revisit it again one day soon now that G laid some better foundation stones. This is one of the main reasons why I enjoy ECF!, Cunning & skilled minds working toward vapor clouds dragons would envy.

AAA+++ on the images as well. mE likes detailed images to go with my vapor education
8N9cC.gif
 

xMackx

Super Member
ECF Veteran
Oct 3, 2012
628
734
40
Michigan
Great work gdeal, just the type of mods I was asking to see. I see it looks like you ran your negative wire up and around the outside? Great idea since it would be hard to keep both legs from touching running both straight down on a vertical setup. I also like the idea of your setup for wick replacement without coil removal.

I'll definitely try your vertical setup eventually. Anyone else that has similar mods I'd love to see them.

I have been thinking of a way to replace the rubber grommet/center pin.
 

Errol

Ultra Member
ECF Veteran
Verified Member
Dec 4, 2010
1,281
823
Salt lake City, Ut
Errol

What is the inner diameter of the V3 ceramic cup?

The V3 ceramic cup ID is 4.92mm or .196 in. on my calipers, just a little larger than the steel cup.

BTW if the v3 are similar in design to other ceramic cups, the wire is held in by either a bit of silicon or a thin insulator wire covering. Gentle pulls should release it.

The only one I tried was a working unit that I didn't want to destroy so I didn't force it that much. The bare wire is miniscule and would be very easy to break but I suppose one could use a very small twist drill to clean a hole for a replacement wire if it broke. At some point I'll take an older unit and see if it can be pulled out without breaking if Mister doesn't get to it first. :)

Errol
 

mrelwood

Senior Member
ECF Veteran
Verified Member
Jan 25, 2012
267
192
Finland, Europe.
gdeal, great idea! I wasn't able to get it working too well though. It tastes a bit burned, like the coil would be dry, although the coil doesn't go red or have visible wickless sections.

I ended up tweaking my Phoenix Rebuildable eGo Tank atty, and since for an unknown reason I have recently failed to make a single good head for my Mini Nova, this is clearly the best vape I got right now. It is surprisingly good though now that I got it to wick properly, so I'm getting by just fine. Waiting for the postman is a tedious thing to do, over and over again. I'm sure we all know that by now...
 

xMackx

Super Member
ECF Veteran
Oct 3, 2012
628
734
40
Michigan
Something I'm starting to do today is keep a wick/coil log of measurements so when I make something that preforms well I can repeat it. Like measurement and thread count of the cheese cloth used. A 1-10 number system on tightness of coils wrapped and how much space between each wrap. I don't know why I didn't think of doing this from the beginning.
 

gdeal

Moved On
ECF Veteran
Aug 4, 2012
2,324
7,271
( -_-) Ω~
I set up another Vivi Head, this time with a 1.5 mm coil as compared to the 2mm coil in the original post. Same technique for the rebuild.

After 5mls, it looked like this:


After about 4ml the draw started to tighten up significantly, so I did this:


That's a "DenTek Easy Brush Cleaner". Just slid it into the coil, did a few twists and pulled it out. Almost like new!


Both set-ups are still performing really good. The 1.5mm version can get a bit gurgle, but the vape is a bit finer and more moist. It still vapes cottony, but the cotton taste is gone, if that makes sense.
 

xMackx

Super Member
ECF Veteran
Oct 3, 2012
628
734
40
Michigan
I set up another Vivi Head, this time with a 1.5 mm coil as compared to the 2mm coil in the original post. Same technique for the rebuild.

After 5mls, it looked like this:


After about 4ml the draw started to tighten up significantly, so I did this:


That's a "DenTek Easy Brush Cleaner". Just slid it into the coil, did a few twists and pulled it out. Almost like new!


Both set-ups are still performing really good. The 1.5mm version can get a bit gurgle, but the vape is a bit finer and more moist. It still vapes cottony, but the cotton taste is gone, if that makes sense.

How are you wiring your coil from the outside? Is it just the negative running out and down the cone?
 

xMackx

Super Member
ECF Veteran
Oct 3, 2012
628
734
40
Michigan
Now that I have found the best way for me to recoil with kanthal/cotton and it's repeatable I figured I would share. I'm using A-1 33 gauge kanthal, and cheese cloth that I boiled just to make it extra clean. This coil came out 1.9 ohms with the legs double twisted for no grommet burn. The main wick rolled dry is about 2mm thick.

First pic is before any modification, and the second is where i bore a hole at the bottom of the slot. I made the cotton wick 1/8th the width of the bored hole because after wet the cotton will swell that much to almost fit the hole perfectly so the slots don't choke the wick.

Another thing that I noticed that seems important is I got the best results with a somewhat tight and small coil using the smallest needle I had, and making sure the coil wraps are as close together as possible. Even wrapping them so they all touch, then taking a pin to seperate them as little as possible with them still not touching. I also didn't remove the needle until I had installed the coil/wick into the head (removed needle after positive and negative wires held with grommets). It helped with keeping the coil nice and tightly together.

Last I made a 1mm cotton wick to lay over the coil/wick for over wicking (not necessary but helps produce more vapor). It's just big enough to come out the slots on both ends ( I cut a couple notches on the rubber hat to accompany the over wicking)

Oh, and seasoning the wire by getting it red hot with a lighter then wiping off any soot gets rid of any metallic break in flavor since you can't dry burn cotton.

Nice clean tasting vape from first hit, no break in period at all almost. Just give the cotton a few minutes to fully swell with liquid. Vapes like a freight train even at low voltage.
 

Attachments

  • After Hole Drilled.JPG
    After Hole Drilled.JPG
    9.9 KB · Views: 407
  • Before hole drilled.JPG
    Before hole drilled.JPG
    14.9 KB · Views: 149
  • Coil.JPG
    Coil.JPG
    16.3 KB · Views: 208
  • Over Wicking.JPG
    Over Wicking.JPG
    17.4 KB · Views: 458
Last edited:

MikeE3

Vaping Master
Supporting Member
ECF Veteran
Verified Member
Aug 23, 2011
8,635
114,550
Downingtown, PA
Now that I have found the best way for me to recoil with kanthal/cotton and it's repeatable I figured I would share. I'm using A-1 33 gauge kanthal, and cheese cloth that I boiled just to make it extra clean. This coil came out 1.9 ohms with the legs double twisted for no grommet burn. The main wick rolled dry is about 2mm thick..................

Well done Mack - thanks for the picture tutorial.
 

xMackx

Super Member
ECF Veteran
Oct 3, 2012
628
734
40
Michigan
I tried every combination possible, loose coil, tight coil, tiny wick. My epiphany came when I realized my coils with larger spaces between wraps gave me the singed cotton flavor and my tight compact coil tasted clean. After drilling the slot wider so they can't choke the wick the coil choking the wick wasn't a possible threat anymore. Anyone else come to a similar conclusion?

Thanks to all of you previous modders for my inspiration in fixing my problem. My cotton and kanthal taste even cleaner than the stock silica head.
 

Stymied

Super Member
ECF Veteran
Verified Member
Jun 29, 2011
432
868
ChicagoLand, IL USA
sites.google.com
I tried every combination possible, loose coil, tight coil, tiny wick. My epiphany came when I realized my coils with larger spaces between wraps gave me the singed cotton flavor and my tight compact coil tasted clean. After drilling the slot wider so they can't choke the wick the coil choking the wick wasn't a possible threat anymore. Anyone else come to a similar conclusion?

Thanks to all of you previous modders for my inspiration in fixing my problem. My cotton and kanthal taste even cleaner than the stock silica head.

Thanks xMackx, nice tuit and pics . Can I ask you what size you drilled the head slot to?
 

xMackx

Super Member
ECF Veteran
Oct 3, 2012
628
734
40
Michigan
Thanks xMackx, nice tuit and pics . Can I ask you what size you drilled the head slot to?

About 4mm in diameter for a dry 2mm cotton cheese cloth wick. Also make sure you don't drill/grind the original slot any deeper ( If you do it makes the coil closer to the grommets). I used my proxxen rotary tool (like a dremel).

Been vaping on it for a full day and yet no discoloration from burning. (pic)
 

Attachments

  • Edit cut n paste.JPG
    Edit cut n paste.JPG
    10.4 KB · Views: 208

Stymied

Super Member
ECF Veteran
Verified Member
Jun 29, 2011
432
868
ChicagoLand, IL USA
sites.google.com
About 4mm in diameter for a dry 2mm cotton cheese cloth wick. Also make sure you don't drill/grind the original slot any deeper ( If you do it makes the coil closer to the grommets). I used my proxxen rotary tool (like a dremel).

Been vaping on it for a full day and yet no discoloration from burning. (pic)

Got it, Thx ... I've put away my silica awhile back after finding so much breakdown and residue from this type of wicking. I have gone solely to cotton, cheese cloth or SS wicking for health and quality issues. Your modification I appreciate, as it is practical and easily applicable. Thanks again for sharing your information and experience feedback. :2cool:
 

Errol

Ultra Member
ECF Veteran
Verified Member
Dec 4, 2010
1,281
823
Salt lake City, Ut
The only one I tried was a working unit that I didn't want to destroy so I didn't force it that much. The bare wire is miniscule and would be very easy to break but I suppose one could use a very small twist drill to clean a hole for a replacement wire if it broke. At some point I'll take an older unit and see if it can be pulled out without breaking if Mister doesn't get to it first. :)

I took one for the team and destroyed a V3 replacement unit to see how much trouble it was to get the wires out of the cup. Turned out to be a breeze, pulled straight out once I cut the ground and power wires and straightened them so it will be possible for the experts to recoil the ceramic cup with a little ingenuity.

Someone with more knowledge than myself should be able to figure a way to fuse the resistance wire to the none resistance wire like some of the coils I've seen. I know my spot welder is way too much but maybe something like a six or twelve volt battery charger and a switch to toggle it on/off rapidly. :):)

Errol
 
Status
Not open for further replies.

Users who are viewing this thread