Hello and welcome back for another review by yours truly. This time I will be taking a look at the Voopoo Vinci 3 that was sent to me by Voopoo in order to provide you with a fair, honest, and hopefully informative review. The Vinci 3 is obviously the third rendition of the Vinci series of pod mods. This one is quite a bit thinner and very much reminds me of pod mod from another manufacturer that I reviewed last year. However, Voopoo has put their own spin on it with some different features and designs. It is made from zinc alloy and carbon fiber so has a nice weight to it. It contains an 1800mah internal battery for what seems like long battery life and is adjustable from 5-50 watts. It also has a display screen on one side. The Vinci 3 has what they are calling a Mobius airflow control which is basically a turn wheel that protrudes from both sides of the mod. The airflow rating is from 100-3000 Pa. It can be button fired or used in auto draw. However, the airflow will need to be tightened up some for more of an RDL or MTL for the auto draw to work correctly.


WHAT’S IN THE BOX?
1* VOOPOO VINCI 3 Mod Pod Device
1* VOOPOO VINCI 3 Empty Cartridge 4ml
1* PnP-TW30 0.3ohm Coil
1* PnP-DW60 0.6ohm Coil
1* User Manual
1* Type-C Cable

SPECIFICATIONS:
Size: 101.3*30.5*21.6mm (with cartridge)
Power Range: 5-50W adjustable
Capacity: 4ml
Resistance Range: 0.15-3.0ohm
Output Voltage: 3.2-4.2V
Battery: Built-in 1800mAh
Material: Zinc Alloy + Optical Coating Decorative Sheet
Standard Coils: PnP-TW30 0.3ohm Coil, PnP-DW60 0.6ohm Coil
Compatible Coils: All PnP Coils
Charging: Type-C charging
Color: Carbon Fiber Black, Aurora Red, Carbon Fiber Blue, Aurora Blue, Rose Gold

FEATURES:
1. Supports MTL to DL vaping
2. Mobius airflow system
3. 5-50W adjustable wattage
4. Ultra-precision auto-ignition


INITIAL THOUGHTS:
The packaging for the Vinci 3 is simple but nice. The front has of course the Voopoo and Vinci 3 names in white against a blue background that reminds me of a laser light show or something. It also has a clear viewing window which I like very much so you can see the actual device inside. The back side of the box has the contents list as well as the usual company information and warnings.


The box for the Vinci 3 is opened from the end. The plastic tray holding the device slides out and the accessories and user manual are located under the tray. I personally don’t care for this type of packaging because when you slide the tray out then some of the contents underneath are going to fall out normally. What Voopoo has done to combat this is to put the user manual and all accessories in a clear plastic pouch that must be torn open to remove the contents.
The Vinci 3 kit comes with the .3 ohm coil pre-installed in the pod which is rated for 28-36 watts. The second coil included in the accessory pouch is a .6 ohm coil rated for a maximum of 23 watts according to the writing on the foil pack containing the spare coil. Also included in the kit is a USB-C charging cable to charge the 1800mah internal battery as well as the user manual.


The Vinci 3 has the Voopoo Vinci name printed on one side with the airflow adjustment wheel protruding near the top of the body and a clear viewing window above that which allows the user to see part of the clear pod to monitor the liquid level. It basically allows the user to see the lower half of the pod so when the liquid level nears the bottom of the viewing window then it’s about time to refill the pod. The opposite flat side has the other side of the airflow adjusting wheel which also has the + and – signs so the user can tell where the airflow is set by looking at where the larger tab on the wheel is positioned. Also on this side is the fire button which has a couple different functions. The Vinci 3 can be button fired or can auto draw fire. However, I have found that I need to tighten the airflow quite a bit for the auto draw fire to function properly. The Gene AI name is printed near the bottom indicating the chipset used in this model.

One side of the V3 is marked “Sample” on the one I received but of course will not when you receive a production model. In the picture on the left you can see that this is where the USB-C charging port is located as well as the airflow inlet openings which are a series of four different sized slotted holes. The airflow slots are identical on both sides. The picture on the right shows the location of the display screen also. I will cover the display and functions shortly along with a picture.

The display screen for the V3 shows the following information when at idle.


The 4ml pod for the V3 is a top fill pod like many other smaller pods I’ve seen. You simply push the mouthpiece to one side and the mouthpiece comes off allowing you to fill the pod without removing it from the device. However, the way the viewing window is set up on this device it’s a little hard to see the liquid level until you get almost all the way to the top when filling.
I very much like that the body of the pod is clear allowing you to see the liquid level very easily. The coil that comes pre-installed has a safety seal over it so that it isn’t accidentally fired before filling the pod. This is especially a good idea since this one is button and auto draw fired. There is a rubber gasket over the fill hole and a smaller vent hole on the opposite side. The coils are a simple push in style and due to the pod opening design on the mod the coil needs to stick out quite a bit from the base of the pod.


The pod opening on the device has two magnets as does the bottom of the pod to hold the pod in securely. The spring loaded contacts in the opening are inset fairly deep which is why the coil must protrude quite a bit as I mentioned in order to make contact with the pins. It’s a little hard to see in my picture but the auto draw airflow inlet is at about the ten o’clock position and is raised.

FINAL THOUGHTS:
The Vinci 3 does have some really nice features for such a small pod mod. The 1800mah internal battery seems to last a very long time with the included coils. There was some difference of course between the number of puffs on the .6 and .3 ohm coils but they can be run very close to the same output where it isn’t a huge difference. The Mobius airflow control is a nice touch to have an airflow control on a small device like this is truly a plus. That being said, the way the airflow control wheel sticks out on both sides of the mod takes away from the hand feel and comfort of holding it in my opinion. The liquid viewing window is a good idea and I do appreciate the effort in the design. It really only exposes about the bottom half of the pod so when you get in the center of the viewing window then it’s time to start thinking about filling the pod again. That leads to one more thing that I didn’t really care for. Yes you can remove the mouthpiece and fill the pod without removing it but you really can’t see the liquid level until it gets very near the top since very little of the pod is exposed above the body. Please remember that these are my personal preferences and others may have different opinions. It is nice that the Vinci 3 has variable wattage output and even though it doesn’t have a + and – button, it does scroll through the numbers rather quickly so it only takes a few seconds to adjust the output. I didn’t really care for how it restricts the output depending on the coil resistance. I started using the .6 ohm coil around 20 watts and worked it up. I knew that it said it was 23 watts max but felt like I still needed more output with this coil but it would not let me go above 23. Instead it went back to 6 watts. Most larger Voopoo devices have an rba mode that lets you set what you want and wish this one had it too because even at 23 watts the vapor from the .6 ohm coil was too cool for me.
The .3 ohm coils was better running at 35 watts with the airflow about 1/3 to ½ open. It provided a bit warmer vapor. Both the .6 and .3 ohm coils produced plenty of vapor. However, I found both coils lacking in the flavor department. I have used many PNP coils and have come to expect pretty good flavor production from them but honestly that was not the case with them on this device. I hate to say this but if I was going to rate the flavor production on the Vinci 3 then I’d probably give it a 6.25 out of 10. It has to be the device since I’ve used these coils on other devices with good results. I tested the .3 ohm coil with Dinner Lady Blackberry Crumble and used Lemon Tart on the .6 ohm coil. In both cases I felt like the flavor was muted compared to other devices I have used these same liquids on.
I felt like the auto draw on the Vinci 3 was similar to other Voopoo devices I’ve tried in the past. Either I had to draw very hard or tighten the airflow control down to ¼ open or less in order to get it to work correctly. A lot of their small pods have great auto draw function but for some reason on the larger devices it has been lacking and needs some work.
I’d like to thank Voopoo and Nical for sending the Vinci 3 for this review. Thanks also to the readers. Below is a link to the website for your viewing pleasure.
VINCI 3-VOOPOO VAPE Spark Your Life
WHAT’S IN THE BOX?
1* VOOPOO VINCI 3 Mod Pod Device
1* VOOPOO VINCI 3 Empty Cartridge 4ml
1* PnP-TW30 0.3ohm Coil
1* PnP-DW60 0.6ohm Coil
1* User Manual
1* Type-C Cable
SPECIFICATIONS:
Size: 101.3*30.5*21.6mm (with cartridge)
Power Range: 5-50W adjustable
Capacity: 4ml
Resistance Range: 0.15-3.0ohm
Output Voltage: 3.2-4.2V
Battery: Built-in 1800mAh
Material: Zinc Alloy + Optical Coating Decorative Sheet
Standard Coils: PnP-TW30 0.3ohm Coil, PnP-DW60 0.6ohm Coil
Compatible Coils: All PnP Coils
Charging: Type-C charging
Color: Carbon Fiber Black, Aurora Red, Carbon Fiber Blue, Aurora Blue, Rose Gold
FEATURES:
1. Supports MTL to DL vaping
2. Mobius airflow system
3. 5-50W adjustable wattage
4. Ultra-precision auto-ignition
INITIAL THOUGHTS:
The packaging for the Vinci 3 is simple but nice. The front has of course the Voopoo and Vinci 3 names in white against a blue background that reminds me of a laser light show or something. It also has a clear viewing window which I like very much so you can see the actual device inside. The back side of the box has the contents list as well as the usual company information and warnings.
The box for the Vinci 3 is opened from the end. The plastic tray holding the device slides out and the accessories and user manual are located under the tray. I personally don’t care for this type of packaging because when you slide the tray out then some of the contents underneath are going to fall out normally. What Voopoo has done to combat this is to put the user manual and all accessories in a clear plastic pouch that must be torn open to remove the contents.
The Vinci 3 kit comes with the .3 ohm coil pre-installed in the pod which is rated for 28-36 watts. The second coil included in the accessory pouch is a .6 ohm coil rated for a maximum of 23 watts according to the writing on the foil pack containing the spare coil. Also included in the kit is a USB-C charging cable to charge the 1800mah internal battery as well as the user manual.
The Vinci 3 has the Voopoo Vinci name printed on one side with the airflow adjustment wheel protruding near the top of the body and a clear viewing window above that which allows the user to see part of the clear pod to monitor the liquid level. It basically allows the user to see the lower half of the pod so when the liquid level nears the bottom of the viewing window then it’s about time to refill the pod. The opposite flat side has the other side of the airflow adjusting wheel which also has the + and – signs so the user can tell where the airflow is set by looking at where the larger tab on the wheel is positioned. Also on this side is the fire button which has a couple different functions. The Vinci 3 can be button fired or can auto draw fire. However, I have found that I need to tighten the airflow quite a bit for the auto draw fire to function properly. The Gene AI name is printed near the bottom indicating the chipset used in this model.
One side of the V3 is marked “Sample” on the one I received but of course will not when you receive a production model. In the picture on the left you can see that this is where the USB-C charging port is located as well as the airflow inlet openings which are a series of four different sized slotted holes. The airflow slots are identical on both sides. The picture on the right shows the location of the display screen also. I will cover the display and functions shortly along with a picture.
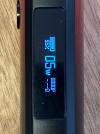
The display screen for the V3 shows the following information when at idle.
- Battery level percentage
- Set wattage
- Puff counter
- Coil resistance
- Total puffs
- Duration of current puff
- Accumulated vaping time in minutes
- Short press the fire button 5X to turn the device on
- Press the fire button 3X and the wattage will flash. From there press the fire button to scroll the set wattage. Once it reaches the top limit then it will round robin to the low setting and climb again. You can either press the button multiple times or press and hold it to fast scroll. Once the desired setting is reached then the display will stop flashing after 5 seconds.
- Press the fire button 5X to enter the menu while the device is on. From there you can choose between button lock (unit only functions with auto draw), Puff clear, or Power off. The V3 does not turn off by pressing the fire button 5X. It only turns it on. To power off, this must be done from the menu.
The 4ml pod for the V3 is a top fill pod like many other smaller pods I’ve seen. You simply push the mouthpiece to one side and the mouthpiece comes off allowing you to fill the pod without removing it from the device. However, the way the viewing window is set up on this device it’s a little hard to see the liquid level until you get almost all the way to the top when filling.
I very much like that the body of the pod is clear allowing you to see the liquid level very easily. The coil that comes pre-installed has a safety seal over it so that it isn’t accidentally fired before filling the pod. This is especially a good idea since this one is button and auto draw fired. There is a rubber gasket over the fill hole and a smaller vent hole on the opposite side. The coils are a simple push in style and due to the pod opening design on the mod the coil needs to stick out quite a bit from the base of the pod.
The pod opening on the device has two magnets as does the bottom of the pod to hold the pod in securely. The spring loaded contacts in the opening are inset fairly deep which is why the coil must protrude quite a bit as I mentioned in order to make contact with the pins. It’s a little hard to see in my picture but the auto draw airflow inlet is at about the ten o’clock position and is raised.
FINAL THOUGHTS:
The Vinci 3 does have some really nice features for such a small pod mod. The 1800mah internal battery seems to last a very long time with the included coils. There was some difference of course between the number of puffs on the .6 and .3 ohm coils but they can be run very close to the same output where it isn’t a huge difference. The Mobius airflow control is a nice touch to have an airflow control on a small device like this is truly a plus. That being said, the way the airflow control wheel sticks out on both sides of the mod takes away from the hand feel and comfort of holding it in my opinion. The liquid viewing window is a good idea and I do appreciate the effort in the design. It really only exposes about the bottom half of the pod so when you get in the center of the viewing window then it’s time to start thinking about filling the pod again. That leads to one more thing that I didn’t really care for. Yes you can remove the mouthpiece and fill the pod without removing it but you really can’t see the liquid level until it gets very near the top since very little of the pod is exposed above the body. Please remember that these are my personal preferences and others may have different opinions. It is nice that the Vinci 3 has variable wattage output and even though it doesn’t have a + and – button, it does scroll through the numbers rather quickly so it only takes a few seconds to adjust the output. I didn’t really care for how it restricts the output depending on the coil resistance. I started using the .6 ohm coil around 20 watts and worked it up. I knew that it said it was 23 watts max but felt like I still needed more output with this coil but it would not let me go above 23. Instead it went back to 6 watts. Most larger Voopoo devices have an rba mode that lets you set what you want and wish this one had it too because even at 23 watts the vapor from the .6 ohm coil was too cool for me.
The .3 ohm coils was better running at 35 watts with the airflow about 1/3 to ½ open. It provided a bit warmer vapor. Both the .6 and .3 ohm coils produced plenty of vapor. However, I found both coils lacking in the flavor department. I have used many PNP coils and have come to expect pretty good flavor production from them but honestly that was not the case with them on this device. I hate to say this but if I was going to rate the flavor production on the Vinci 3 then I’d probably give it a 6.25 out of 10. It has to be the device since I’ve used these coils on other devices with good results. I tested the .3 ohm coil with Dinner Lady Blackberry Crumble and used Lemon Tart on the .6 ohm coil. In both cases I felt like the flavor was muted compared to other devices I have used these same liquids on.
I felt like the auto draw on the Vinci 3 was similar to other Voopoo devices I’ve tried in the past. Either I had to draw very hard or tighten the airflow control down to ¼ open or less in order to get it to work correctly. A lot of their small pods have great auto draw function but for some reason on the larger devices it has been lacking and needs some work.
I’d like to thank Voopoo and Nical for sending the Vinci 3 for this review. Thanks also to the readers. Below is a link to the website for your viewing pleasure.
VINCI 3-VOOPOO VAPE Spark Your Life