Wood veneer on a Chuck (With Pics)

Status
Not open for further replies.

tonypilot7

Senior Member
ECF Veteran
Jun 5, 2009
106
1
Portland, OR
Covering the cone could get tricky because as you apply it, the angle of the grain will change. You might be able to do it it with 2 pieces of veneer.Just apply one piece at a time from the center of the piece out towards the edge. then cut it so its straight. then apply the second piece and cut it to fit the first. The seams would show a lot more because of the way the grain is meeting at an angle but it could look kinda cool that way.
 
Last edited:

Para

Ultra Member
ECF Veteran
Verified Member
Aug 15, 2010
2,812
1,180
Texas
Is this wood material easy to manipulate? I was trying to think of a way to cover the cone too. I guess I will find out soon, as I already ordered some. I like the organic look of the wood, mixed with the technology. I had been thinking about making some kind of wood drip tips, and I am a bit surprised somebody else has not already done so. I am excited to try this project out. I hope I get as decent results as what I have seen here so far. Nice work Ya'll!

Do a search on this forum.....about two weeks ago a member applied veneer to his tube mod and put a hand rubbed finish on it. It looked fantastic and he gave a short tutorial on how to apply it
 

JamBandPhan

Super Member
ECF Veteran
Jan 26, 2010
577
2
OR
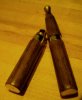
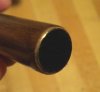
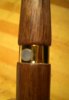
Well, I've been busy while my internet was down yesterday... I really like working with the wood veneer, and found the learning curve to be fairly short. The light colored one is Birch, had trouble with the seam showing on that one, but after some practice, I think I know how to avoid that next time. The med color is Cherry, and the dark color is Walnut. I still have not made one with the red oak that I have seen other's already using, but after this weekend you can bet I will. I am using Minwax PolyShades Stain and Polyurethan in 1. Pecan color. I still had to stain, sand, stain, sand and then stain twice to get the finish I was looking for, but only had to buy one can. I'm impressed with how nice these came out considering I just started this 2 days ago. I spent the most time working on the darker Walnut Riva, Started the Cherry last night, so I need to put more stain on it, and decided to keep the Birch in the rougher stage, since the seam is bad. I might just redo the Birch one...
DSCN4325.jpg
 

Attachments

  • DSCN4308.jpg
    DSCN4308.jpg
    41.1 KB · Views: 75
  • DSCN4314.jpg
    DSCN4314.jpg
    33.7 KB · Views: 66
  • DSCN4316.jpg
    DSCN4316.jpg
    18.2 KB · Views: 73
  • DSCN4317.jpg
    DSCN4317.jpg
    27.5 KB · Views: 63
Last edited:

JamBandPhan

Super Member
ECF Veteran
Jan 26, 2010
577
2
OR
for the seam, I figured out that if you over lap the seam by a couple of mm then sand it down, it works great. I tried >< butting the seam on the Birch one, and it was no good, a gap formed and it looks bad. This veneer is great to work with, and the cone was surprisingly easy to cover. I just made the template larger than the cone and trimmed the ends down after I wrapped it.
 

Gummy Bear

Vaping Master
ECF Veteran
Oct 10, 2010
4,733
11,947
orlando fl
agummybear.deviantart.com
Very nice. Any seam tips?

Overlap a bit and with an exacto knife and a straight edge cut through both layers, then lift up the end and fish out the small piece then press it all together. Even if you get off a bit the two parts will line up because they were cut together.


Dang woodchucks.
 
Status
Not open for further replies.

Users who are viewing this thread