Zmax V3 w/Orchid V4- New to RBA's and got a few coil building questions...

Status
Not open for further replies.

PerilousPersimmon

Full Member
Dec 4, 2014
19
1
UK
Hi all, got a few questions on coil building, as I’ve finally taken the step up to an RBA after spending over a year tinkering and rebuilding with various kanger devices, and I got fed up with leaks, gurgles and nasty silica wicks.


I’ve got a Zmax v3 flat top, with a new orchid V4 which I found for a decent price at black Friday sale over here in the UK (we seem to have adopted black Friday now!) and apparently it’s quite the RBA – potentially as good as a Kayfun?


So, I’ve been running into a few issues with getting the right ohms on my coils and have a few questions:


I’m looking for around 1.5-1.6 ohms as a target, and I have 28ga, 32ga and yesterday I bought some 34ga as I feel I may end up using this as my go-to.


My issues are that the Zmax has a low load cut off of 1.3v. My first build (and lack of knowledge) was two coils built both to 1.8 (working out at .9) so the low load was triggered.


So I spent last night experimenting with steam-engine.org and trying combinations of dual coil twisted/single strand 32ga, and twisted/single 28ga.


Managed to get an overall build to 2ohm, but the coils just weren’t getting hot at all when I wicked them and test fired it with juice…


What combination of gauge/wraps/single or twisted would you use for this RBA?

I can’t go too low in ohms or too thick a guage, and the coil can’t be too big as it’ll touch the chimney as you know... there's not much room in there (that or i'm not used to how small and fiddly these things can be!).


Would twisted 34ga be a good choice? I can do about 7/8 wraps to get a 3ohm coil I believe, which should fit in the chimney nicely but I don’t want to get hot spots or have the wire pop on me :(
Or would I be better trying to sub-ohm this RBA and buying a mech?


Are there any other VV/VW devices capable of dealing lower than 1.3V or will this just run off the battery primarily?


Thanks for all the help and sorry for the long post!
 

State O' Flux

Vaping Master
ECF Veteran
Verified Member
Jul 17, 2013
4,844
4,993
Seattle
I’m looking for around 1.5-1.6 ohms as a target, and I have 28ga, 32ga and yesterday I bought some 34ga as I feel I may end up using this as my go-to.


My issues are that the Zmax has a low load cut off of 1.3v. My first build (and lack of knowledge) was two coils built both to 1.8 (working out at .9) so the low load was triggered.


Are there any other VV/VW devices capable of dealing lower than 1.3V or will this just run off the battery primarily?
Using 1.6mm (1/16") as a mandrel diameter, 2mm as a leg length and 15 watts as your output current...

8 wraps of 34 gauge, or the more preferable 11 wraps of 32 gauge Kanthal A1... will provide a net target resistance of 1.6Ω for dual parallel coils.

Plenty of APVs with output ratings of 20 watts or greater available that will provide adequate current up to 200 plus watts for net resistance values down to less than 0.2Ω. Just a matter of budget, form factor, style and feature content.
 

victoryt71

Full Member
Dec 30, 2014
20
12
Texas
I recently purchased an Orchid V4 to use with my Nemisis. I love the flavor I get from my Plume Veil but lets face it, dripping and driving is not the safest thing in the world, lol. I'm relatively new to the world of mechanical mods and rebuildable attys/tanks and have basically been teaching myself. I got the V4 because the build deck was the same as the Plume Veil and I have the build on that nailed down to my personal tastes...figured I would just do the same build on the V4 and be good to go with a tank full of juice. WRONG. I kept getting the burnt taste from the V4 that others have posted about, I watched enough online videos and duplicated enough builds to realize I was not going to be able to get exactly what I wanted out of my set up by trying to copy someone else's ideal build.

Issue one: The V4 deck is much smaller
Issue two: The juice channels that feed the deck in combination with how you wick can be tricky
Issue three: No matter what tutorials or instruction I followed, I could not get the same flavor from my V4 as I could from my dripper (as advertised by many)

After the third build, the sixth wick variation, and a growing urge to take the Orchid back and throw it at someone I was still getting the burnt taste and had wasted more juice than I felt was exceptable.

My solution: I went back to step one, put my Plume Veil build on the V4 (.5 ohms dual coil id 2mm with 24 gauge kanthal and cotton wicks). I then inserted a fully charged 18650 and vaped until the battery drained to a voltage that eventually eliminated the burnt taste and the V4 started tasting freaking awesome. Removed the battery and checked the voltage (was at 3.4) and double checked the resistance on my V4. Calculated the wattage and amps, recorded them, and determined the resistance I would need to build for to get the same output of flavor with a fully charged 18650. Loving it ever since.

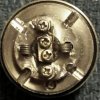
Here is my build (the coils in these pics are not my best work but oh well, it works).

In my case I needed a dual coil setup that would give me .68 ohms. I went with 30 gauge Kanthal so the entire coil would be the same width as the air holes on the deck..came out to a 6/5 wrap.
65w 32.jpg I did not compensate for the extra length of wire needed to center the coil so and ended up with .9 ohms when finish. (will go with 5/4 wrap next time)

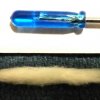
The wicking on this thing is a pain to figure out because you have to be careful not to block the channels or the air holes. I use all natural cotton and boil it to remove any chemicals. I make sure all the strands are running in the same direction as the cotton dries. This is my gauge for consistent wicks with my coils being wrapped at id 2mm. There actually is a use for the little blue screwdrivers!Wick.jpg

Twist each end of your wick and cut it in half to make two wicks that are exactly the same thickness and then trim off the twisted ends once you have them threaded through your coil.Wick 2.jpg

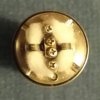
Take yours or your wife's cuticle scissors, lol...the curvature on them match this V4 deck perfectly, and with the scissors pressed against the deck cut completely around the deck removing any cotton that gets in your way. Paint the cotton with some juice and shape it so that the chimney will not catch any of it in the threads when you screw it down. What? A second use for the little blue screwdriver! The diameter of this screwdriver fits perfectly in the juice canals of this deck, use it to press any cotton that finds it's way into the canal firmly against the wall of the channel so the wick does not block the flow of juice.Shaped Wick.jpg

Screw on the chimney all the way down, put the top on, bottom fill through your screw hole, and hold the tank upside down for about two minutes. I do not know why this helps with the initial leakage, but it does. Attach to your mod, blow out any excess that has collected in your chimney while you are heating your coils...vape should be shooting out the sides of your device along with a little bit of juice. Once no juice is leaking you are set.

Note: You may be able to tell in the pictures that I connect the last center lead by wrapping it under the screw head instead of through the hole. This makes using the "opposite posts" much easier when you go to insert the second coil. The V4 screws work fine like this with 30 gauge...not so much with smaller gauge wire.

Hope this helps some of you get rid of the "burnt taste" issue and some of the leakage complaints. It worked for me.
 
Status
Not open for further replies.

Users who are viewing this thread