Hi, Today let's take a look at Wafer 5000 Vape Pod Kit which is a disposable vape sent by Wotofo. In this Test I will examine each of the characteristics that distinguish this item. I hope that at the end of this reading you can understand this product, and therefore decide whether to invest in it or not. As always, my opinions are free and based on my personal experience.
• Enjoy the reading.
► Wotofo Wafer 5000 Vape Pod; Before starting, let's see together some special features indicated by the manufacturer:
• Compact and stylish look with transparent body
• Ergonomic Flat Mouthpiece
• Flavor Mania Provided by Wotofo nexMesh
•Adjustable Airflow
• Big puffs with Compact size - 1100mAh Battery Capacity and 12ml Juice Capacity
► Wotofo Wafer 5000 Vape Pod; Packaging:
From a purely disposable product like this one certainly does not expect a sumptuous package, however the small multicolored box clearly suggests what will be present inside, the package is nice and shows the image of this item with the color and the flavor you will find inside, and other numerous information.
► Wotofo Wafer 5000 Vape Pod; Packing List:
• 1* Wafer 5000 Vape Pod
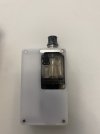
* Once you open the box you will find the device contained in a vacuum sealed bag, the white silicone cap that you can use as protection against dirt infiltration during transport is very useful.
* Wafer 5000 can also be purchased in a maxi pack of 10 pieces.
► Wotofo Wafer 5000 Vape Pod; Specifications:
• Product dimensions: 45.2mm*82mm*24.5mm
• Battery capacity: 1100mAh
• E-Liquid Capacity: 12ml
• Number of shots: up to 5000
• Coil Type: NexMESH Tech mesh coil
• NexMesh coil resistance: 1.1Ω
• Nicotine salt: 50mg/20mg
• Material: Food grade PC
The Wotofo Wafer 5000 Vape Pod features a 12ml e-liquid capacity calculated to achieve around 5,000 Puffs before disposing of the device, meaning you won't have to buy a new vape as often as you would other devices. This makes the Wafer 5000 a great option for those who are always on the go and don't have time for vape shopping.
Wafer 5000 is also equipped with a large 1100mAh battery, which can deliver up to 5000 puffs without recharging. This means that you can use it for a long time without having to worry about running out of power, which is why the Wafer 5000 is able to satisfy all your vaping needs on the go.
► Wotofo Wafer 5000 Vape Pod; Flavor List:
• Blueberry Sour Raspberry
• Strawberry Ice Cream
• Cherry Watermelon
• Cherry Dragon Fruit
• Mango pears
• Watermelon Cantaloupe Honeydew
• Mango Pineapple Juice
• Grape Ice
• Lemon Cola
• Strawberry Lush
• Peach Lychee
• Lychee Ice
You can choose one of the many exotic flavors available with the Wotofo Wafer 5000. The wide range of flavors available includes a range of 12 exotic and delicious flavours. The internal e-liquid level guarantees you the perfect throat hit and surprisingly dense clouds of vapor with every hit. You can choose to enjoy a convenient vaping experience without worrying about refilling with e-liquid and risking making a mess.
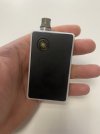
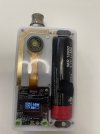
Wafer 5000 is a disposable Mod-Box shaped device with an attractive transparent shell design. The built-in battery and juice tank are visible through the Wafer 5000's clear acrylic casing, this allows you to see every detail of the internal sticker design. Plus you'll realize how compact the Wafer 5000 is once you hold it in your hand. Wotofo Wafer 5000 is so compact that it makes it incredibly easy to carry in your pocket or purse wherever you go.
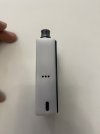
The ergonomic flat mouthpiece adds an elegant look to the device and also makes it more comfortable to use. The flat mouthpiece can fit between your lips and the shape makes it easy to hold between your lips if you need to use your hands for something else. With the adjustable airflow positioned at the bottom, the Wafer 5000 can provide a wider (RDL) or narrower (MTL) draw to suit every vaper's needs.
► Wotofo Wafer 5000 Vape Pod; Vaping Test & Final Conclusions:
I got for this test 10 different devices with 10 different flavors all with Nic 20 which is a bit high value for me as I stopped absorbing nicotine for some time already and I only do it for my tests. I must say that the amount of Nic in these liquids seems to me really right for those who want to quit smoking by starting to vape. All the flavors I have tried have bewitched me because they are really delicious.
• lemon cola:
Fresh and fruity, ideal for hot summer days, with a sparkling mix of Cola and Lemon, the taste we all wanted as children.
• Mango pears:
If you like the taste of pears as much as that of exotic mangoes, a sweet explosion of taste awaits you, which will pamper your palate to fully enjoy this intense flavour.
• Cherry Dragon Fruit:
The sweetness of a well-sweetened cherry, combined with a juicy and tasty Dragon fruit, all well blended.
• Blueberry Sour Raspberry:
The right mix of blueberry and raspberry for tart flavor lovers
• Grape Ice:
A satisfying dose of cooling feels like sipping on a cold can of refreshing grape soda. Grape ice is a fizzy alternative to the usual grape juice.
• Strawberry Lush:
The classic mix of sweet strawberries and deliciously ripe watermelons. Strawberry Lush is the perfect mix of these two famous fruits that create a balanced sweet taste.
• Cherry Watermelon:
Cherry Watermelon is an explosion of a sweet cherry inhale and a fresh watermelon exhale that you are sure to love.
• Strawberry Ice Cream:
Fresh, fruity and sweet liquid. A creamy and delicious liquid with juicy Ripe Strawberries covered with Sugar Cream and a touch of Ice.
• Mango Pineapple Juice:
The juicy taste of pineapple and mango in an absolute balance that ensures you a wonderful trip to a tropical beach.
• Watermelon Cantaloupe Honeydew:
A fresh blend of three melons that offers a sweet, satisfying and invigorating taste

The 1.1Ω resistance of the nexMesh coil is part of the state-of-the-art technology developed by Wotofo Lab, it is the same mesh coil technology used on Wotofo's disposable e-cigarettes and atomizers. nexMesh has amassed huge amounts of positive feedback and a great reputation around the world since it was launched. The flavor produced by nexMesh is phenomenal, it genuinely gives the taste as close as possible to the flavor profile written on the device. The taste recreated by nexMesh is so realistic. It's just like you are actually drinking the juice or eating the fruit or dessert when you vape Wotofo products with nexMesh. This is why vapers who have never tried nexMesh products are always surprised the first time they vape Wotofo products, and this is also why Wotofo fans stay loyal. The coil is very durable and delivers a high puff count, nexMesh can handle all the puffs very well and still gives the same amazing flavor from the first to the last puff. The cooking time is insane, it creates the richest flavor instantly once you hit the roll. Finally, the vapor production is amazing with the airflow open, or you can narrow the flow down for a throat-hitting and extremely satisfying MTL draw. This like all Wotofo disposables with nexMesh are the best choice. Wotofo Wafer 5000 is undoubtedly designed to offer you an unparalleled vaping experience.

Thanks to Wotofo for sending me the Wafer 5000 Vape Pod Kit for this test.
Wafer 5000 is an adjustable airflow disposable device with a unique transparent shell design. It can provide up to 5000 puffs with a huge 1100mAh battery.

www.wotofo.com
Thanks for reading.