2k18 Doggystyle leaking profusely

Status
Not open for further replies.

ChelsB

Vaping Master
ECF Veteran
Verified Member
Dec 12, 2016
7,848
40,892
California
Hello all,
I’m sure this has been discussed before as this is not a new tank, but after doing a search I didn’t find an answer. I also didn’t find much help on YouTube. I just pulled out my 2k18 doggystyle (I think that’s the correct version, it is a top fill) and built and wicked it. It has been so long since I bought this and read up on it, I don’t remember any of the tips and tricks.
As soon as I adjusted the airflow, ejuice started leaking in large amounts out of the holes. Luckily I was able to salvage most of the juice as it was premium juice I just bought from a store (not diy). What did I do wrong? Is it a wicking issue or is something else wrong? Any suggestions are greatly appreciated! Sorry if this has been covered before, but didn’t know where else to ask and I want to get this tank to work.
 

ChelsB

Vaping Master
ECF Veteran
Verified Member
Dec 12, 2016
7,848
40,892
California
Screwdrivers before hammers :wub:

First try it screwed onto a mod tightly:
Try it first without the screwdriver, as the extra grip from rubber gloves may be enough.
View attachment 918151

Attempt A:
Wear a surgical or latex or rubber glove if you have one. .
With the rubber covered hand twist the tank to the right

Attempt B:
Stick a tiny screwdriver into the airflow hole.
Hold the screwdriver in place with one hand -
With the rubber covered hand twist the tank to the right

Attempt C:
Take it off the mod, flip it upside down. Hold the tank with your rubber hand. Stick screwdriver in the airflow hole, and twist the screwdriver to the right.

Attempt D:
Hammer time :grr:

The gloves worked! Yippee!! I used rubber gloves for dishwashing.
Thank you for your excellent ideas! I’m glad I didn’t use the hammer!
 

UncLeJunkLe

ECF Guru
ECF Veteran
Verified Member
  • Nov 29, 2010
    10,543
    2
    28,393
    Clown World, USA
    If no wicking technique solves the leaking issue, there's an air leak somewhere, no doubt about it. Assuming glass (or plastic) tank is not chipped or cracked, it's an oring issue, most likely the top cap oring or the chimney oring or both.

    If you never used these tanks before with success, could be that one of both of these orings shipped with the tank are slightly too thin to do their job. It happens.

    As far as loosening stuck tank parts I use a combination of pliers with a rag to avoid damage & grippy gloves. Also, you can put the tank in the freezer for about 20 minutes. This will contract the parts, even metal, and may allow you to get stuck parts unstuck more easily (but you still may need tools).
     

    AngeNZ

    ShutterBug
    Supporting Member
    ECF Veteran
    Contest Winner!
  • Mar 24, 2018
    10,762
    82,950
    New Zealand
    Thanks for the suggestions. I checked the orings and they seem to be fine. This must be user error, so frustrating that others don’t seem to have the same issues so I know it’s me :-(

    Can you switch to a different 2k18 tank, while using your current build? That may give you an indication if it's a wicking problem, or an o-ring problem.

    Here's my wicking for the 2k18 doggy:
    soggy2k18-jpg.786823

    2k18wickchannel-jpg.786819

    These were using rayon and the tails were thinned. With cotton, I don't thin the tails - just plonk them in the channels, so that the ends spread out under coil deck
     

    AngeNZ

    ShutterBug
    Supporting Member
    ECF Veteran
    Contest Winner!
  • Mar 24, 2018
    10,762
    82,950
    New Zealand
    Any tips on a stuck 2k16 base? I have no leaks on that one but I can’t get the tank section off. I foolishly tried using my sharp wick fluffer as leverage in the air hole; it slipped and cut my finger. I’m wondering if others have had a stuck tank and what they did to fix it?

    Flip it upside down, stick a small screwdriver in the airflow hole and use that as leverage to unscrew it. @Katdarling has a blingy picture of it somewhere ;)
     

    AngeNZ

    ShutterBug
    Supporting Member
    ECF Veteran
    Contest Winner!
  • Mar 24, 2018
    10,762
    82,950
    New Zealand
    I tried to do that but it didn’t work. Hopefully she will post a pic as the freezer didn’t work :-(
    My fingers are very sore from trying to unscrew that thing. I’m worried that it’s totally stuck and I won’t get to use it again. I guess I could try taking a hammer to the plastic tank and breaking the pieces off (That will be my last resort).

    Screwdrivers before hammers :wub:

    First try it screwed onto a mod tightly:
    Try it first without the screwdriver, as the extra grip from rubber gloves may be enough.
    baddoggy.jpg


    Attempt A:
    Wear a surgical or latex or rubber glove if you have one. .
    With the rubber covered hand twist the tank to the right

    Attempt B:
    Stick a tiny screwdriver into the airflow hole.
    Hold the screwdriver in place with one hand -
    With the rubber covered hand twist the tank to the right

    Attempt C:
    Take it off the mod, flip it upside down. Hold the tank with your rubber hand. Stick screwdriver in the airflow hole, and twist the screwdriver to the right.

    Attempt D:
    Hammer time :grr:
     

    Katdarling

    I'm still here on ECF... sort of. ;)
    Supporting Member
    ECF Veteran
    Verified Member
    Jan 25, 2011
    32,572
    167,592
    Utopia
    Flip it upside down, stick a small screwdriver in the airflow hole and use that as leverage to unscrew it. @Katdarling has a blingy picture of it somewhere ;)

    Glad it's all fixed, Ms. Chels.

    Pics nevertheless, just cuzza. But hardly blingy, dahlink! :D

    screwdriver 0822182340.jpg
    0716181834.jpg
    0716181835.jpg
     

    Ryedan

    ECF Guru
    ECF Veteran
    Verified Member
    Mar 31, 2012
    12,869
    19,652
    Ontario, Canada
    I have SJMY 2k16's and have never had any issues with removing the tank section. Never needed to use a screwdriver, rubber gloves (or hands ;)) and never required 'the hammer'.

    In fact I am still on my first clear tank section. The threads are still fine.


    My rule of thumb with every RTA I own --- never tighten any part tighter than finger tight... ever, never.

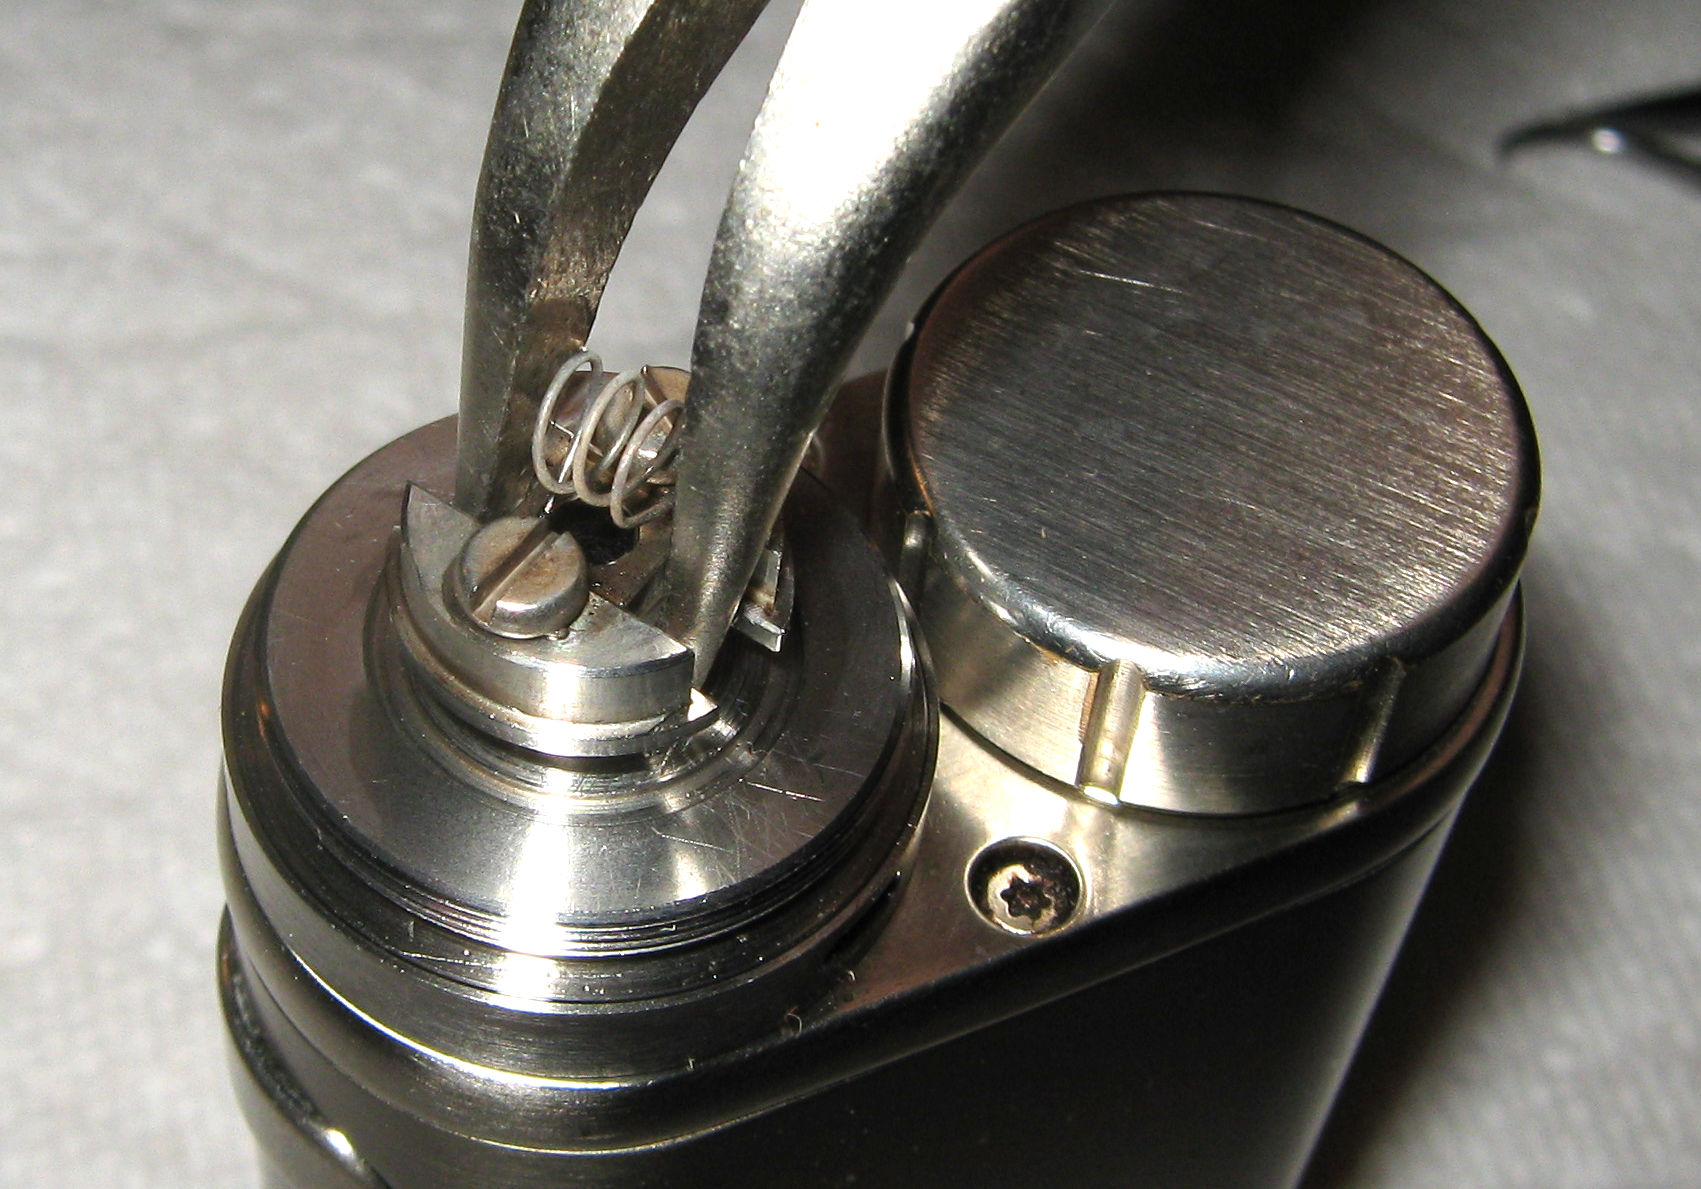
    I live by the same 'finger tight' rule with the vast majority of my vape hardware ShowMeTwice, but my SJMY 2K16 bases get a not so gentle tighten with the tips of a long nose plier in the wick grooves. I found this makes it foolproof for me to take the tank off to refill without having the atty unscrew from my mod. I don't use an O-ring between the clear tank and the base so I need the tank to touch the base, and these tanks get tighter than I want extremely easily. I started doing this soon after beginning to work with my first one and have never had an issue since.

    I appreciate these atties so much I have 12 of them and more spare parts than I'll probably ever need. I'm still using the first one I got about two years ago and have not had to replace anything on it. These are what I use all day at work on a Pico 75 and a couple have been droped on a concrete floor a couple of times. Broke the drip tip once so I vaped it direct from the tank the rest of the day. They've been so dependable, I don't feel the need to have a spare with me :cool:

    BTW, I also really enjoy hammer time :)
     

    Ryedan

    ECF Guru
    ECF Veteran
    Verified Member
    Mar 31, 2012
    12,869
    19,652
    Ontario, Canada
    Pics please, oh Ryedan one?

    Or not. Just keeding.

    No, I'm not. I WOULD like to see what you mean.

    Got time to do so? If that's a no, so be it. I shall not regale you with blingy pleas.

    :D

    I kould not possibly not help out with this oh Blingy one :cool:

    It's been a while since I've posted a pic here, but I'm up for the challenge. I used to use Tiny Pic for pic hosting, but they've been out of the game for a while now. I'm going to try uploading to ECF and posting that here.

    Here goes:


    Well, that seems to work pretty well in the preview :)

    I slip the pliers tips in there as shown and give it an appropriate twist which snugs the whole base down pretty well. As you can see, it can be done and undone with the coil installed.

    Hope that helps Katdarling :)
     

    ChelsB

    Vaping Master
    ECF Veteran
    Verified Member
    Dec 12, 2016
    7,848
    40,892
    California
    I was just looking for a review with a build for you @ChelsB just to get you up and running, sorry it's not in English but there's probably going to be a few more video links as well to chase up on as well. Just to check for consistency in the build, as sometimes there's a bit of variation.

    But if an RTA leaks, it's usually down to wicking. And it can be punishing trying to find the goldilocks zone with the wicking of RTA's.

    But I do hope that you manage to get it to behave and not wet itself.

    Yes, I still struggle with the perfect wick for most RTAs. That’s why I like the Avocado: no matter how I wick it, I don’t get leaks!
     

    Mordacai

    Vaping Master
    ECF Veteran
    Jan 16, 2019
    4,237
    7,634
    UK
    I've found the Taifun Typhoon GT IV (Ulton clone) to not be completely awful with wicking, was an absolute pain to get working with Rayon. As every build video used Cotton, so took about 2 months to get it to behave itself.

    The answer was much shorter tails than if you were using cotton, as in you have to cut level around the juice/liquid control.
     
    Last edited:

    ChelsB

    Vaping Master
    ECF Veteran
    Verified Member
    Dec 12, 2016
    7,848
    40,892
    California
    Can you switch to a different 2k18 tank, while using your current build? That may give you an indication if it's a wicking problem, or an o-ring problem.

    Here's my wicking for the 2k18 doggy:
    soggy2k18-jpg.786823

    2k18wickchannel-jpg.786819

    These were using rayon and the tails were thinned. With cotton, I don't thin the tails - just plonk them in the channels, so that the ends spread out under coil deck

    Good suggestion to try on a different tank; I hadn’t thought of that. Unfortunately I already pulled out the wick so I’ll re-wick. I also used rayon but did not thin the tails. I will try thin tails next and then switch the tank if it leaks. Is this known to be a finicky tank to wick?
    I will keep trying as I have 2 of these and would really like to be able to use them! Thanks very much for the help, I appreciate it!
     

    smacuser

    Total Member
    Supporting Member
    ECF Veteran
    Verified Member
    Contest Winner!
  • Jan 22, 2012
    8,940
    26,772
    Vape Hartwell, GA
    Flip it upside down, stick a small screwdriver in the airflow hole and use that as leverage to unscrew it. @Katdarling has a blingy picture of it somewhere ;)
    Be careful. The one time I tried that, the 2mm air hole became a 3mm :(.
     

    stols001

    Moved On
    ECF Veteran
    May 30, 2017
    29,338
    108,118
    The tank is a pain, yes. But I have plenty of guts. And I think my FT order did finally get here of 10 more tanks to break.

    I personally think the first design is better personally but I LOVE not looking at (and inevitably changing the revolting looking wick every time I fill it and I love the way they look.

    Both probably bad reasons but whomever designed that JFC thing should be taken out and SHOT.
    Anna
     
    Status
    Not open for further replies.

    Users who are viewing this thread