I've seen the same thing on some of mine Teach. It breaks in two real easy, doesn't it? This subject has been debated more than once on other threads and some people believe the wick burns in two. However, if you burn the black out of yours with a torch, you will find that all the wick fibers are still there.Thanks BR and Rocketman,
I agree with what you're saying... but this is what I found when I opened the E2.
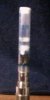
These small fibers are spun together to make thin strands, and as near as I can tell, the black gunk builds up in between them and separates them. Once separated, the wick almost falls apart. Nowadays I torch the wicks often enough so that this does not happen. Notice in the photo that the wick glows red hot, but the fibers do not melt.


")