after reading mamus threads this is what I came up with.
thanks mamue for your threads ! and all who wrote in with so many ideas.
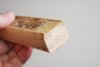
made a wooden plug to lay up carbon fiber sealed and waxed . milled a groove on top to take a strip of formica covered with scotch tape for mold release. wrapped 2 layers ..pressed in formica strip and layed 2 more layers . this forms a groove . trim and cut to length . still working on a better way build boxes and will write about it at a later time.
the top and bottom is corean . the conector is a 510 to ego convertor ...better quality. dis assembled pre heat with pencil torch and soldered to copper clad circuit board. the corean top forms a drip well with the hole cut to exept ego attys . after esemble and test potted in epoxy.
the bottom is another piece of circuit board with a magnet and the ai charger board . oven baked clay for the guide to another slice of corean. the charger is connected to input on dna 20. put a pt fuse in the negative leg from the battery. batterys are two 1200 ma turnagy round cells soldered in parallel . carefull with the tabs ...they gooped them up with silicone looks like it. used exacto knife to gently free them . soldered easy so . put some 5 min epoxy on wiring and wrapped some scotch tape around .
to stabilize the dna20 esembly I used some thin satin weave fiberglass about quarter inch wide wetted w epoxy .. started out a little away from board and massaget it w a toothpick to touch the board ..carefull not to get any epoxy on the holes for the wires. continued to layup on wire bundle till under the glass ...bend back the readout to glue to tranducer. worked out great ..nice and stable to handle.
when ever I mix epoxy and don't use it all I lay up some flat stock of glass between some plastic from cake boxes . for shelvs.
pre wire the board w about 1 inch leads both ends trimmed .
now mounted the board w outside tape to the " shelc " the up down bottons 6 mm switshes 24 gage wire epoxyed to shelv .
easy to remove as a unit . the firing botton is just a tactile switch recessed ...a fiber washer glued on to cover the raw edge of the leather .
now soldered all conections and heat shrink of course .
the big moment ... fire it up !! whouiiiii this vapes nice ...to nice I vaped it for a wile without finishing it..
so what I wanted in this mod was reasonale vape time -ergonomics - get away from menues for sure -hidden switches and charge port. all happy w the dna 20 and battery combination.
now is the time to visit some sign shops for some collored lexan to dress it up could not find any at 1/8 to be flush w the leather .
have funn and ceep on modding


thanks mamue for your threads ! and all who wrote in with so many ideas.
made a wooden plug to lay up carbon fiber sealed and waxed . milled a groove on top to take a strip of formica covered with scotch tape for mold release. wrapped 2 layers ..pressed in formica strip and layed 2 more layers . this forms a groove . trim and cut to length . still working on a better way build boxes and will write about it at a later time.
the top and bottom is corean . the conector is a 510 to ego convertor ...better quality. dis assembled pre heat with pencil torch and soldered to copper clad circuit board. the corean top forms a drip well with the hole cut to exept ego attys . after esemble and test potted in epoxy.
the bottom is another piece of circuit board with a magnet and the ai charger board . oven baked clay for the guide to another slice of corean. the charger is connected to input on dna 20. put a pt fuse in the negative leg from the battery. batterys are two 1200 ma turnagy round cells soldered in parallel . carefull with the tabs ...they gooped them up with silicone looks like it. used exacto knife to gently free them . soldered easy so . put some 5 min epoxy on wiring and wrapped some scotch tape around .
to stabilize the dna20 esembly I used some thin satin weave fiberglass about quarter inch wide wetted w epoxy .. started out a little away from board and massaget it w a toothpick to touch the board ..carefull not to get any epoxy on the holes for the wires. continued to layup on wire bundle till under the glass ...bend back the readout to glue to tranducer. worked out great ..nice and stable to handle.
when ever I mix epoxy and don't use it all I lay up some flat stock of glass between some plastic from cake boxes . for shelvs.
pre wire the board w about 1 inch leads both ends trimmed .
now mounted the board w outside tape to the " shelc " the up down bottons 6 mm switshes 24 gage wire epoxyed to shelv .
easy to remove as a unit . the firing botton is just a tactile switch recessed ...a fiber washer glued on to cover the raw edge of the leather .
now soldered all conections and heat shrink of course .
the big moment ... fire it up !! whouiiiii this vapes nice ...to nice I vaped it for a wile without finishing it..
so what I wanted in this mod was reasonale vape time -ergonomics - get away from menues for sure -hidden switches and charge port. all happy w the dna 20 and battery combination.
now is the time to visit some sign shops for some collored lexan to dress it up could not find any at 1/8 to be flush w the leather .
have funn and ceep on modding
Last edited: