Part 1
The Gogo finds it’s strength in the cartomizer design. The horizontal coil allows a user to remove all the filler from the gocart without disturbing the atomizer. This means that factoring the already long, initial usage of the gocart, one can thoroughly inspect, recondition and reuse the gogo carto. Over and Over.
The first step with reconditioning the gocart is to wet the gocart in question under tap water. I actually soak the gocart in a bowl of water to thoroughly wet them from tip to end. You will find that the filler is much easier to handle when wet. Trying to remove dry filler or partially wet filler can result in pulling out the center tube and the filler sticking together and ruining the gocart completely (ask me how I know). After the gocart is completely soaked, do the following.
1. Using a pair of needle nosed pliers, Remove the filler. It will keep it’s shape as a tube. If you’ve soaked it well, the material will separate well. If you have an ultrasonic cleaner, use vodka and clean the empty carto just as you would any atty. I run the empty gocarts through 5 cycles of 3 minutes each using Vodka in a Bogue, 42,000 cycle Ultrasonic cleaner, then rinse with water. If not, run the carto under hot tap water for 5 minutes to flush out all residual. Shake the carto well to dry.
2. While the carto dries, unroll the filler. You will notice that there is an inner wrap of cotton batting and a thicker, outer wrap of polyfil material. Flatten out the polyfil and unroll the cotton batting. Clean thoroughly under hot water until white. Spread both, evenly on a kitchen or paper towel.
3. Go back to your empty carto and blow through it to insure it’s dry. Screw onto battery and push the button while you look down the empty carto. Hold the button down looking for a cherry red glow to the coil at the bottom. This is dry burning. You may have to dry burn 3 or 4 times to remove any caramelizing from the coil. Once you have a cherry red glow from your coil, you know you have a good, clean atomizer for your gocart. Rinse out any ash. All that remains is to reinsert the filler properly and you have a brand new gocart. This is where most have been having problems.
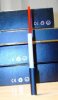
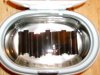
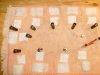
Picture 1 shows you the cartos in the ultasonic cleaner after the filler has been removed.
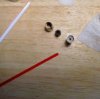
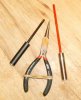
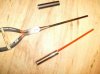
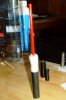
Picture 2 shows you the tools you will need for your job
red or black cocktail straws.Red ones from Bars work very good for 90% of the gocarts(The black ones from coffee stirrers from quick stop markets work best if the center tube is oversize as they are more flexable and can be widened if necessary, as you shall see) Tweezers will work but needle nose pliers are the perfect tool for this job.
[/INDENT]
The Gogo finds it’s strength in the cartomizer design. The horizontal coil allows a user to remove all the filler from the gocart without disturbing the atomizer. This means that factoring the already long, initial usage of the gocart, one can thoroughly inspect, recondition and reuse the gogo carto. Over and Over.
The first step with reconditioning the gocart is to wet the gocart in question under tap water. I actually soak the gocart in a bowl of water to thoroughly wet them from tip to end. You will find that the filler is much easier to handle when wet. Trying to remove dry filler or partially wet filler can result in pulling out the center tube and the filler sticking together and ruining the gocart completely (ask me how I know). After the gocart is completely soaked, do the following.
1. Using a pair of needle nosed pliers, Remove the filler. It will keep it’s shape as a tube. If you’ve soaked it well, the material will separate well. If you have an ultrasonic cleaner, use vodka and clean the empty carto just as you would any atty. I run the empty gocarts through 5 cycles of 3 minutes each using Vodka in a Bogue, 42,000 cycle Ultrasonic cleaner, then rinse with water. If not, run the carto under hot tap water for 5 minutes to flush out all residual. Shake the carto well to dry.
2. While the carto dries, unroll the filler. You will notice that there is an inner wrap of cotton batting and a thicker, outer wrap of polyfil material. Flatten out the polyfil and unroll the cotton batting. Clean thoroughly under hot water until white. Spread both, evenly on a kitchen or paper towel.
3. Go back to your empty carto and blow through it to insure it’s dry. Screw onto battery and push the button while you look down the empty carto. Hold the button down looking for a cherry red glow to the coil at the bottom. This is dry burning. You may have to dry burn 3 or 4 times to remove any caramelizing from the coil. Once you have a cherry red glow from your coil, you know you have a good, clean atomizer for your gocart. Rinse out any ash. All that remains is to reinsert the filler properly and you have a brand new gocart. This is where most have been having problems.
Picture 1 shows you the cartos in the ultasonic cleaner after the filler has been removed.
Picture 2 shows you the tools you will need for your job
red or black cocktail straws.Red ones from Bars work very good for 90% of the gocarts(The black ones from coffee stirrers from quick stop markets work best if the center tube is oversize as they are more flexable and can be widened if necessary, as you shall see) Tweezers will work but needle nose pliers are the perfect tool for this job.
[/INDENT]
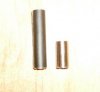
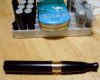
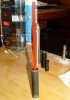
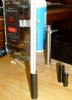
Picture 3 shows the filler unrolled and laid out after initial cleaning.
Some will be cleaned again as you can see. Just run the filler under hot tap water until all the old juice is out and it is white and clean. Note the small cotton piece that is wrapped around the center tube when in the gocart it must stay with the gocart when refilling for proper wicking. The empty gocarts are clean and drying next to their respective fillers.
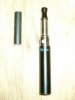
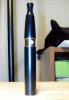
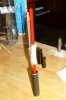
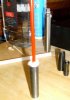
Picture 4 shows the black straw being flared with the tip of the needle nose to accomodate an oversized centertube.
Part 2 continues in next thread.
Some will be cleaned again as you can see. Just run the filler under hot tap water until all the old juice is out and it is white and clean. Note the small cotton piece that is wrapped around the center tube when in the gocart it must stay with the gocart when refilling for proper wicking. The empty gocarts are clean and drying next to their respective fillers.
Picture 4 shows the black straw being flared with the tip of the needle nose to accomodate an oversized centertube.
Part 2 continues in next thread.
")