
Hey guys,
Though I'de take 15 minutes out of my day to share with you how I rebuild my 510 carts with lipton's great pyramid style teabags. This filling as been working great for me! It holds alot more liquid and took care of that wierd plastic taste I got from using the standart polyfiber material included on stock carts. I'll try to explain myself as best I can but keep in mind I'm french. They say an image is worth 1000 words but my Aspire One's webcam is only worth about 500...still here's the breakdown of how I do this.
Step 1:

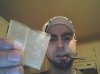
Go out and buy it...should be quite simple lol. This is the kind I got, any grocery store should carry these. Got mine at 2.49$ CND for a pack of 20.
Step 2:

Cut along the seem where the string is attached and empty the contents of the teabag. (or eat it whichever)
Step 3:

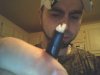
Fold about a mm of the material to give yourself a head start on rolling the thing up. I like to roll it real tight on the first half and then go a little looser. (<- is that a real word lol?) This part is what can be a little tricky, but nothing that'll waste 24h of your time really. If you roll it up too tight you wont be able too hold as much liquid or worst, you'll think you can by filling those air pockets with juice which will just run right out flooding your atomizer when you flip the cart upside down lol. On the other side, too loose and they just wont fit inside the cart.
Step 4:

Fold your rolled up material in half lenghtwise and jam it in the cart. It should give a little resistence on its way in. If it just falls in there its too loose, in that case take it out and let it unroll itself a tad bit and try again.
Step 5:

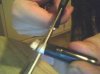
Push the material all the way in then gently pull it back out about 2mm. You want to cut the exess material but not flush with the cart. If you take a look inside your atomizer you'll notice a little arch. This arch needs to have "some" pressure on the cart filling to have a good wicking effect but not too much or again, when you'll put your cart on your atty with too much pressure it will squeeze out alot of liquid in one shot and flood your atty. Here's another picture of what it looks like done and inserted back in.

About 1.5 - 2mm looks about right. If its too deep in there you'll simply notice that you wont run your cart as dry. I drop a single drop at the time on one side of the filling leaving a little spot dry to let the air flow up and watch how the fillng absorbs it. Once it starts pooling at the top I empty by dropper and suck out the exess. You want the filling to hold the liquid, not the cart haha.
Well folks that's about as much detail as I can give about this simple mod. Seriously I think I might've over complicated the thing, it takes me about a minute to build a cart now. Just keep a spare atty and cart set in case you manage to mess things up.
I'll also attach the images in case imageshack messes up.
Have fun!
Though I'de take 15 minutes out of my day to share with you how I rebuild my 510 carts with lipton's great pyramid style teabags. This filling as been working great for me! It holds alot more liquid and took care of that wierd plastic taste I got from using the standart polyfiber material included on stock carts. I'll try to explain myself as best I can but keep in mind I'm french. They say an image is worth 1000 words but my Aspire One's webcam is only worth about 500...still here's the breakdown of how I do this.
Step 1:
Go out and buy it...should be quite simple lol. This is the kind I got, any grocery store should carry these. Got mine at 2.49$ CND for a pack of 20.
Step 2:
Cut along the seem where the string is attached and empty the contents of the teabag. (or eat it whichever)
Step 3:
Fold about a mm of the material to give yourself a head start on rolling the thing up. I like to roll it real tight on the first half and then go a little looser. (<- is that a real word lol?) This part is what can be a little tricky, but nothing that'll waste 24h of your time really. If you roll it up too tight you wont be able too hold as much liquid or worst, you'll think you can by filling those air pockets with juice which will just run right out flooding your atomizer when you flip the cart upside down lol. On the other side, too loose and they just wont fit inside the cart.
Step 4:
Fold your rolled up material in half lenghtwise and jam it in the cart. It should give a little resistence on its way in. If it just falls in there its too loose, in that case take it out and let it unroll itself a tad bit and try again.
Step 5:
Push the material all the way in then gently pull it back out about 2mm. You want to cut the exess material but not flush with the cart. If you take a look inside your atomizer you'll notice a little arch. This arch needs to have "some" pressure on the cart filling to have a good wicking effect but not too much or again, when you'll put your cart on your atty with too much pressure it will squeeze out alot of liquid in one shot and flood your atty. Here's another picture of what it looks like done and inserted back in.
About 1.5 - 2mm looks about right. If its too deep in there you'll simply notice that you wont run your cart as dry. I drop a single drop at the time on one side of the filling leaving a little spot dry to let the air flow up and watch how the fillng absorbs it. Once it starts pooling at the top I empty by dropper and suck out the exess. You want the filling to hold the liquid, not the cart haha.
Well folks that's about as much detail as I can give about this simple mod. Seriously I think I might've over complicated the thing, it takes me about a minute to build a cart now. Just keep a spare atty and cart set in case you manage to mess things up.
I'll also attach the images in case imageshack messes up.
Have fun!


")
