Making An E-Pipe.

Status
Not open for further replies.

Mstr Mashnst

Unregistered Supplier
ECF Veteran
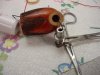
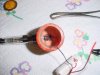
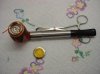
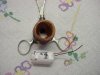
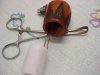
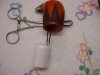
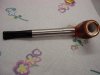
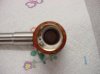
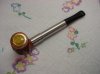
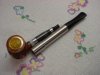
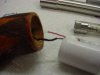
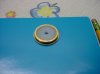
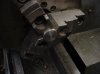
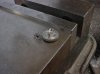
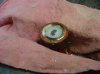
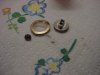
Next was the ground wire on the battery adaptor. Drilled a small hole on the shoulder. Filled the hole with silver solder and put a black wire in it. I tined the black wire first. Now I have power and ground up to my battery holder. I want to stop by, get a small red LED and find a switch that will work. I still just might make my own switch if it comes down to that. Was able to touch the red wire to the pos of the battery and give it a test smoke. It worked very well. Can't wait to try a dual coil tank on it.:D
 

Attachments

  • Pipe Build 6 008.jpg
    Pipe Build 6 008.jpg
    21.1 KB · Views: 66
  • Pipe Build 6 009.jpg
    Pipe Build 6 009.jpg
    23 KB · Views: 69
  • Pipe Build 6 010.jpg
    Pipe Build 6 010.jpg
    22.1 KB · Views: 72
  • Pipe Build 6 011.jpg
    Pipe Build 6 011.jpg
    22 KB · Views: 75

Mstr Mashnst

Unregistered Supplier
ECF Veteran
Had to have my monthly blood work done today. As I was sitting in the waiting room, with 100 other people, I was drawing pictures of a switch for the top of my pipe. I think I have come up with something that just might work. I was also thinking if I just cut my own throat and bleed out there in the lab office, they would have thier blood , I could get out of there faster. Had a few details on that last part to work out. Waited my turn and then went and pick up a LED. Had to put a 47 ohm res on it to make it work. Came home and glued in the battery adaptor. Soldered in the LED and glued all the wires down. Also glued the wires in the bottom of the bowl. Tomorrow I can solder the two leads together and install the battery holder.
 

Attachments

  • Pipe Build 7 001.jpg
    Pipe Build 7 001.jpg
    22.1 KB · Views: 54
  • Pipe Build 7 002.jpg
    Pipe Build 7 002.jpg
    21.7 KB · Views: 57

Mstr Mashnst

Unregistered Supplier
ECF Veteran
All the glue dried so it was time to put it all together. Soldered the two wires together and pushed the battery holder down into the bowl. Then I put a little glue on the brass ring and pushed it in on top of the battery holder.
 

Attachments

  • Pipe Build 8 001.jpg
    Pipe Build 8 001.jpg
    22 KB · Views: 47
  • Pipe Build 8 002.jpg
    Pipe Build 8 002.jpg
    21.8 KB · Views: 46
  • Pipe Build 8 003.jpg
    Pipe Build 8 003.jpg
    21.4 KB · Views: 47
  • Pipe Build 8 004.jpg
    Pipe Build 8 004.jpg
    21.6 KB · Views: 51

Mstr Mashnst

Unregistered Supplier
ECF Veteran
Needed to put a little black paint on the tank shield. I just painted the part that stepped down to the mouth piece. That left a bare end on it. Had to work on the mat in the paint to match the mouth piece. It is close, may work on it a little more. I like the looks of it however, almost done with this pipe.:D:D
 

Attachments

  • Pipe Build 8 005.jpg
    Pipe Build 8 005.jpg
    21.4 KB · Views: 51
  • Pipe Build 8 006.jpg
    Pipe Build 8 006.jpg
    21.9 KB · Views: 49
  • Pipe Build 8 008.jpg
    Pipe Build 8 008.jpg
    21.4 KB · Views: 52
  • Pipe Build 8 009.jpg
    Pipe Build 8 009.jpg
    21.5 KB · Views: 46

Mstr Mashnst

Unregistered Supplier
ECF Veteran
Now the second Ah S#$%. After I got it all put together I though I would give it a test. I shorted a wire across the contact point. The red LED came on put no vap. A quick volt test and no power to the battery adaptor. The glue was still soft so I was able to pop it apart. When I stripped the wire for soldering I nicked the copper. As soon as I pushed it into the bowl with a twist, it broke. It was a quick fix but made my heart stop for the count of five. With my heart that's a bad thing. All good now, was able to vap it like a two stroke dirt bike. Last thing to do is the switch, then.:vapor::vapor:
 

Attachments

  • Pipe Build 8 007.jpg
    Pipe Build 8 007.jpg
    20.9 KB · Views: 40

Mstr Mashnst

Unregistered Supplier
ECF Veteran
Making the switch turned out to be a little harder then one would think. Started out by turning an insulator out of UHMW. It was a press fit to the threaded inside ring. You can not epoxy UHMW to anything so, I cut notches in the back side and filled them with epoxy. The epoxy will stick to the brass after it was cleaned real good. The UHMW will not turn or come out.
 

Attachments

  • Pipe Build 9 001.jpg
    Pipe Build 9 001.jpg
    19.7 KB · Views: 42
  • Pipe Build 9 002.jpg
    Pipe Build 9 002.jpg
    21.6 KB · Views: 47
  • Pipe Build 9 003.jpg
    Pipe Build 9 003.jpg
    21.1 KB · Views: 45
  • Pipe Build 9 006.jpg
    Pipe Build 9 006.jpg
    20.7 KB · Views: 43
  • Pipe Build 9 007.jpg
    Pipe Build 9 007.jpg
    19.8 KB · Views: 46

Mstr Mashnst

Unregistered Supplier
ECF Veteran
Next was to turn the button. I faced it off and rounded the top a little. Then I put it in the mill to make the other end long and skinny. It also was dilled and tapped for a screw.
 

Attachments

  • Pipe Build 9 009.jpg
    Pipe Build 9 009.jpg
    21.8 KB · Views: 43
  • Pipe Build 9 011.jpg
    Pipe Build 9 011.jpg
    20.7 KB · Views: 46
  • Pipe Build 9 012.jpg
    Pipe Build 9 012.jpg
    21.2 KB · Views: 52

Mstr Mashnst

Unregistered Supplier
ECF Veteran
The last part was to cut a slot to match in the UHMW insulator. Then put the screw in the back to hold it together. Now I can screw it on and the spring under the battery will hold it up. When I push down on the button it makes contact with the brass ring and completes the circut. The last part is to put it all together and try it out.
 

Attachments

  • Pipe Build 9 013.jpg
    Pipe Build 9 013.jpg
    21.5 KB · Views: 56
  • Pipe Build 9 014.jpg
    Pipe Build 9 014.jpg
    22.2 KB · Views: 57
  • Pipe Build 9 015.jpg
    Pipe Build 9 015.jpg
    22.1 KB · Views: 55
  • Pipe Build 9 016.jpg
    Pipe Build 9 016.jpg
    21.7 KB · Views: 60
  • Pipe Build 9 017.jpg
    Pipe Build 9 017.jpg
    22 KB · Views: 57

Mstr Mashnst

Unregistered Supplier
ECF Veteran
What can I say, it works. I think the button is to big and it stands off of the brass ring to much. But you know what, I'm just going to leave it the way it is and enjoy it for a while. It was a fun build and I hope everyone enjoyed it. I learned a lot from this build that I will take to the next pipe build. Until then, thank you.:D:D:D:vapor:
 

Attachments

  • Pipe Build 9 018.jpg
    Pipe Build 9 018.jpg
    19.8 KB · Views: 43

asdaq

Vaping Master
ECF Veteran
Verified Member
Feb 23, 2010
4,570
1,845
poland, and the brassy lands of google
Very nice build from start to finish and the pics along the way are greatly appreciated. I find my hands are too dirty to handle the camera in this part. As I understand it, the spring on the other end of the battery assures the return for the switch and so the whole battery moves with the button press? It looks like you could fairly easily grind off a bit of the button nubs for a shorter throw. The size of the button itself looks just fine IMO.
 

Mstr Mashnst

Unregistered Supplier
ECF Veteran
Very nice build from start to finish and the pics along the way are greatly appreciated. I find my hands are too dirty to handle the camera in this part. As I understand it, the spring on the other end of the battery assures the return for the switch and so the whole battery moves with the button press? It looks like you could fairly easily grind off a bit of the button nubs for a shorter throw. The size of the button itself looks just fine IMO.

You're correct about the battery ground spring moving the whole battery up to open the switch. As far as making any changes to this pipe, it is what it is. I like the switch idea and I think this winter I'm going to make an injection mold for the parts. I have eight people that want me to make them pipes. Going to make the button fit down inside the bowl flush, black and look like tobacco. I should be able to do the mouth piece and the pos post insulator all at the same time. Not something I want to do full time but, it would be fun to do a few more.
 

Burnie

The Bug Man
ECF Veteran
Verified Member
Jul 1, 2009
5,562
18,195
Sunny Florida
So I was able to spend half the afternoon working on my pipe. My 601 e-pipe gave up the ship so I cut it apart to see if there was any useable parts in it. I found a few that should work. It turned out that the board was bad. I had it for a year and I vaped it almost every day. I took 32 pictures today as I was working. I'm going to have to do a few post and cut some out.

Thanks for the pictures. I am modding one of my 601 pipes and putting a 510 connector on it, but leaving the battery holder part in tact. I have removed the atomizer and just have the 4 wires coming out of the hole. Have to figure out a switch for the stem and how to center the 510 connector. Your build let me see inside without having to destroy my pipe. Thank You again for the pictures. Your pipe is Awesome, Great Job...

Vape On
:vapor:
 
Status
Not open for further replies.

Users who are viewing this thread