
A cheap, nicely anodized aluminium tube can be found in the shape of a standard simple bicycle pump that can be cut to size. Ideal for a minimalist style mod along madog lines. Saw these today and thought i would share ...
You are using an out of date browser. It may not display this or other websites correctly.
You should upgrade or use an alternative browser.
You should upgrade or use an alternative browser.
My DIY - DSE901 - MAGNUM POWER
- Thread starter madog
- Start date
- th_trl_thread_readers 0
- Status
- Not open for further replies.
hmmmmm, this seems like quite an interesting thread, i might just have to give this a try when my first battery dies. i dont even have my first 901 yet, should be getting here by friday. i was seriously thinking about getting the screwdriver for the added battery life but this seems like a much cheaper alternative. i can just imagine myself with a massive army of batteries and chargers for this. i might in fact try it with the AA batteries at first because i have a bunch of rechargables already, but i suspect that the reason the atomisor lasts so much longer is because of the higher voltage vaping the liquid more effectivley.
Quick question. Do i have to Unsaulder the spring on the circuit board? or can i just go into the spring with my saulder and get that middle bulb off? kinda dont want to take the spring off if it will fry my circuit board. if i dont saulder it correctly.(im not very good) and plus i dont have a fancy voltmeter reader thingy. its around 4 minutes into the DiY VIDEO. is what im talking about.
Also for the disk u made can i just use a copper washer? instead of going through all that hassle? thanks
Also for the disk u made can i just use a copper washer? instead of going through all that hassle? thanks
Last edited:
Quick question. Do i have to Unsaulder the spring on the circuit board? or can i just go into the spring with my saulder and get that middle bulb off? kinda dont want to take the spring off if it will fry my circuit board. if i dont saulder it correctly.(im not very good) and plus i dont have a fancy voltmeter reader thingy. its around 4 minutes into the DiY VIDEO. is what im talking about.
Also for the disk u made can i just use a copper washer? instead of going through all that hassle? thanks
as to the unsoldering of the spring.. it's going to be easier for you to unsolder/resolder th spring that to try to remove the center led without doing so.. as one of the led prongs is in the same lump of solder that holds the spring to the circuit board...
as to the voltometer... i also do not own one or have one to borrow from a friend.. buti DID find a neat trick.. since whilst making the mod you are in a constant state of memorizing your positive negative lead points.. i found that you can use one of the removed LED to make the connection points and make sure they are working while working on the mod.. if there is a shortage caused by improper soldering or such... it will become obvious as the led will notlight up
")
dunno for sure on the washer thing... was gonna look into that myself soon
A cheap, nicely anodized aluminium tube can be found in the shape of a standard simple bicycle pump that can be cut to size. Ideal for a minimalist style mod along madog lines. Saw these today and thought i would share ...
Do you have a link/pic?
found a nice easy flashlight to mod... coleman max .. it already uses two CR2's so the only modding I had to do was to the "head" of the flashlight..
walmart.com/catalog/product.do?product_id=10196614
I used a 901 as the PV
walmart.com/catalog/product.do?product_id=10196614
I used a 901 as the PV
Oh you can go to my profile and look at my photos to see the finished MOD
Hey Maddog your mod is awesome. Do you have an electrical diagram and what atomizer are you using?
Thanks
Jeff
Thanks
Jeff
I didn't unsolder the spring, and all the LED's came off fine. Maybe I got a fluke? These chinese made things aren't very consistent! Now tonight is the hard part, making the tire-valve connection and putting everything together. Between school and work I don't have enough time to play with stuff....
- Deleted by Oliver
Hey Maddog your mod is awesome. Do you have an electrical diagram and what atomizer are you using?
Thanks
Jeff
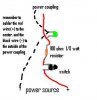
I really wish I could remember who posted this diagram, but maybe this will help. The power source is you battery; the power coupling is the part that screws into your atomizer. Center conductor is '+' and threaded part is '-'. The Magnum mod uses a 901 atomizer; my version uses 801 atomizers.
Attachments
So the resistor goes between the switch and the coupling. I thought the power positive lead goes directly from switch to the coupling and the resistor and Led was in parallel off the switch. Am I reading that correctly?
found a nice easy flashlight to mod... coleman max .. it already uses two CR2's so the only modding I had to do was to the "head" of the flashlight..
walmart.com/catalog/product.do?product_id=10196614
I used a 901 as the PV
Can you explain what you did? This is more my speed, something simple yet effective.
The way I wire mine: the resistor and led (in series) are parallel to the atomizer.
Positive side:switch Normally Open contact wired to resistor lead (not the lead of resistor that goes to LED) and center of connector for atomizer.
Minus Side: Directly to minus (negative) end of led and threaded part of your connector for the atomizer.
The LED is just an indicator that the switch is closed and you have power to your device. It does not indicate that there is power to atomizer.
I have simplified all of my latest mods to just have a switch and batteries or switch and direct power(USB or 5V power wall device)- no LED.
Hope this helps and does not add to anyone's confusion.
Gosh darnit me and my dad can't figure it out. were using the Harborfriehgt flashlight and the napa tire valve, only my dad gets confused because Madogs video is a different valve. I've been trying to get this for a week now and can't do it. Anyone willing to do mine for me for some money? I'll even give you the extra flashlight I have. If not, I might just buy a penstyle and be done with it.
Madog, love the video you did a great job. I am having trouble finding the switch you used can you please list the radio shack part# for me?
Thank you
Thank you
OMG my Mcguyver hubby will love this thread,...LOL... Thanks Maddog for the awesome video & Thanks everyone else for all your input
I can see a custom job looming in the near future! ... hmm maybe a pink one for me? LOL
I can see a custom job looming in the near future! ... hmm maybe a pink one for me? LOL
So, I'm a newbie - but I'm also an engineer - and I'm interested in building something. I'd like it to have long battery life, but also small size. What do you guys think of nimh batteries?
ww.fotoconnection.com/p34679-power-2000-4-pack-2700-mah-nickel-metal-hydride-rechargeable-aaa.html
ww.fotoconnection.com/p34679-power-2000-4-pack-2700-mah-nickel-metal-hydride-rechargeable-aaa.html
madog.. i have a question.. will the dse901 wall outlet charger charge the batterys in the magnum or do you have to hook up the batterys spacifically made for them?
im sorry what i ment was can the magnum be hooked up to the dse901 wall charger or do you have to take the batterys out and charge them in the charger spacifically ment for the batterys..
if the dse901 can charge it then what i can do is extend the stem maybe 1 inch out of the magnum im building so that is can just screw it in.. if not i will keep the *connection short like the original..
**the connection im referring to is the old battery side connection
if the dse901 can charge it then what i can do is extend the stem maybe 1 inch out of the magnum im building so that is can just screw it in.. if not i will keep the *connection short like the original..
**the connection im referring to is the old battery side connection
im sorry what i ment was can the magnum be hooked up to the dse901 wall charger or do you have to take the batterys out and charge them in the charger spacifically ment for the batterys..
if the dse901 can charge it then what i can do is extend the stem maybe 1 inch out of the magnum im building so that is can just screw it in.. if not i will keep the *connection short like the original..
**the connection im referring to is the old battery side connection
Nah, it uses completley different batteries. All the magnum is replacing the crappy "stock" batteries with rechargable Cr2s, superhcharged and longer lasting power
If you want more vapor, longer lasting batteries and easily attainable batteries, do this mod. If your technically challenged its difficult to do, even my dad can't figure it out completley.- Status
- Not open for further replies.
Similar threads
- Replies
- 22
- Views
- 35K
Users who are viewing this thread
Total: 2 (members: 0, guests: 2)