Resistance-No Resistance wire welder

Status
Not open for further replies.

Vapid1

Full Member
Verified Member
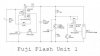
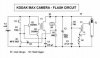
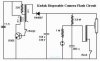
I have noticed that different people are working with different circuits. I have found the following schematics, and it seems like the fuji has a charge button that you need to hold, while the Kodak has a one touch charge button that you can release, and the charging continues.

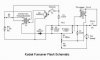
There also seems to be two schools of though on how to get the correct voltage. The fuji boards can "pulse" to get the desired voltage, checked on a meter. The Kodak models, which I'm currently using, needs to be regulated. Some kodaks use a Zener Diode, and I'm working on varying the value of this, to have the voltage regulated at a predetermined value. A led, with proper resistors, can serve as a indicator that the cap is charged, and ready to weld.

For simplicity, and not needing a meter, I'm currently working on the Kodak Zener boards. I'd like to give some of these to friends, and can't afford to give away meters....

More info to follow...
 

Vapid1

Full Member
Verified Member
Schematics
 

Attachments

  • ImageUploadedByTapatalk HD1358578687.923782.jpg
    ImageUploadedByTapatalk HD1358578687.923782.jpg
    19.5 KB · Views: 102
  • ImageUploadedByTapatalk HD1358578718.709234.jpg
    ImageUploadedByTapatalk HD1358578718.709234.jpg
    21 KB · Views: 79
  • ImageUploadedByTapatalk HD1358578737.131777.jpg
    ImageUploadedByTapatalk HD1358578737.131777.jpg
    19.4 KB · Views: 83
  • ImageUploadedByTapatalk HD1358578764.471136.jpg
    ImageUploadedByTapatalk HD1358578764.471136.jpg
    19.5 KB · Views: 82
  • ImageUploadedByTapatalk HD1358578827.872593.jpg
    ImageUploadedByTapatalk HD1358578827.872593.jpg
    20.3 KB · Views: 70

dsy5

Ultra Member
ECF Veteran
Verified Member
Nov 18, 2010
1,632
1,355
New York
Since we're sharing pictures of the box, I thought I would share mine...

weldbox.jpg

Charge button on left; discharge button on right. Alligator clip removable to use standard leads. Fuji board with (1) 330µF cap and a 10kΩ resistor in series to slow the charge rate, thus avoiding over-shoots.
 
Last edited:

dsy5

Ultra Member
ECF Veteran
Verified Member
Nov 18, 2010
1,632
1,355
New York
I've been toying with the idea of using a comparator 741 op-amp with 4 pots and a 4 position selector switch. The op-amp would drive a MOSFET to charge the cap and would cut off when a voltage determined by the pots was reached. It would require a 9 V battery and an additional board, so it would not fit in the original box, though, since it's fairly packed now.

The pots could be adjusted to different voltages and chosen with the selector switch.

But, as breaktru has said before, it is easy enough to tap the charge switch a few times. I may just breadbord the circuit to see if it could work...
 

breaktru

Vaping Master
ECF Veteran
Verified Member
Since we're sharing pictures of the box, I thought I would share mine...
Charge button on left; discharge button on right. Alligator clip removable to use standard leads. Fuji board with (1) 330µF cap and a 10kΩ resistor in series to slow the charge rate, thus avoiding over-shoots.
Congrats! Nice and simply. It's all we need.
 

TBinAZ

Ultra Member
ECF Veteran
Verified Member
Jun 6, 2012
1,628
1,340
Mesa
Needs an LED module to make it self-contained. Nice one, dsy5. I'm going to see what I can fit in mine for an LED. Should work. I really like that 10k in series.

I think I got it through my thick skull that less voltage is needed to melt the silver to the Kanthal, and not melt the two together. Still not sure why it was working for me for a day.

Congrats! Nice and simply. It's all we need.
 
Last edited:

dsy5

Ultra Member
ECF Veteran
Verified Member
Nov 18, 2010
1,632
1,355
New York
I have been using pure nickel wire - it welds very well to Kanthal and Nichrome. I have some silver, but it is 24 ga and a little thick to work with in my atties.

As a note to all, not everyone will have the same voltage requirements - depending on the cap size, there is more charge available with larger caps. I am currently using from 35V to 60V when welding - and I put a larger cap on my Fuji board.
 

gsa

Senior Member
ECF Veteran
Verified Member
Oct 27, 2009
214
167
49
Well, my second LM2577 board came today from here LM2577 3A DC Step Up Adjustable Breadboard Module Power Supply Converter USA | eBay

I only had enough time to hook it up to the breadboard circuit I made last go around with the 3.6ohm 10w resistor, 18650 AW battery and 2amp fuse but I was able to verify that I was boosting from 4.15v to 35v. I have half a dozen 1000uf 50v caps here so hopefully tomorrow I will have a chance to make my v2....(actually it was my v1 and then I got distracted by cameras ;) )
 

dsy5

Ultra Member
ECF Veteran
Verified Member
Nov 18, 2010
1,632
1,355
New York
Last edited:

gsa

Senior Member
ECF Veteran
Verified Member
Oct 27, 2009
214
167
49
OK, the LM2577 welder is the cats meow. Pics and part list to follow soon. A couple things to note if you have built a camera welder or are thinking of it:

1. There is zero chance of overshooting your voltage target, set the regulator at 35v and that's what you get. The cap takes about 4 seconds to fully charge (sound familiar?) and after that you are not doing anything by keeping the button pressed. This means you only need a dmm to check the voltage the first time you set it up or if you need to use the trim pot to adjust the voltage.

2. Less volts with a higher uf cap means less sparky. I can actually see during and after welding. There is no loud snap, this is overall a pretty civil way to join wires, I will have to find another way to embarrass my wife in front of her friends.

3. Welds are much, much easier to produce. I can't state this enough, if you learned to weld wires with the camera welder, you will be a pro the first time you weld at 35v 1000uf.

4. The welds are stronger, the "overlap" is fully welded, not simply "tacked".

Note: My board limits voltage to 35v max, I am welding 32g nickel NR to 32g and 34g kanthal. If you have different wire sizes, combos there is likely going to be a slightly different voltage requirement. I do have some 30g and 28g kanthal as well as some 30g silver I will try later to try and get a feel for what those voltages might be.
 

JazzyTech

Super Member
ECF Veteran
Nov 16, 2012
812
508
California
OK, the LM2577 welder is the cats meow. Pics and part list to follow soon. A couple things to note if you have built a camera welder or are thinking of it:

1. There is zero chance of overshooting your voltage target, set the regulator at 35v and that's what you get. The cap takes about 4 seconds to fully charge (sound familiar?) and after that you are not doing anything by keeping the button pressed. This means you only need a dmm to check the voltage the first time you set it up or if you need to use the trim pot to adjust the voltage.

2. Less volts with a higher uf cap means less sparky. I can actually see during and after welding. There is no loud snap, this is overall a pretty civil way to join wires, I will have to find another way to embarrass my wife in front of her friends.

3. Welds are much, much easier to produce. I can't state this enough, if you learned to weld wires with the camera welder, you will be a pro the first time you weld at 35v 1000uf.

4. The welds are stronger, the "overlap" is fully welded, not simply "tacked".

Note: My board limits voltage to 35v max, I am welding 32g nickel NR to 32g and 34g kanthal. If you have different wire sizes, combos there is likely going to be a slightly different voltage requirement. I do have some 30g and 28g kanthal as well as some 30g silver I will try later to try and get a feel for what those voltages might be.

Woot! Thanks for the info! Really looking forward to seeing the schematics and building one from scratch :)
 

jmarkus

Ultra Member
ECF Veteran
Verified Member
Mar 3, 2011
1,387
1,126
53
CA USA
OK, the LM2577 welder is the cats meow. Pics and part list to follow soon. A couple things to note if you have built a camera welder or are thinking of it:

1. There is zero chance of overshooting your voltage target, set the regulator at 35v and that's what you get. The cap takes about 4 seconds to fully charge (sound familiar?) and after that you are not doing anything by keeping the button pressed. This means you only need a dmm to check the voltage the first time you set it up or if you need to use the trim pot to adjust the voltage.

2. Less volts with a higher uf cap means less sparky. I can actually see during and after welding. There is no loud snap, this is overall a pretty civil way to join wires, I will have to find another way to embarrass my wife in front of her friends.

3. Welds are much, much easier to produce. I can't state this enough, if you learned to weld wires with the camera welder, you will be a pro the first time you weld at 35v 1000uf.

4. The welds are stronger, the "overlap" is fully welded, not simply "tacked".

Note: My board limits voltage to 35v max, I am welding 32g nickel NR to 32g and 34g kanthal. If you have different wire sizes, combos there is likely going to be a slightly different voltage requirement. I do have some 30g and 28g kanthal as well as some 30g silver I will try later to try and get a feel for what those voltages might be.

can't wait to see your masterpiece and here about silver.
 

dsy5

Ultra Member
ECF Veteran
Verified Member
Nov 18, 2010
1,632
1,355
New York

BJ43

Vaping Master
ECF Veteran
Verified Member
Nov 27, 2008
5,896
7,212
82
That converter looks pretty good, too. Has the higher volts needed for thicker wire. It would work well with 2 18350 batteries in series.

Too bad it is from China, though, they are about ready for their holiday...

I got mine a few months ago and will power it from one of my 12v 5 amp sources I use on all my PTs.
What cap would you recommend and should I use one or multiple caps. I really don't mind the size of this as I won't be carrying it around.
 

dsy5

Ultra Member
ECF Veteran
Verified Member
Nov 18, 2010
1,632
1,355
New York
I got mine a few months ago and will power it from one of my 12v 5 amp sources I use on all my PTs.
What cap would you recommend and should I use one or multiple caps. I really don't mind the size of this as I won't be carrying it around.

I would say that anywhere from 1000µF to 2000µF at 50V should be good. With the supply that gsa has: if a DPDT switch was added and a second cap, you could throw a switch which would series tie the 2 charged caps together - effectively doubling the output voltage.
 

gsa

Senior Member
ECF Veteran
Verified Member
Oct 27, 2009
214
167
49
IMG_20130120_123803.jpgIMG_20130120_121918.jpgIMG_20130120_121929.jpgIMG_20130120_123754.jpg

Schematic with digikey part numbers. To that BOM you also need the LM2577 board, some alligator clips, some wire and solder and a box. The digikey list is about $7, the LM2577 another $7 and then the other misc supplies is going to bring it to around $25 with shipping.

30g silver to 32g or 34g kanthal was a piece of cake at 35v. I am building this at work so that's all the wires I have here, I will try the 28g kanthal when I get home.

Also, I tested the current draw on the battery and it is about .2A

You can see the trim pot for voltage adjustments in pic 3. I used some loctite to secure the board to the side of the box, everything else is hot glue.
 
Last edited:
Status
Not open for further replies.

Users who are viewing this thread