
Hello and welcome back! Today I have quite a treat for those of you who are flavor chasers and don't mind tooting out some big clouds (from your face, of course
 ). I'm constantly looking around to see what people claim to be "the best" rda, RDTA, RTA, SRBA, purchasing them, and then being let down. In the past 6 or so months, I've seen a lot of clout around the Vandy Vape Pyro V4 RDTA, Damn Vape Nitrous rda, and Vandy Vape Drop (OG and V1.5) RDA from a number of people claiming each of them to be "the best". Of these, I've purchased the Drop V1.5 RDA and now have acquired the Pyro V4 RDTA for the purpose of this review, thanks to Sue over at HealthCabin.
Understand that comparing a squonk capable RDA to an RDTA or RTA isn't directly applicable, as they both play a different role for a different setup/purpose. Even though the Drop V1.5 RDA does produce very good flavor, my liking to it is actually in the build deck - it's wide open allowing you to do some pretty cool things with it. Now, if we were to solely compare pure flavor output, despite it's flaws, I can without a doubt say that the Pyro V4 RDTA is now one of the cleanest tasting and best rebuildable decks that I own. This review will remain as unbiased and objective as I am able.
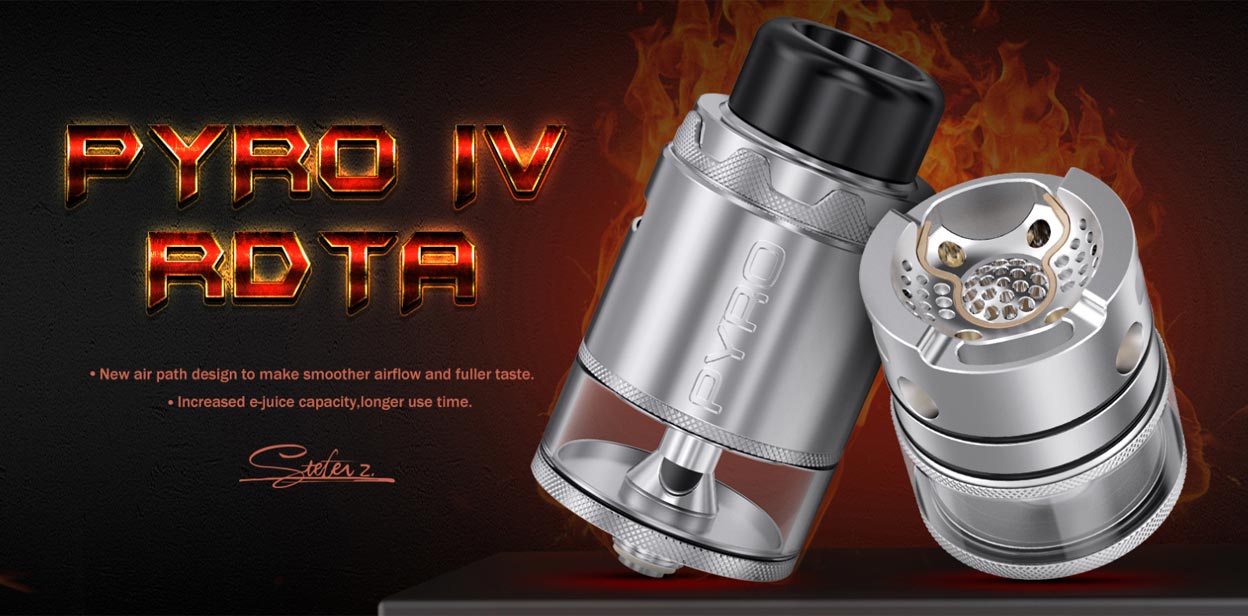
Ready for some pictures!

-Main Features and Colors-
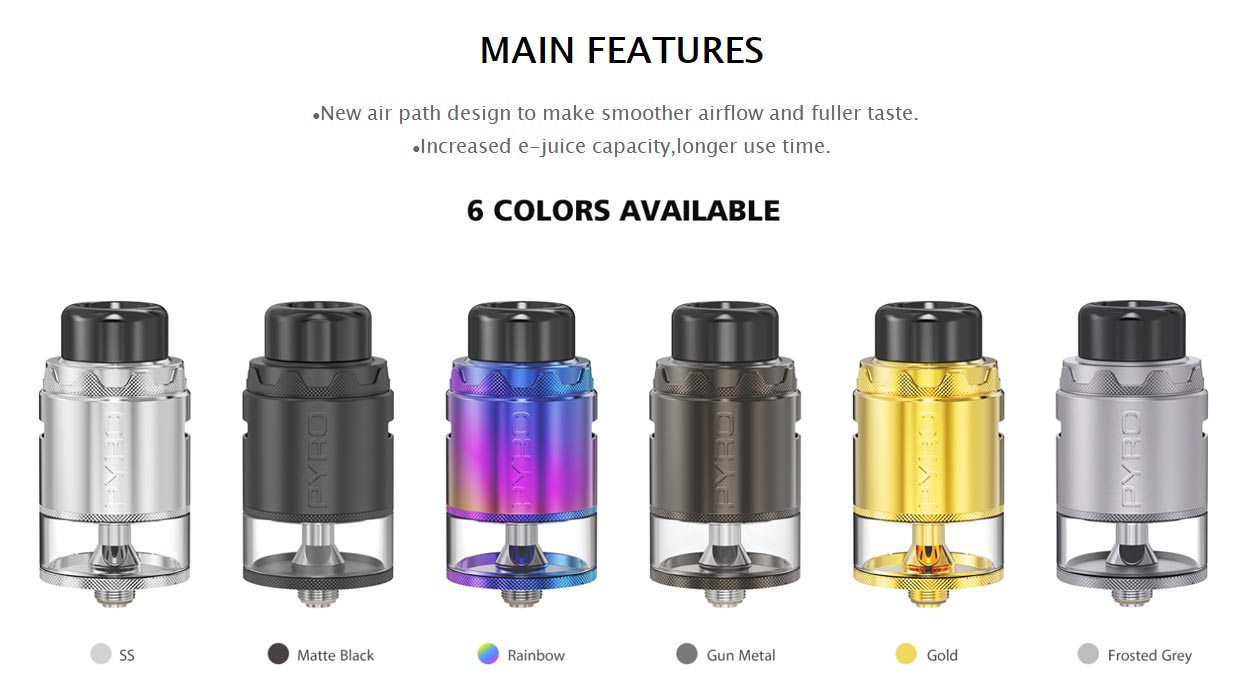
Color Options:
- Stainless Steel
- Matte Black
- Rainbow
- Gunmetal
- Gold
- Frosted Grey
Main features:
- New air path design to make smoother airflow and a fuller taste
- Increased e-juice capacity for longer use time
Also, the tank has been upgraded from 4 mL to a 5 mL capacity from the Pyro V3 to the V4.
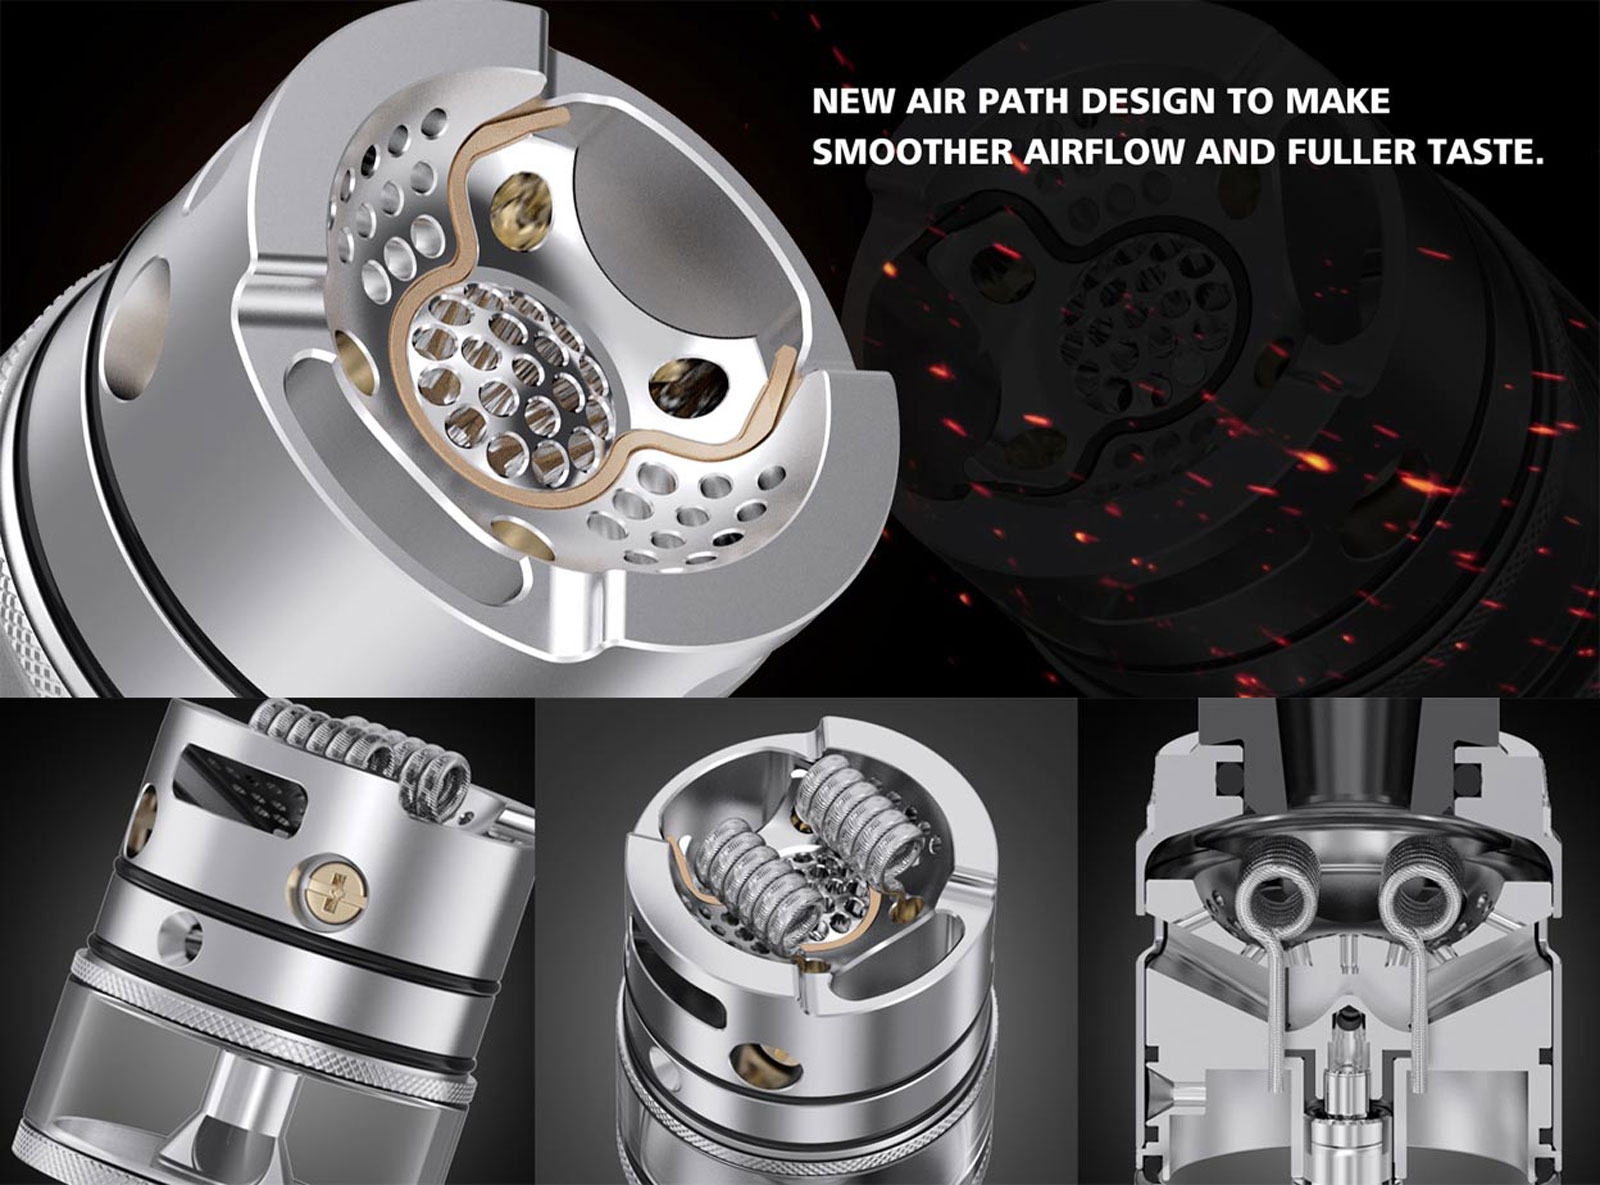
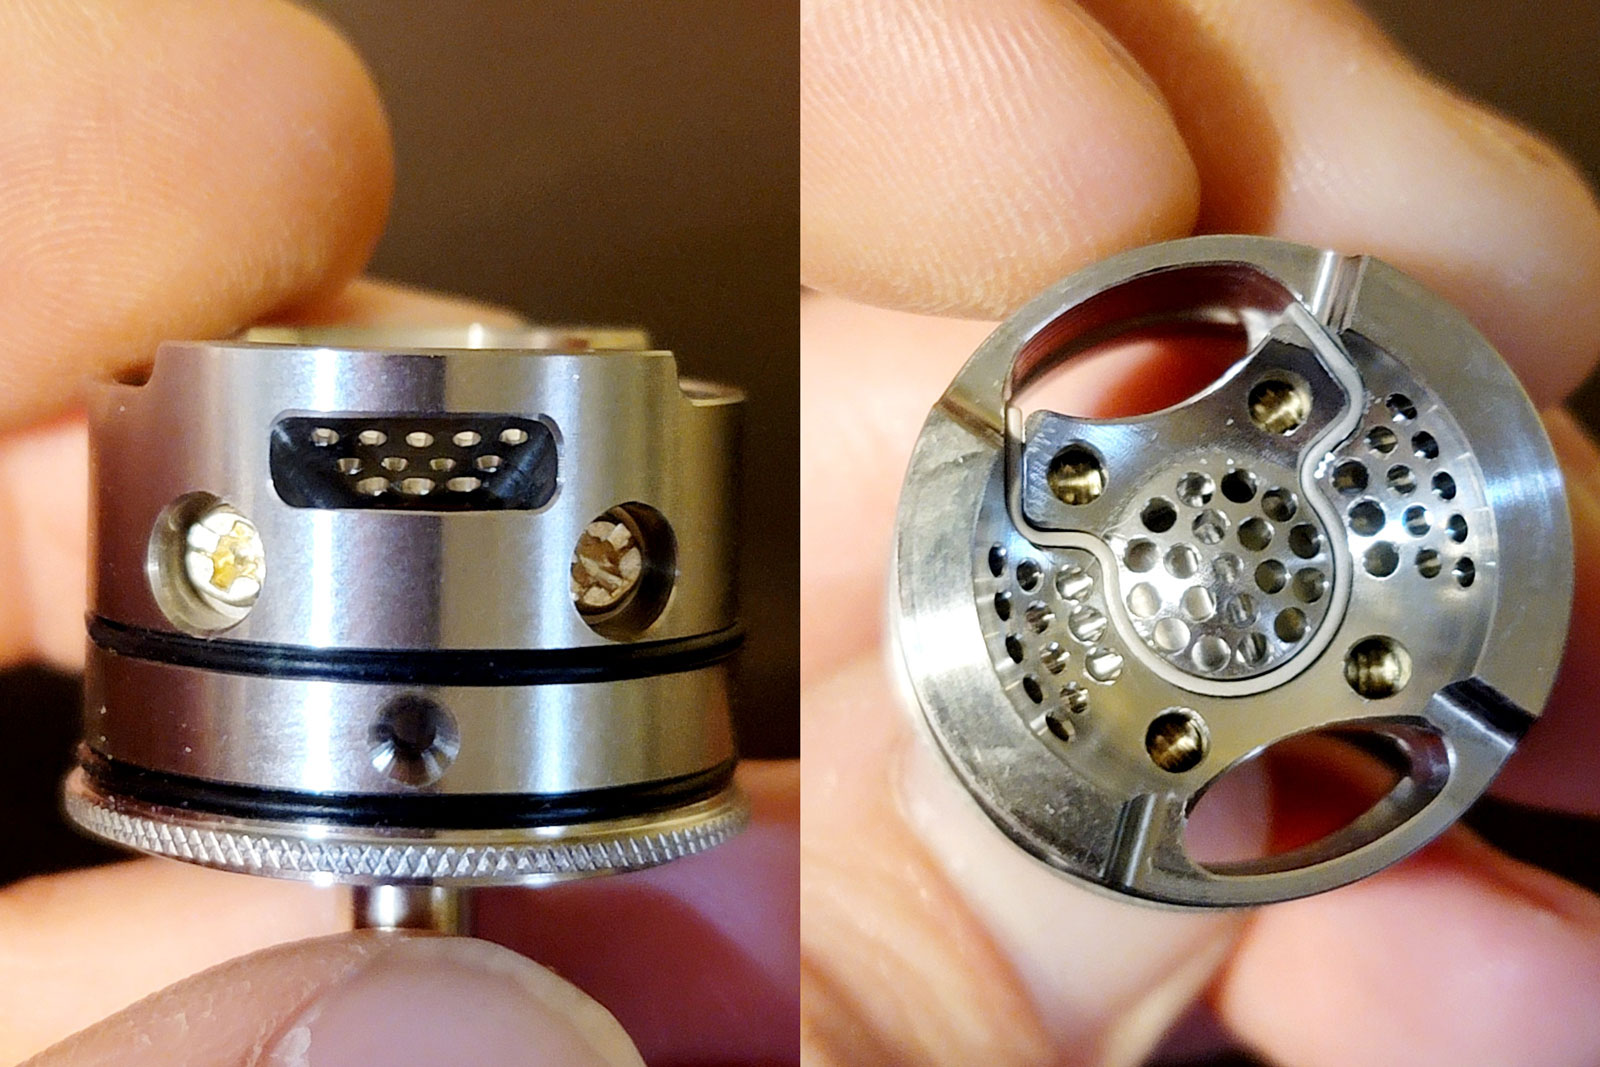
-Postless Deck-
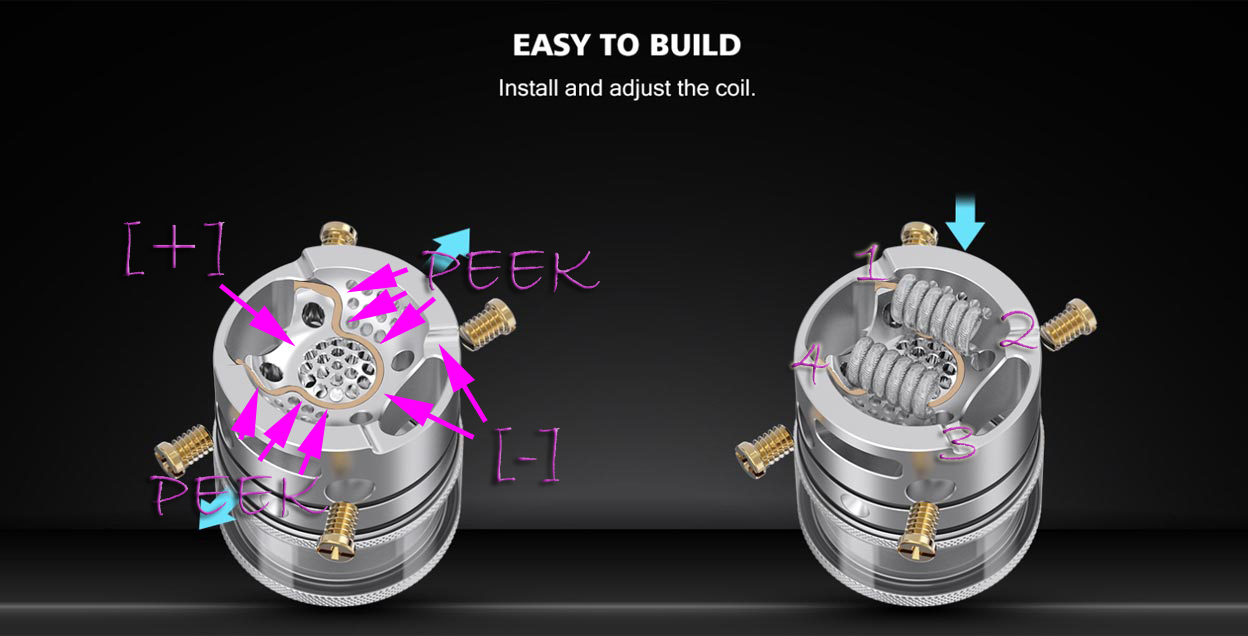
First off, this is a postless deck if you hadn't already noticed. The 4 larger holes surrounding the center of the deck are where your coil leads (legs) will be screwed in. If you're ever confused about the orientation of your coils, look for the PEEK insulator (the tan plastic piece separating 2 post holes from the other 2). Whichever side of the PEEK insulator covers the center of the deck, that's your positive connection. In this case, the smaller cutout noted by the [+] covers the center of the deck, and is thus the positive end. When installing the coil(s), one lead needs to be connected to the positive side and one needs to be connected to the negative side.
Using the numbered post holes in the right picture, you can see that post hole 1 and hole 2 can go together as well as 3 and 4. If you're going to go with a single coil, you can use this same configuration by simply removing a coil or, you can run them diagonally. In this case, you can run a single coil from post hole 2 to 4, or 1 to 3.
Whichever way you plan to build this, there's a lot of airflow directed at your coil(s) which is sure to guarantee at least a decent output of flavor.
-Refilling-
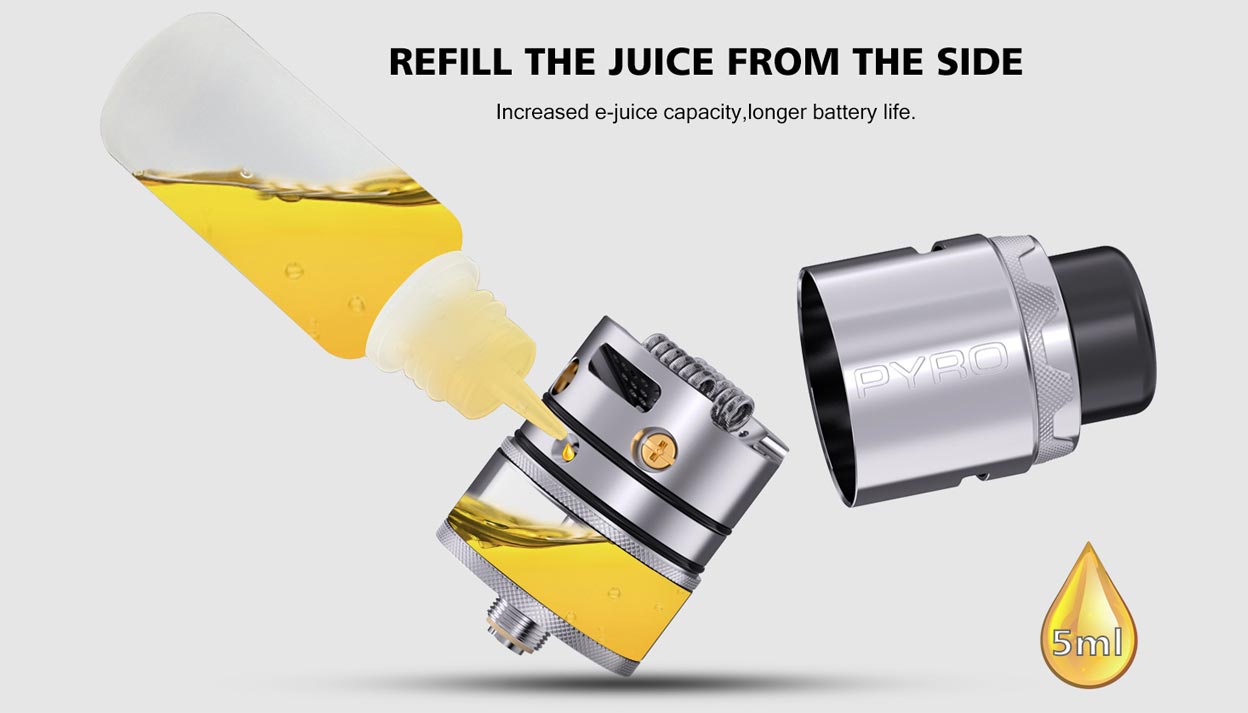
This begs the question however; what good is an upgrade in capacity from 4 mL to 5mL if you're not able to fill the reservoir to the top - especially with this refill process being a bit more of a pain than most others? I think a downward slanted refill hole that's a millimeter or two wider in diameter could have alleviated pretty much all of these issues.
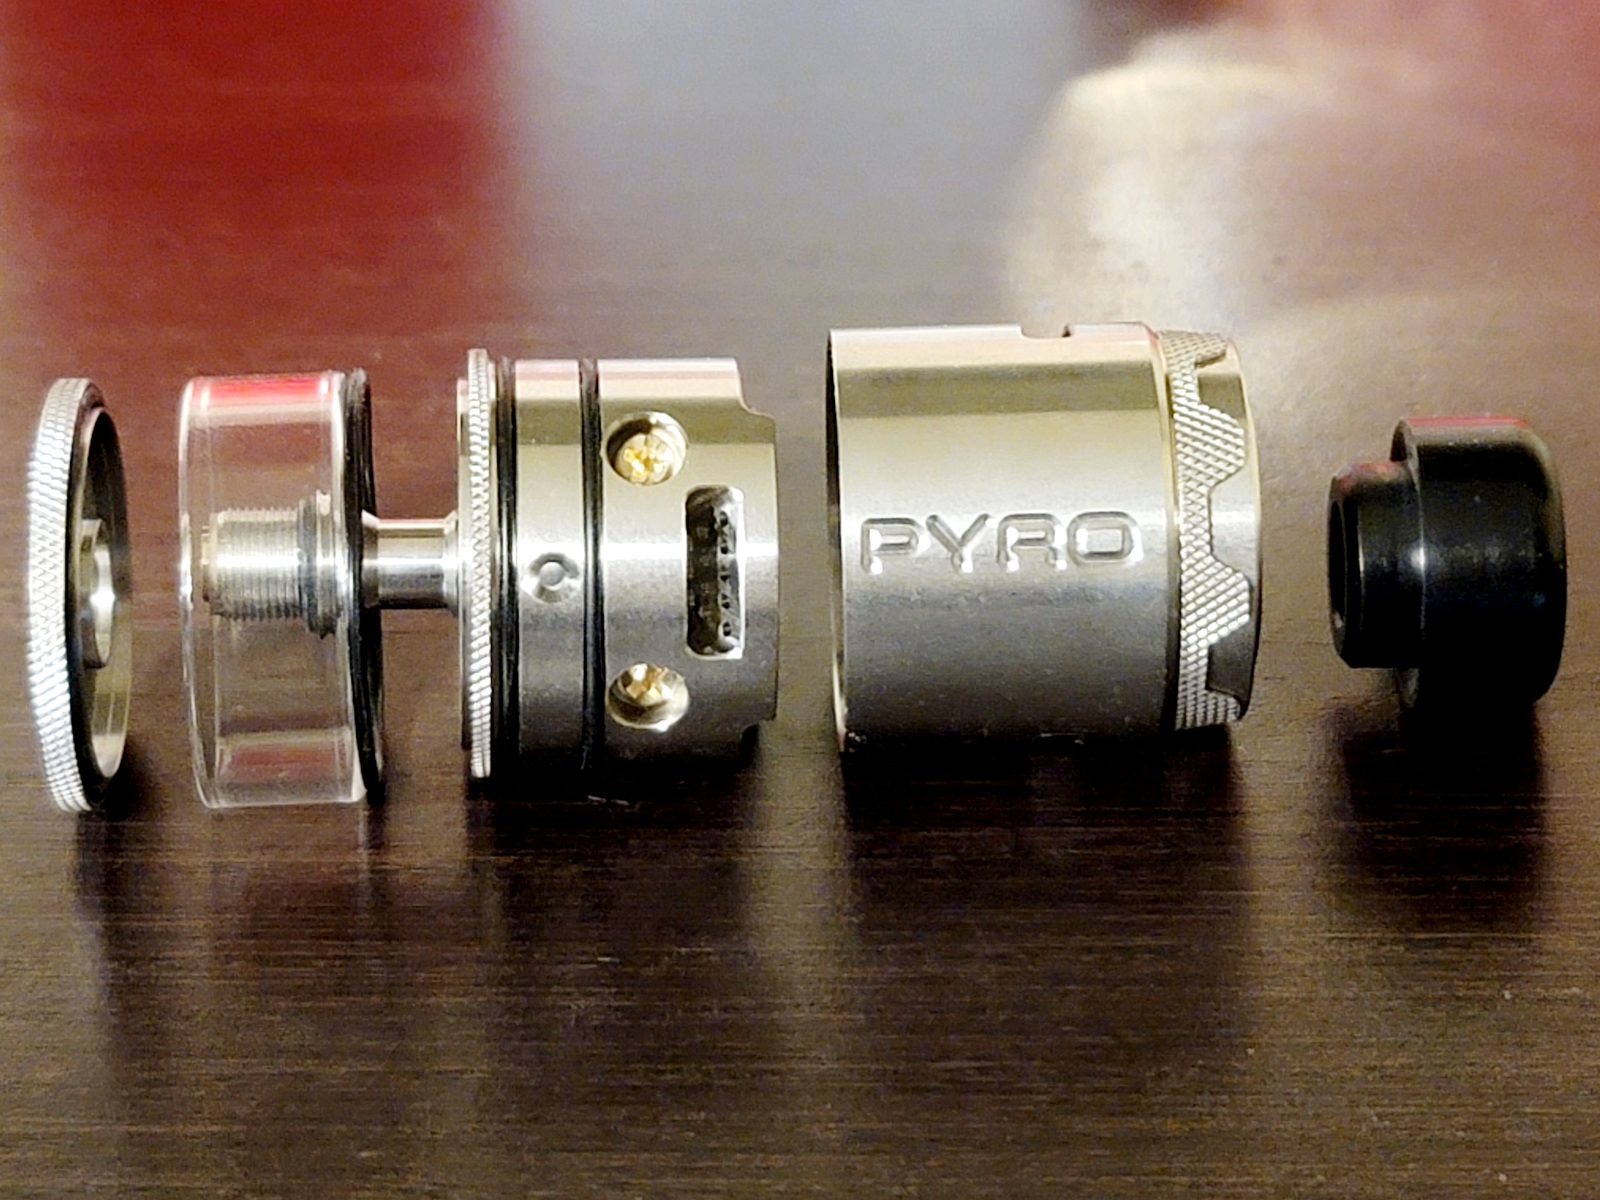
-Easy Cleaning-
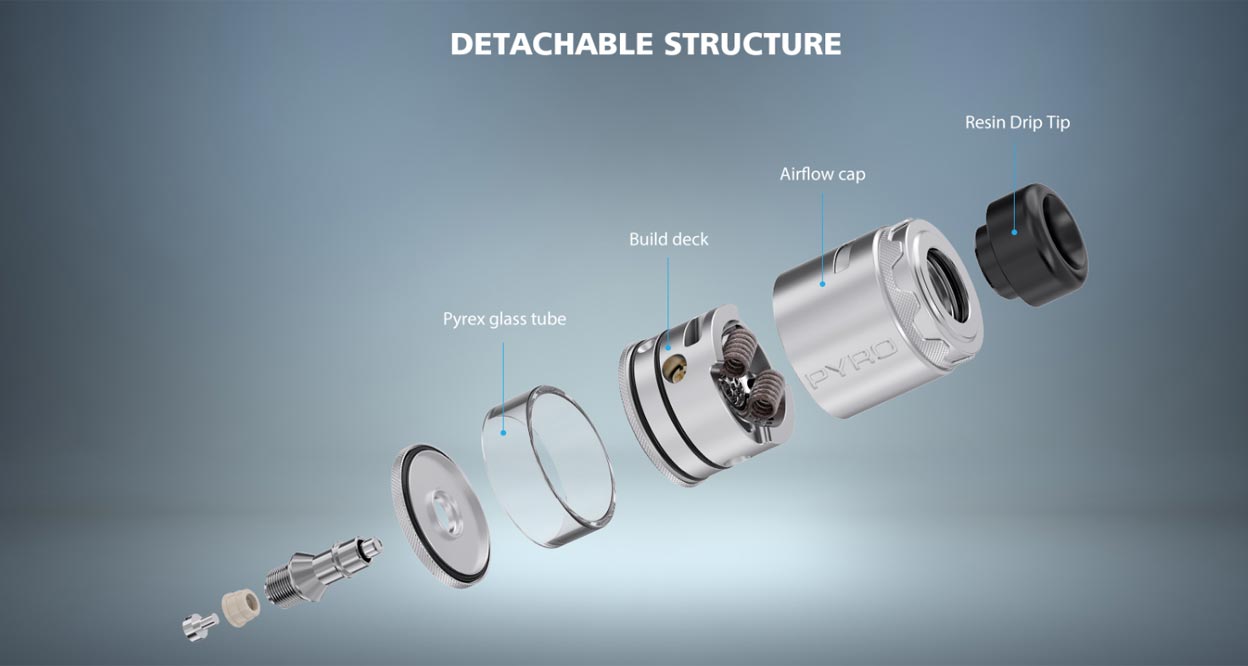
This RDTA comes fully apart for easy cleaning. This exploded view helps to identify what people are talking about if you're still in the beginning stages of rebuilding. If a tutorial says to remove the top cap, you can look at this and say "Ayyy, I bet they're talking about the Airflow cap!"
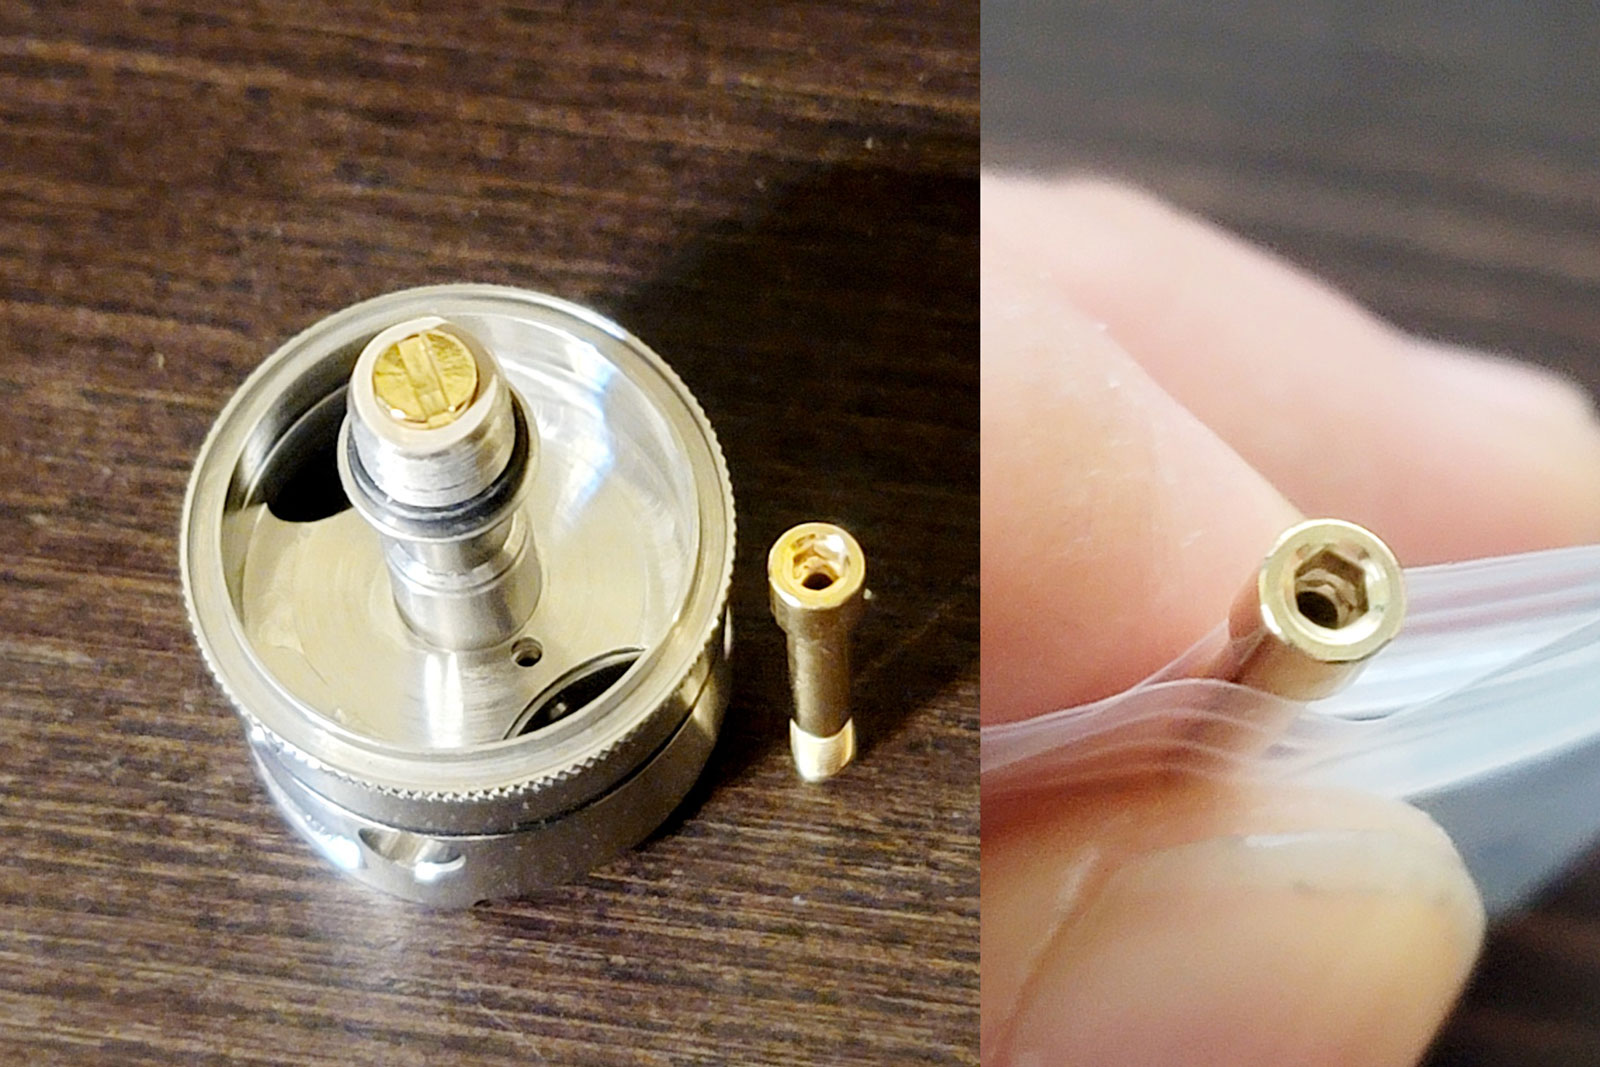
Also remember, if/when you change out the 510 positive pin, that the tan PEEK insulator (second item in on the far left) doesn't get lost in the shuffle. This will cause an immediate short in any mod. In a regulated mod, this just means the mod won't fire, but you may have a difficult time diagnosing the problem if you didn't know that a PEEK insulator needs to be there. In an unregulated mech mod, this could lead to much more drastic things like batteries exploding.
-What To Expect In The Box-
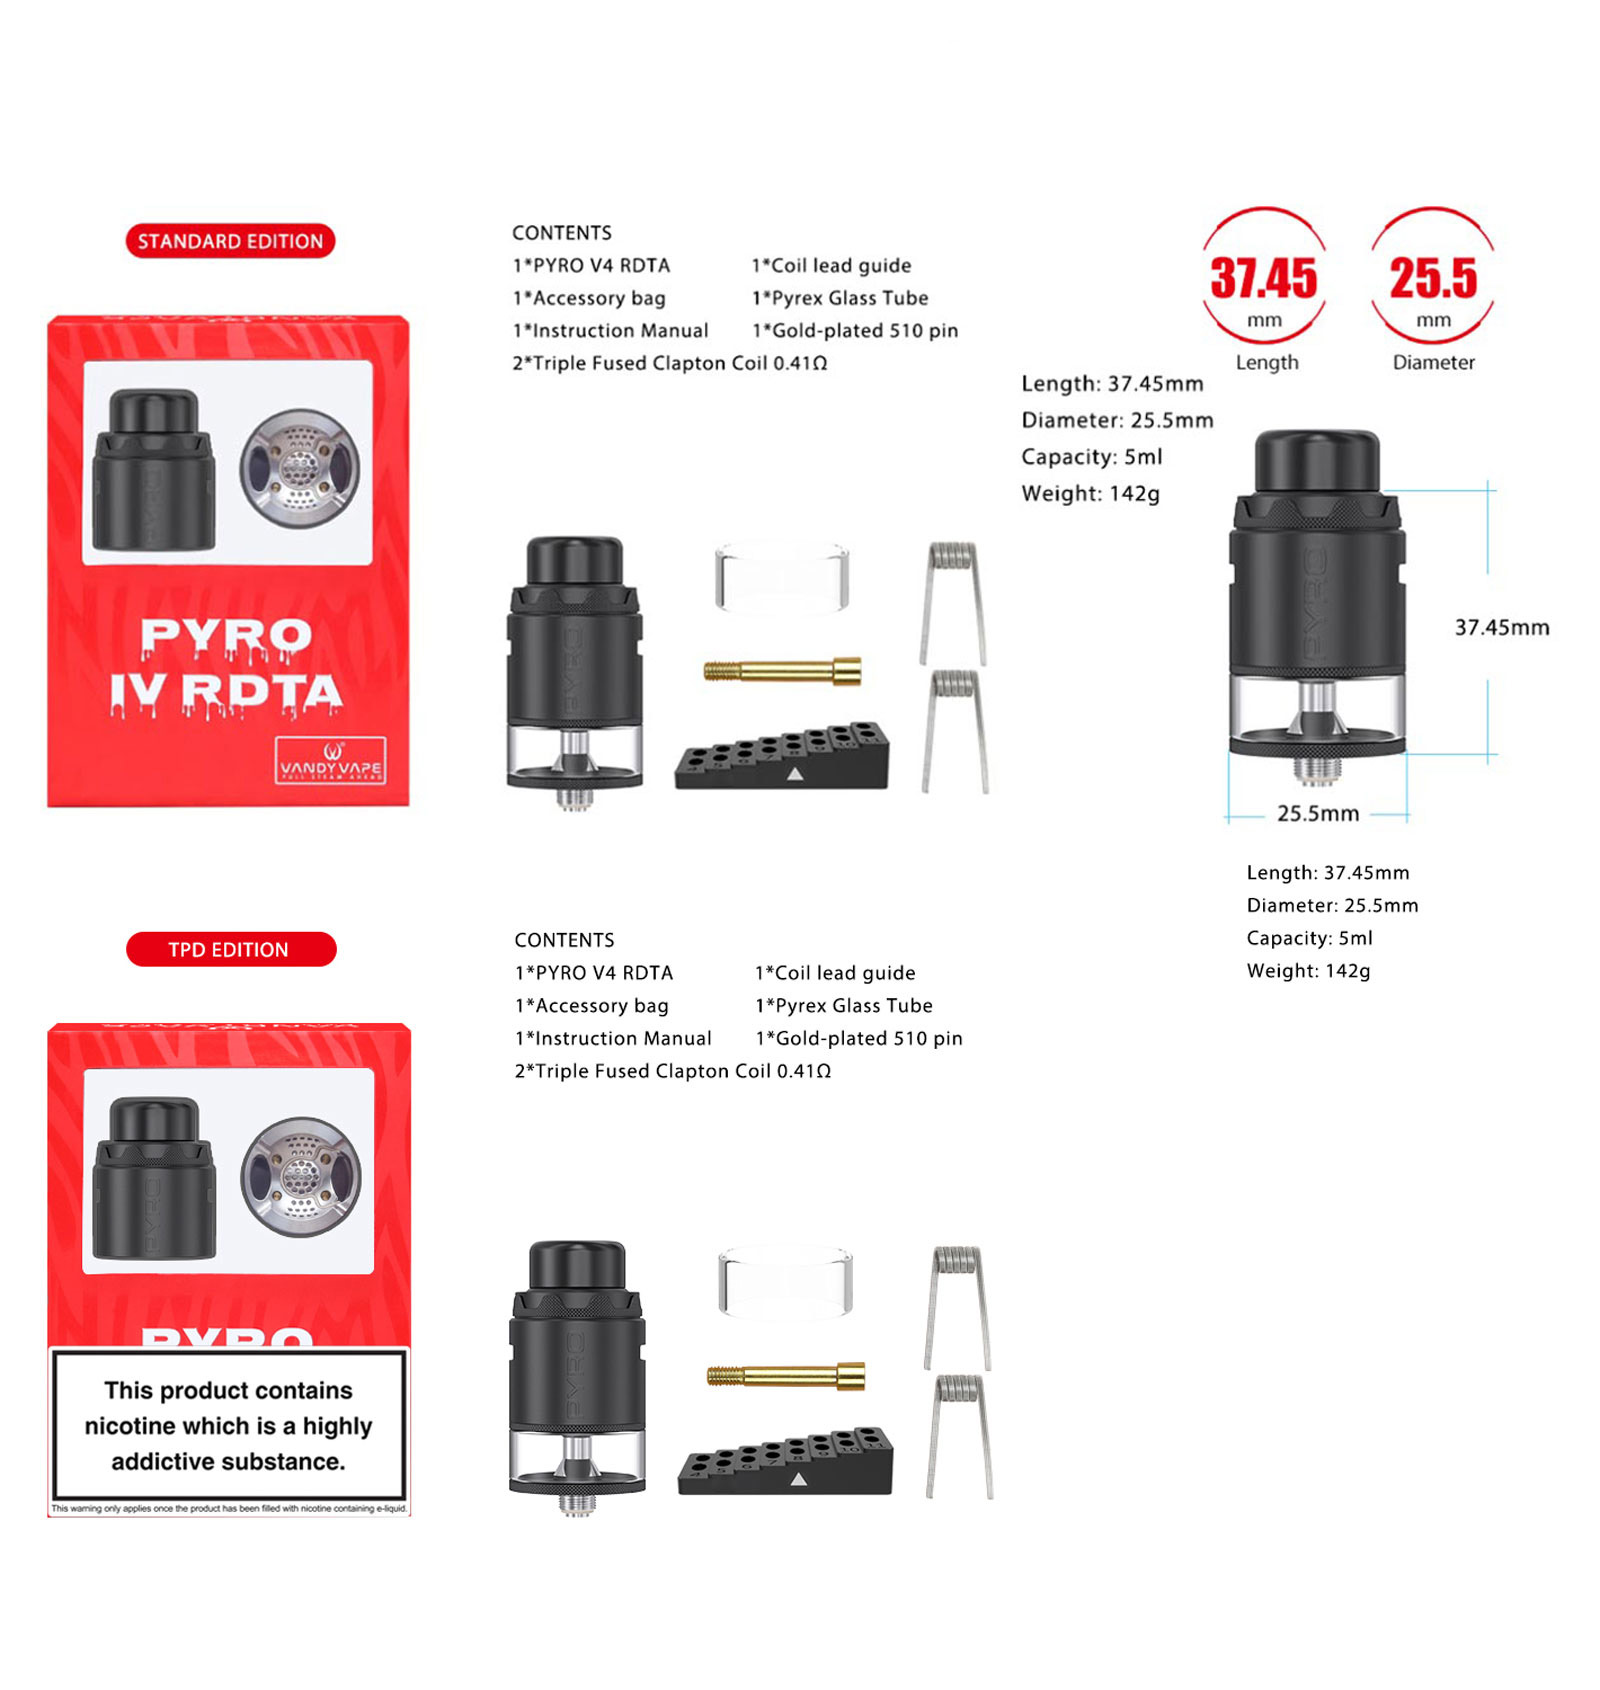
- Pyro V4 RDTA
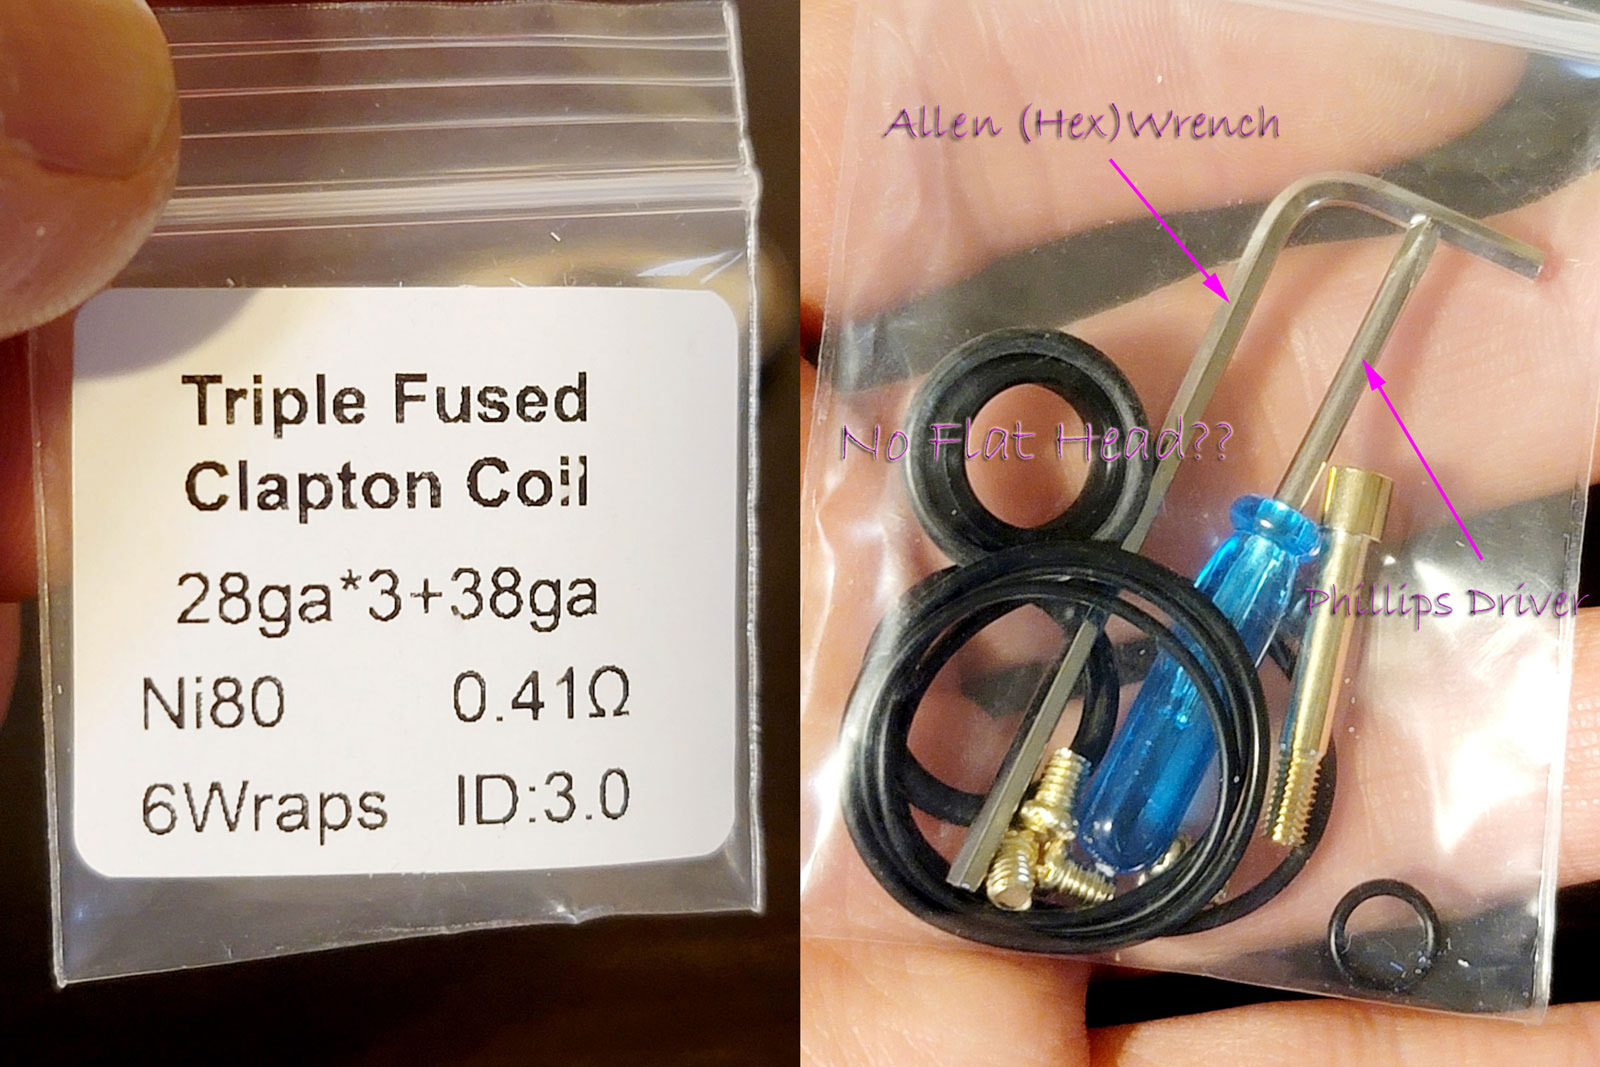
- Accessories Bag (Lots of O-rings, 4 deck screws, Phillips Driver, Allen Wrench, 510 drip tip adapter)
- Instruction Manual
- 2x Triple Fused Clapton Coils 3 mm ID (inner diameter) @ 0.41Ω each (0.2~0.21Ω if installed as a dual coil)
- Coil Lead Guide
- Spare Pyrex Glass
- Gold-plated 510 BF "squonk" Pin
-Specs-
- Dimensions: 37.45 mm height * 25.5 mm diameter
- Construction: Stainless steel, Pyrex glass tank, Resin drip tip
- E-juice capacity: 5 mL (2 mL for TPD Version I'd assume?)
- Deck style: Postless
- Coil options: Single or Dual Coil
- Squonk capable: Yes
- Airflow control: Dual sided airflow control ring
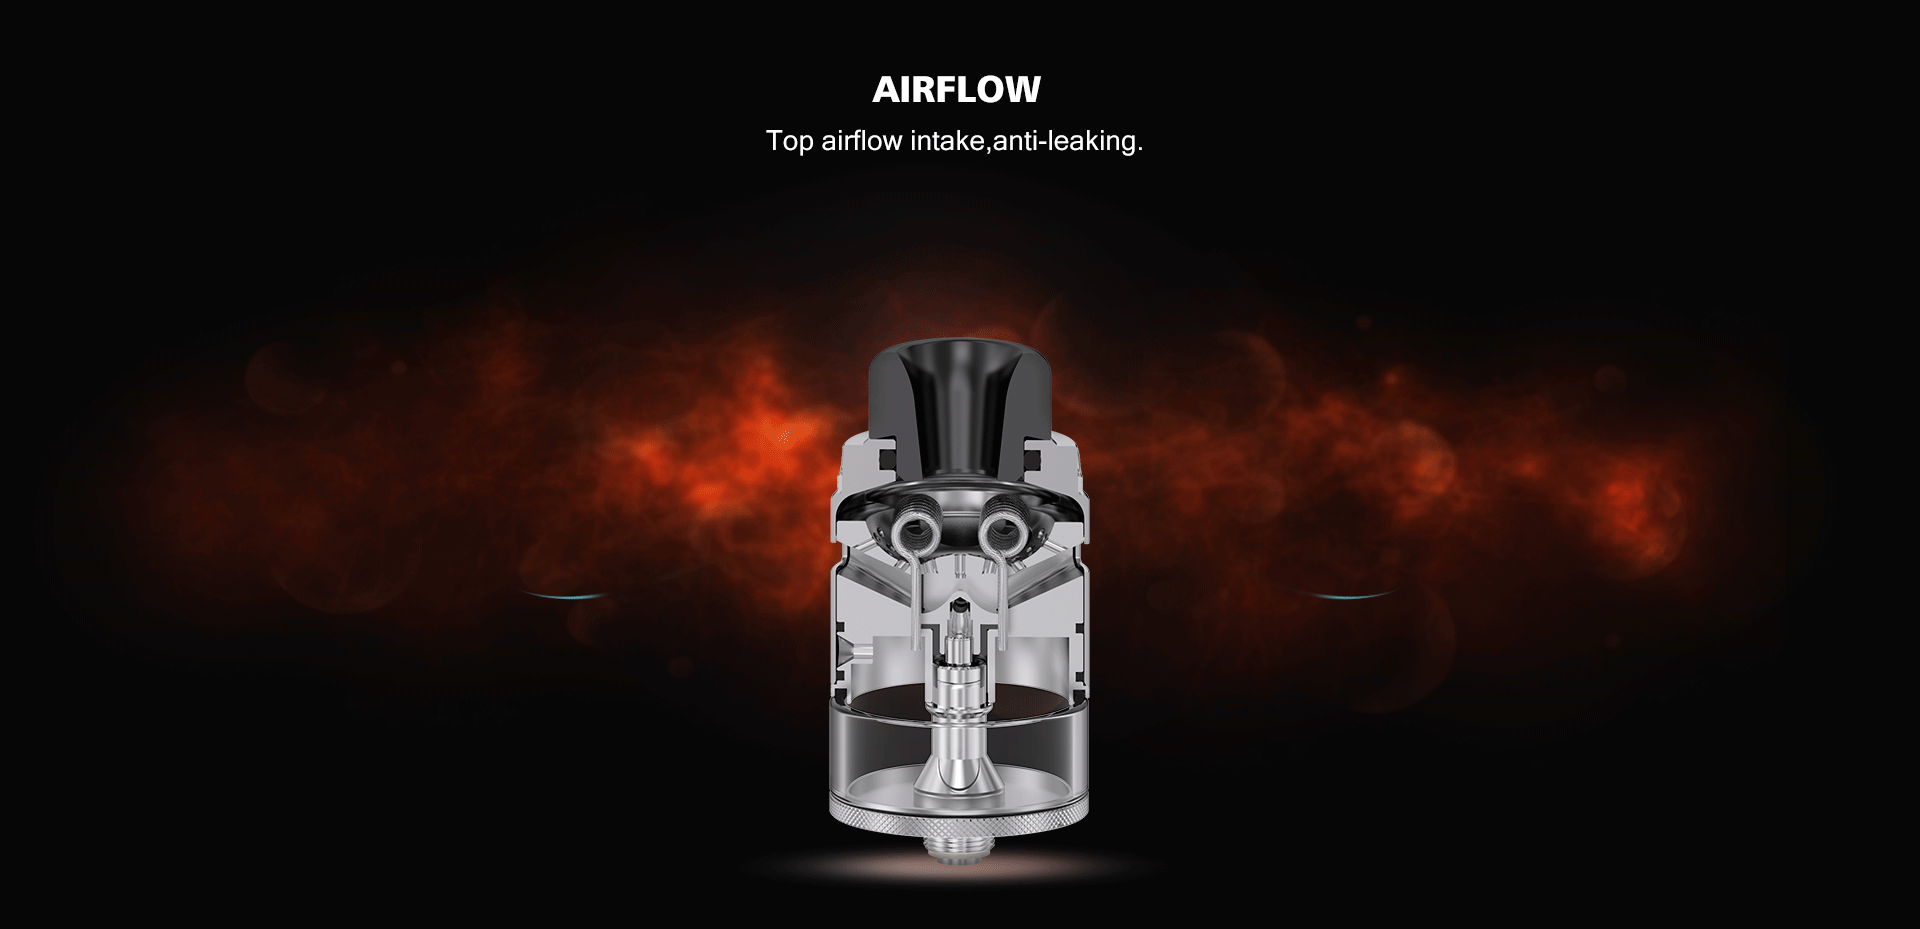
- Airflow positioning: Top airflow
- Drip tip: 810 resin drip tip (without O-rings)
-Personal Observations & Experiences-
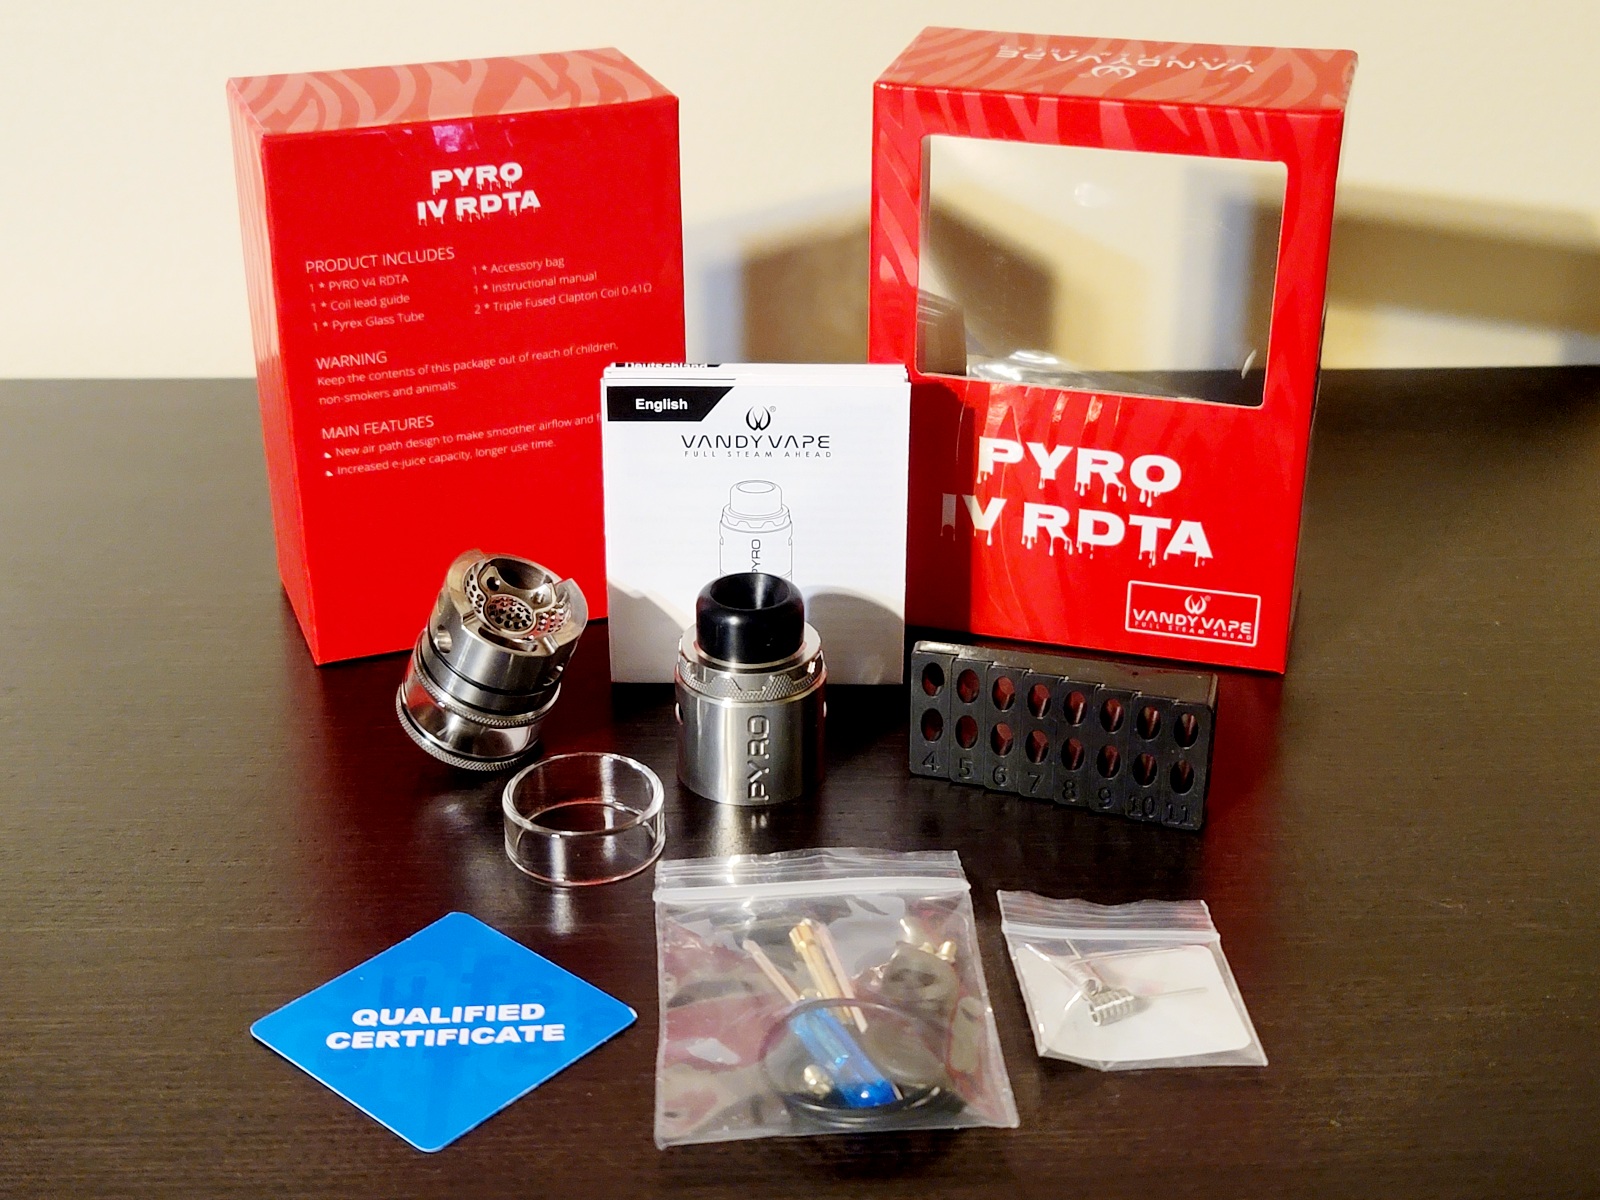
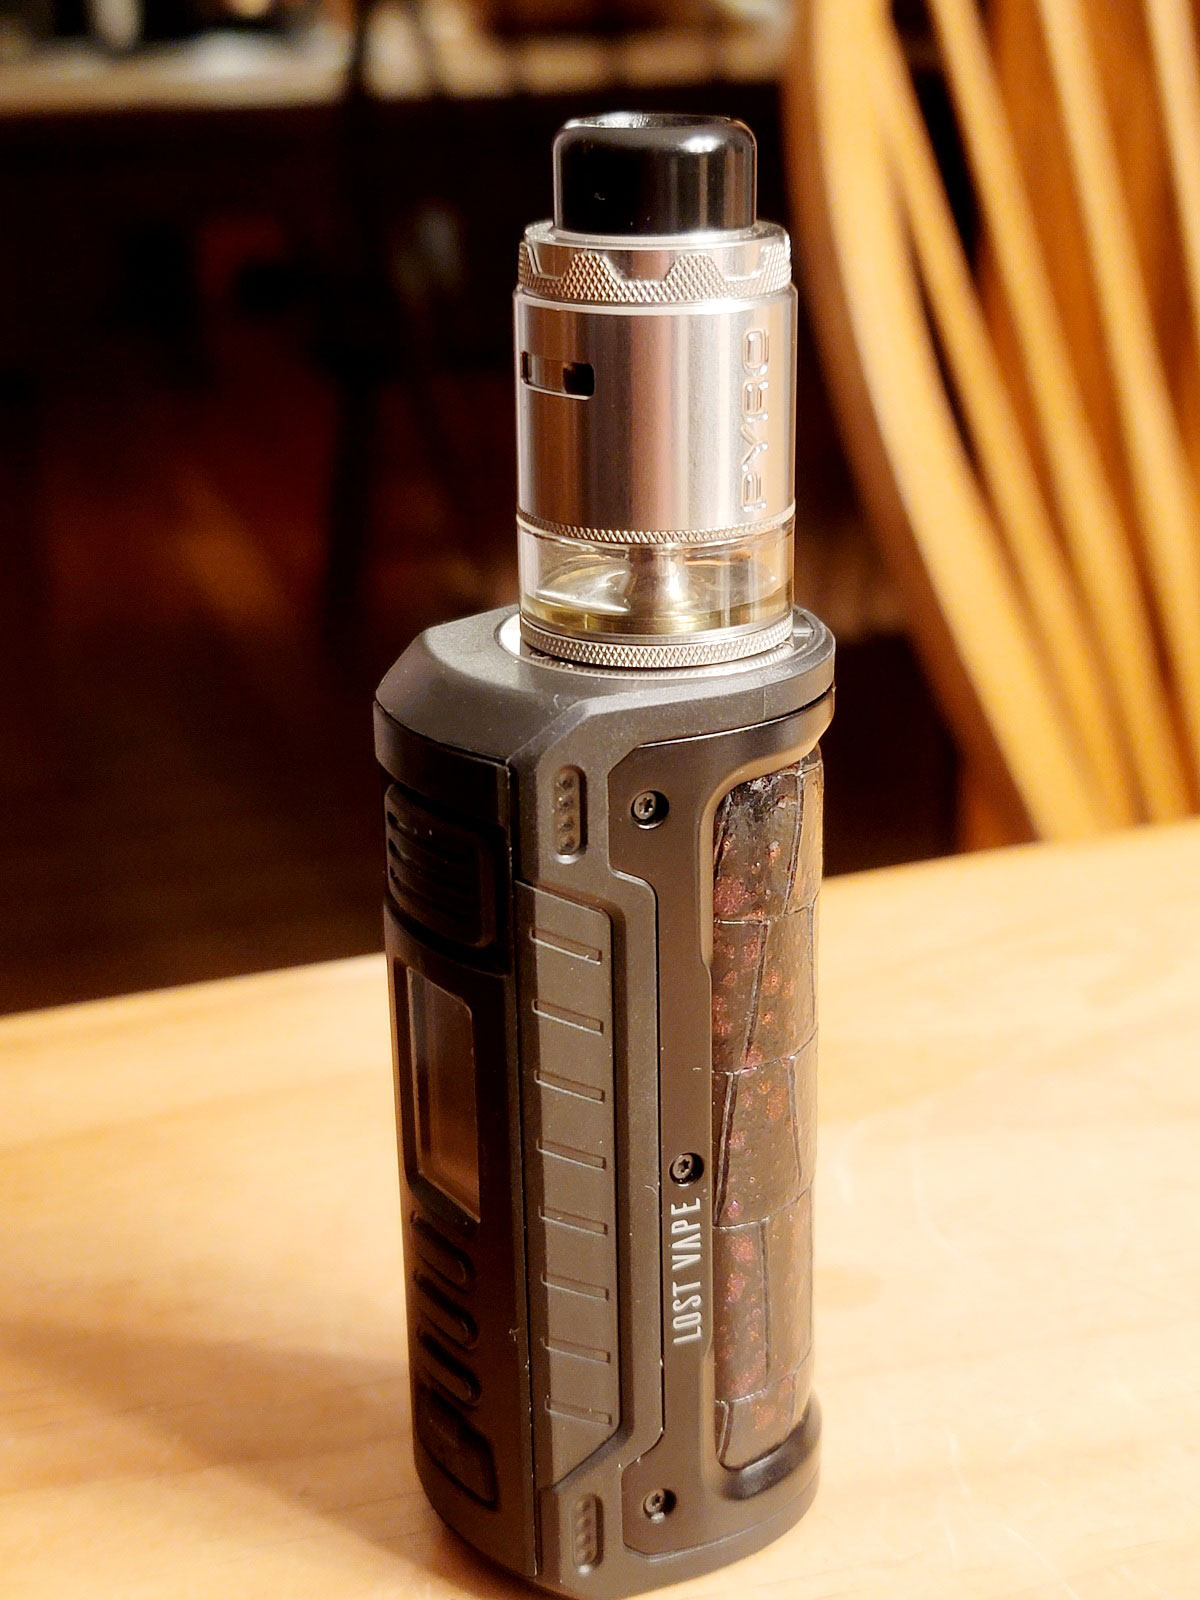
The Vandy Vape Pyro V4 RDTA arrived in good health. The box is presented in an orderly fashion with almost everything you'd need to get it up and running. The Stainless Steel finish looks immaculate and isn't quite the fingerprint magnet you'd think it would be. The machining is top notch with very few things to be desired. However, this design doesn't come without a few flaws, as great of a vape as it is.

-A Closer Look-
I also wish the knurling along the bottom of the deck was just a tad bit wider. There isn't enough knurling between the top and bottom ring along the bottom of the tank to grip when trying to spin or loosen the top cap.
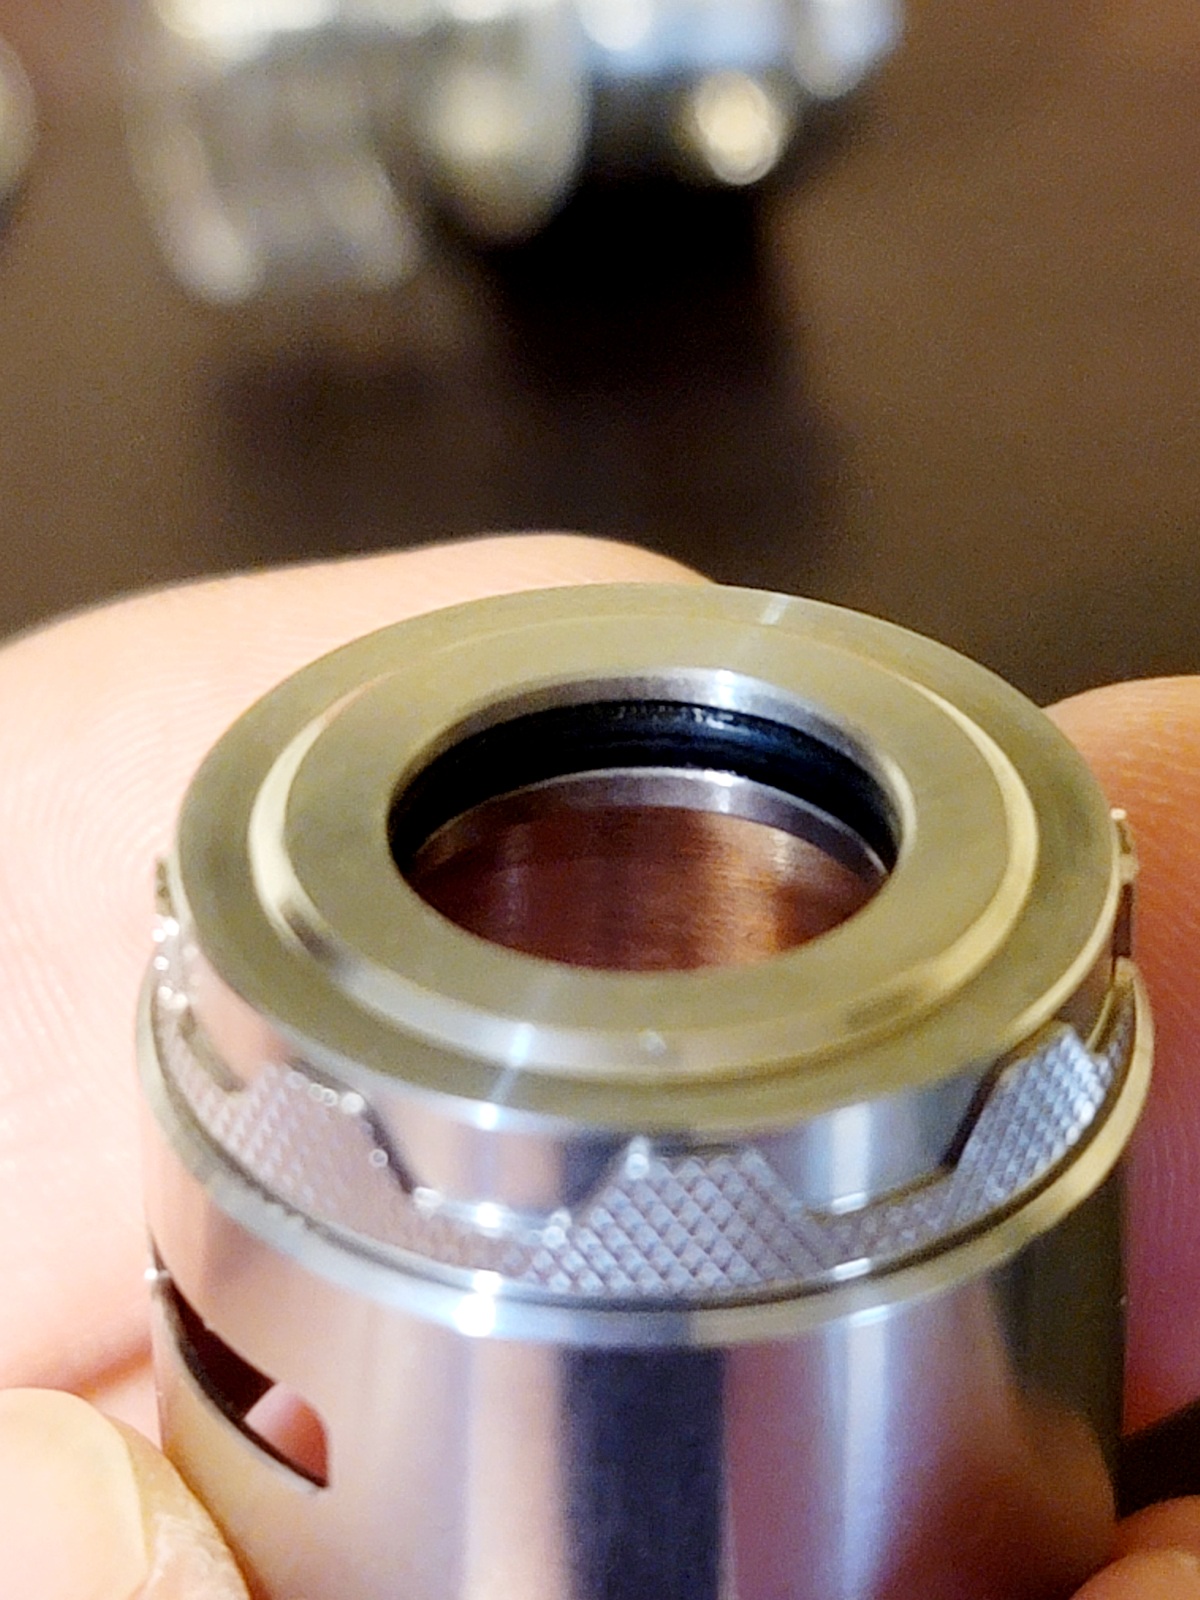
If you match the airflow slot in the top cap (near the bottom of the picture) with the airflow inlet on the deck, you can see how the airflow can be adjusted by spinning the top cap. The airflow is infinite meaning you can freely spin the top cap without it stopping. The variation in airflow is very well done (a full range of MTL to a DL) however, on settings of around 1/3 open or less, I notice a tendency for the atomizer to want to whistle.
-Pros/Cons-
- No leaking other than from user error
- Very well built
- Stainless steel isn't a fingerprint magnet
- Airflow variation is very well done (MTL to DL)
- Honeycomb airflow for days
- Flavor output is outstanding
- 810 drip tip sits firmly
- 510 drip tip adapter comes in the kit
- Squonk capable
- Deck is very forgiving to build on
- 5 mL tank
- Disassembles nicely/easy to clean
==Cons==
- Top cap is incredibly hard to turn for airflow or to take off to refill once it's been filled
- Refill process is cumbersome
- Knurling at the base of the deck could be just a tad wider for better grip
==Preference Considerations==
- Missing a flat head driver
- No cotton in the package
- Any further airflow restriction beyond 2/3 closed can cause a slight whistle
- Can get a little warm when chain vaping with dual coils
-Overall Rating-
For the Flavor Chaser: 9.5-10
Overall experience: 9
Also, you can follow HealthCabin on Twitter or one of their various IG accounts for product news and giveaways.
There really isn't much to nag on. Sure, a few things could be improved, but overall this is a great product. Currently at Healthcabin it's $24.00 before S&H. If you're looking for a quality rebuildable that won't break the bank, has top notch flavor, and is very easy to build on, look no further.
Again, I want to thank Sue over at HealthCabin for giving me the opportunity to review this product. Hopefully you learned all you need to know about the Vandy Vape Pyro V4 RDTA. If you have any questions, comments, or you see errors, don't be afraid to point them out. Thanks for reading!
Happy vape hoarding!

Last edited:
