Thought I'd hold on to this forever but after being relegated to "Stand-Queen" status for past 5 years, decided it deserves to be sent to a new Duty Station where it will be rightly utilized & enjoyed regularly... and I need to raise some Capital for a couple more "Wants"
I've had this for about 7 years and it was rarely used even before it became a mere Stand Resident. Probably left the house to go to At Work/Desk Duty less than probably 10 times. I did pluck it from its place in passing every now & then just to hit it and make sure RTA hadn't seeped or anything (mated with High-End stuff only over the years ie. Mark Buggs, Kayfuns, etc.) and only used the same LG HG2 Batt bought new for it (Batt NOT included). As pics show, about as pristine condition as ya will ever find on the pre-owned side of NIB. No issues or glitches at all and she still performs as new as one would expect a Provari to do.
These very rarely come available and were somewhat rare even when still being produced and Provari still in business (may they and their Legendary Rep & Gear long remain).
Priced at a Fair (IMO) $200 which is probably below what the High-End Market would bear. That will include USPS Priority shipping, Tracking, & standard $100 Insurance to the lower U.S. 48 States.
Will be shipped in its OEM Box it came from when new from Provari.
Payment by Paypal ONLY immediately upon purchase.
Shipping will occur and Tracking # PM'd within 48 business hours of cleared payment (I usually ship the very next morning).
Questions welcomed and please check my Feedback to be assured & confident in my Gear & Description.
Thanks much for looking & considering and as always;
Vape On & Enjoy
Discover the world of Escobar vapes through our comprehensive Escobar Vape Review. Dive into the Escobar Bars Collection, a curated assortment of premium vape flavors that deliver exceptional taste and satisfaction. Explore our review and embark on an unparalleled vaping experience with Escobar Vapes.
BORN TO BE WILD BORNTO BE DIFFERENT
Meet the most cost-effective and capable Jellybox series ever.Jellybox V3 brings a stunning new appearance with futuristic design.The 750mah battery capacity dominates in your daily vaping for two days at least. The new Jellybox V Pod ( 0.8 / 1.0ohm ) released after thousands of tests to ensure ultimate flavour and delightful MTL experience.
Jellybox is an industry pioneer in terms of its innovatively transparent design . Futuristic style combines with half transparent design . it makes your Jellybox V3 stand out and out of the ordinary
Experience a new level of vaping satisfaction with the Hyde N Bar. This rechargeable device offers 4500 puffs of flavorful vapor and a wide range of delicious flavors to choose from. Elevate your vaping game with Hyde N Bar.
Experience vaping like never before with the LED Vape Pen. This innovative disposable vape pen features an LED light that illuminates with each puff, adding a touch of flair to your vaping sessions. With a rechargeable battery and 2500 puffs, enjoy a visually captivating and satisfying vaping experience.
The Vandy Vape Requiem Mod is a perfect blend of style and functionality, designed to give you an incredible vaping experience.
Let's dive into its features! With a vibrant 0.96-inch TFT screen, you'll have all the information you need at your fingertips. The box mod is made from high-strength transparent materials, which not only look cool but also keep lightweight and add durability to withstand the rigors of everyday use. And with five exciting colors to choose from, you can express your unique style.
The requiem mod boasts an excellent ergonomic grip, ensuring a comfortable hold for those extended vaping sessions. Powered by a single 18650 or 21700 battery, the requiem mod is both convenient and reliable. And with its button-activated firing method, you'll enjoy instant and satisfying hits every time.
Now let's talk power! With an output range of 5-95W and multiple working modes like VW, BYPASS, VV, and TC, you'll have the flexibility to customize your vaping experience to suit your preferences. The mod supports atomizers up to 28mm in diameter, giving you plenty of options for pairing it with your favorite tanks. Then you can enjoy a wide variety of vape juices!
Ready to get your hands on this vandy vape requiem mod? Head over to vape accessories online and make this awesome mod yours today! Happy vaping!
Experience the pinnacle of vaping excellence with the Vandy Vape Requiem Box Mod. Designed to elevate your vaping experience, this mod offers an array of powerful features that deliver unparalleled performance. Let's dive into the details:
With a power range of 5-95W, the requiem box mod provides the perfect balance between versatility and performance. Whether you're a cloud chaser or flavour enthusiast, this mod has the power to satisfy your vaping needs.
Experience consistent and precise voltage output with a range of 0.5-6.0V. This ensures a stable and enjoyable vape, allowing you to savour every puff with confidence.
The vandyvape requiem mod boasts a maximum output current of 34A, allowing for quick coil heating and robust vapour production. Immerse yourself in thick clouds and indulge in intensified flavours that will leave you craving for more.
Say goodbye to long charging times. The Requiem Mod supports Type-C charging, ensuring swift and efficient recharging. With an input voltage of 5V and a charging current of 800-1000MA, you'll be back to vaping in no time.
Equipped with a 0.96'' inch TFT screen, the Requiem Mod provides clear and concise visibility of your vaping data. Stay informed about your wattage, battery life, and other essential information with ease.
Explore a variety of vaping styles with the Requiem Mod's versatile working modes. From Variable Wattage to Bypass, Variable Voltage, and Temperature Control, this mod caters to all preferences, ensuring a tailored vaping experience.
Available in a range of stylish colours, including Clear Black Gold, Clear Red, Clear Black, Clear Blue, and Ultem, the Requiem Mod allows you to showcase your unique vaping style. At vape shop uk brings you a variety of products worth browsing that you can enjoy at will.
Introducing Aspire Proteus Neo, the pinnacle of innovation in the world of e-hookahs.
Our story begins with a deep-rooted passion for revolutionizing the way people experience hookah.
Inspired by the rich heritage and communal joy of traditional hookah smoking, we embarked on a journey to create a product that captures the essence of this beloved tradition while embracing modernity and convenience.
The Proteus Neo is ideal for bars, hookah lounges, parties, and for in home use.
At Aspire, we believe that sharing hookah sessions should be an effortless and enjoyable experience for everyone.
We recognized the need for a portable and user-friendly e-hookah that could replicate the flavors and satisfaction of traditional hookah smoking without the hassle of setup, maintenance, and limited mobility.
That's how the Proteus Neo was born.
Jellybox V1 Kit is an small and portable draw-activated device. It is powered by a built-in 750mAh battery with 16W max and Type-C charging to bring you all day vaping experience. It is designed with LED battery indicator to timely show you battery life and multiple protections to ensure daily safe use. By adopting upgraded MCU chip, it also provides a constant output voltage to ensure delightful MTL vaping. It is fit for Jellybox V 0.8Ω/1.0Ω Pod Cartridge of 3ml capacity with leak-proof design to bring you original pure flavor. Just get it.
Details:
1. Small and light, compact and portable
2. Easy-to-use and low-cost draw activated device
3. Built-in 750mAh battery with 16W max
4. Type-C charging to satisfy all day vaping
5. Adopts upgraded MCU chip
6. Designed with LED battery indicator
7. Leak-proof 0.8Ω/1.0Ω pod for MTL vaping
8. 3ml e-juice capacity, easy refilling
9. Multiple safety protections
10. Packed with fashion element-lanyard
Rincoe Jellybox V2 Kit
Rincoe Jellybox V2 Kit is the pod system with portability and incredibly lightweight size, transparent style. The pod is easy to refill, can hold 3ml e-liquid capacity. In addition, Jellybox V2 Kit will intelligently detect the coil and automatically to provide stable output with the function of smart pod detection. Compatible with brand-new Jellybox V Cartridge (0.8ohm & 1.0ohm), Jellybox V2 will provide an original purer flavor. Jellybox V Cartridge is suitable for Jellybox V Series products, is the best option for no matter beginners or MTL lovers. What's more, Jellybox V Pod features new leakproof design, longer coil lifespan. A fashion lanyard is included in the package. Jellybox V2 Kit is powered by 850mAh built-in battery and upgraded MCU chip.
Details:
1. 850mAh built-in battery
2. 16W max output power
3. 3ml capacity, auto-draw
4. Type-C charging
5. Compatible with 0.8ohm/1.0ohm cartridge
6. Portability and incredibly lightweight size
7. Smart pod detection
8. Upgraded MCU chip
9. Leakproof design, longer coil lifespan
10. LED battery indicator
11. Fashion element-lanyard
12. Safety protections: Over Charging/Short-circuit/Over-heating/Low Voltage/Output Over-current Protection
Rincoe Jellybox V3 Kit
Jellybox V3 Kit features stunning and half transparent appearance with futuristic design. It is powered by a built-in 750mAh battery with Type-C charging to bring you all day vaping experience. It also comes with 5-16W adaptive power which automatically match the power to 0.8Ω/1.0Ω Cartridge. Designed with upgraded NCU chip, it provide a constant output voltage to ensure delightful MTL experience. It is fit for new leak-proof Jellybox V Cartridge 0.8Ω/1.0Ω with 3ml capacity and easy side filling to bring you original purer flavor.
Details:
1. Stunning and transparent, futuristic design
2. Built-in 750mAh battery with Type-C charging
3. Designed with LED battery indicator
4. 16W max power, stable output
5. Adopts upgraded MCU chip for MTL vaping
6. Fit for Jellybox V 0.8Ω/1.0Ω Cartridge
7. Multi-layer leak-proof design
8. 3ml e-juice capacity, easy side filling system
9. Multiple safe protections
10. Packed with fashion element-lanyard
Hello again. I’m back with you today to present another review for Sourcemore. I just recently reviewed the Kylin M boro tank which was the first time I’ve used any of the Kylin series of tanks but today I’m with you to attempt to present a fair...
Okino C100 Pod Kit - Powered by Innokin OK For You Hello again! Today I'm excited to bring to you a review of a product brand I've never heard of before, but has impressed me far beyond any expectations I might have had. The main reason is...
Okino C100 Pod Kit - Powered by Innokin OK For You
Hello again! Today I'm excited to bring to you a review of a product brand I've never heard of before, but has impressed me far beyond any expectations I might have had. The main reason is that Okino is a sub-brand of Innokin that has designed their products separate of Innokin, and from the ground up. The C100 is a small 800 mAh open pod device that has something I haven't seen yet, and has proven to come in quite handy. Their theme hovers around the word or idea of being "OK", but I will admit with a precautionary spoiler -
it's much better than just "OK".
I recommend heading over to Okino's site to get more info and check out their cute animations.
I appreciate @Innokin_timmy for sending me the Okino C100 for review. As always, it will be conducted in a fair and honest manner.
Let's dig in!
(pictures can be clicked on for easier viewing)
> OVERVIEW <
Colors:
There are 11 color options as of launch. Keep an eye out for more options if you're looking for a color more suitable to your liking. > Red
> Pink
> Yellow
> Green
> Dark Green
> Aqua
> Cyan
> Blue
> Purple
> Light Grey
> Black
Main Features:
There are quite a few features included in this small kit. The big things to pull out of the above is that there are two coil resistance options, 0.4Ω and 0.6Ω, there are moisture pads included (new concept), it uses an 800 mAh internal battery, and it has a USB Type-C charge port. They also don't mention this in the features, but this device activates by both auto-draw and a fire button.
Specs:
Each kit comes with: > C100 Pod Mod
> C100 Pod Cartridge (4mL; 2mL TPD)
> OK R2 Coil (0.4Ω)
> Condensation Pads
> A Vape Band
> A User Manual
> TEST RESULTS & OBSERVATIONS <
Intro:
The top picture of the two above displays everything that was sent to me for this review. What comes in the package itself is shown on the left. I would consider this a decent starter kit because it contains everything but your very own e-juice to start vaping. A reminder that his product is meant for DL/RDL vaping, so 2-5% salt nics are not advised. Stick to 1.8% salt nic or 18mg/mL freebase and lower. The only other nitpick that I have in calling this a great starter kit is that it only comes with a single coil. As a reviewer, I've been guilty on more than one occasion of accidentally frying my coil simply by trying to turn a device on before putting juice in the pod. As a fresh beginner, I'm almost positive that this is going to happen to more than a few people, and that's a terrible experience to start off with right out of the gate. I really wish every kit sold on the market would include two coils, especially when there are multiple different resistances available. I understand that the benefit is a lower cost, but cost really doesn't play much of a factor if the experience is ruined before you're even able to use the device. That's not a gamble I'd consider to be a good one - that's my two cents at least.
Additionally added to the kit that do not usually come in pod kits is a rubber lanyard band, and 5 condensation/moisture pads. The rubber lanyard band is self-explanatory and a nice feature if that is something you're interested in using. A lanyard itself is not provided, so that must be something are willing to seek out if you're interested in using the lanyard band.
The condensation/moisture pads are a completely new concept and are a welcomed gesture. While I can't say I've had any leaking issues thus far, I will say that due to the way I stored this device in my lunch bag, the moisture barrier created by a fully saturated wick was allowed to be interrupted and it ruined the normal capillary action that's needed to properly keep the wick saturated. The result ended up being a coil that became ultra-sensitive to burning if my draws were longer than about a second and a half. As an RDL vaper that's used to taking 3 or so second puffs, this felt a bit underwhelming. All of this because I stored this device on its side with a partial tank of juice. Even though the C100 is capable of being stored this way w/out leaking, it can cause issues and I don't recommend storing it on its side. I digress... So, while trying to resurrect the coil back to a useable state, the pod did end up leaking a bit due to my own diagnostics process and these moisture pads picked up that juice. The biggest reason that these pads are important are so that any juice that leaks down into the connector bay doesn't end up down in the pod mod, or in your lap, pocket, or purse. Additionally, these pads will keep juice from clogging up the auto-draw sensor which is a huge issue with pod devices that have the ability to be auto-drawn. Google it, it's a huge problem. Luckily with this device, it can be auto-drawn or fired using the fire button. That is however both a pro and a con when it comes to storing the device and is recommended to be turned off before stowing. I will explain how the functionality of the device works in more detail below.
The C100:
I received the Aqua colorway and it has a rather pastely look to it as you can see. At 25mm in width, this is a slightly larger pod device when compared to its apparent competitors in the market, however the C100 can not be directly compared to many of those products simply because this is not an MTL device like the Caliburns and Xroses. This would be more comparable to Vaporesso's Luxe X, Luxe XR, Luxe XR Max, and VooPoo's Vinci 3, in which this is a smaller device than all of those. The larger battery sizes found in direct-lung (DL) and restricted-direct-lung (RDL) devices are needed because each puff requires a higher wattage to provide that nice aromatic ploomage of vape. The 0.4Ω coil uses 22.5W and the 0.6Ω coil vapes at 18W. 800 mAh is not a lot for this purpose, however what you lose in battery capacity, you gain in size and pocket-friendliness. A reasonable compromise if you will, if size is of importance to you.
On the front of the Okino pod mod, it's quite easy to see the raised circular fire button. On the reverse side is where you'll find the USB Type-C charging port. The port is advertised to charge at 1.0A, and it reaches around 0.7A which is pretty common for 1.0A. At this rate with an 800 mAh battery, you can expect an empty to full charge to take around 75 to 90 minutes. The Okino C100 does support pass-through vaping for those that like to be able to take a few puffs while it's charging.
The pod mouthpiece tapers down quite nicely and fits between the lips very naturally. Unlike many DL devices with 810 drip tips, it will not feel like you're putting your lips around a garden hose.
On the underside of the pod mod, there's a white ring around the entire base that acts as the ring of illumination where different colored LEDs indicate specific functions of the pod mod. This can be confusing, but is a pretty common way for simple chips to provide a wide range of information.
On the top of the pod mod (under the pod), you'll see two brass-plated spring-loaded connectors toward the middle, two larger circular magnets, and a small black chimney that acts as the auto-draw sensor. Like I mentioned above, the white moisture pad you see here absorbs excess juice and prevents it from clogging up the connector pins and the auto-draw sensor. If a leak of any sort does occur, you'd simply replace it with one of the multiple backup pads that are provided in the kit. When purchasing additional coils, each of those boxes come with additional moisture pads, as well. Very thought out and considerate!
Part of the beauty in the C100 is how simple it is to use. Like most smaller pod devices, there really isn't too much to worry about in being able to just simply pop the pod in and begin vaping.
Use the following instructions to better understand basic functions: Operation:
> 3x clicks of the fire button - Turns the device on and off
> 2x clicks of the fire button (when on) - Turns an LED on or off that flashes colors constantly through a rotation
Light indicators:
> Battery Status - Blue = >30%; Yellow = 10-29%; Red = 0-9%
> Battery has Died - 8x red flashes
Light Indicators when Charging:
> Red = <90%
> Blue = >90%
> Light turns off when fully charged
Additional troubleshooting safety light indicators can be found in the manual if you experience anything not mentioned here.
The C100 Pod:
Leave the sticker on until you've filled the pod up to prevent yourself from frying the coil. Don't let my past failures become yours. There's a "Max" indicator on the pod which is kind of odd to me now that I think about it, lol. Usually this is considered a "Min" line, but I suppose it can also indicate the "Max" juice consumption line as well. Regardless, do not get in a habit of allowing your juice levels to get below this, or funky things will start happening to you, and not in a good way. This is a great way to start experiencing dry hits.
The rubber refill tab has an arrow pointing to the end that pulls up. It's also the squared off end if you find yourself confused. The refill hole is large enough to easily accommodate 100/120 mL Chubby Gorilla bottle nozzles, so no worries there. Once you've filled the pod and let it sit for 5 or so minutes (I take a few dry pulls on the pod while it isn't on the pod mod to help quicken the wicking process - sticker must be removed to do this), take the sticker off, pop it on the pod mod, and away you go!
As I mentioned before, the mouthpiece is very comfy when putting it between your lips for a puff. Not something usually experienced in a DL device.
The OK Coils:
The kit comes with the R2 OK coil pre-installed which is a 0.4Ω coil. Between the 0.4Ω and 0.6Ω coils, the 0.4Ω coil has a larger bore for more airflow making it more ideal for DL vaping. The 0.6Ω coil is slightly more restricted and more aimed at an RDL airflow. Regardless, both coils perform great and put out an immense amounts of flavor. If battery life over airflow is important to you, you may want to consider using the 0.6Ω coil to use less wattage per puff. For overall flavor output, I'd put the 0.4Ω coil ever-so-slightly above the 0.6Ω, but they're very close and almost indistinguishable.
A quick reminder when installing the coils, there is a right and wrong way of installing them which isn't necessarily intuitive. The open sided gaps on the bottom of the coils should be lined up with the magnets. If they're situated perpendicular to the magnets like you see in the bottom left picture, the pink O-ring is visible meaning that it isn't seated and sealing properly. In the bottom middle picture, the airflow slots in the coil are correctly lined up with the magnets, and thus allowing the coil to seat and seal properly. The picture in the bottom right is showing you the different bores of the chimney which changes the amount of available airflow. The slightly more restricted 0.6Ω coil is on top, with the 0.4Ω coil on the bottom. The lower the resistance, the more open the airflow usually is. This a general rule that applies to all vape products if this is something you weren't aware of.
And lastly, this is what you can expect from a replacement package of coils. 3 coils come in each box, along with additional condensation pads. The R1's are the 0.6Ω coils, and the R2's are the 0.4Ω coils.
> CONCLUSION <
The Okino C100 has blown me away. At first it just looked like a cheap plastic vape device and I wasn't all that excited to try it out. I actually used the Aquios Bars Innokin also sent for this review as my backup devices while on-the-go. Reluctant to start testing the product out, I've got nothing but great things to say about it. It's small for a DL device, it has outstanding flavor output, and beyond user-error, the coils are lasting quite a long time. While it's near impossible to keep track of how many total puffs I've put on these OK coils, my guess is that they easily compete and exceed against what I would consider the market standard of 1000 puffs. My only gripe is the battery size at 800 mAh, but taking the overall size of the device into consideration, it's easier to let it slide. My overall rating on the flavor output very easily makes the OK coils comparable to the best tasting coils on the market.
++ PROS ++
> Small for a DL device
> Intense, in-your-face flavor output
> Price-point is an easy yes
> Comfortable in the lips
> Auto-draw and fire button activation
> DL and RDL airflow options
> Condensation/Moisture pads (innovation!)
> Lots of extra pads
> Pod sits firm, but easy to remove
> USB Type-C
> Pass-through vaping
> Decent charge time
- - CONS - -
> Package only comes with one coil
+- CONSIDERATONS -+
> 800 mAh battery is smaller for a DL device
> Lanyard band available
> No lanyard comes in the package
> Juice level can be harder to see w/out proper light
> Coils dictate airflow/non-adjustable airflow
> RATING < 9.5
I considered giving this a 10, but nothing's perfect. The battery size is smaller for a DL device and only one coil comes in the package. But other than that, Innokin has blown me away with the Okino C100. There hasn't been too many pod devices I've purchased additional coils for, but I will be looking for these better-than-OK coils. A part of me hopes that Innokin adopts these coils in one of their atomizers. I would for sure be buying multiples. That's all that really needs to be said - if you're a DL or RDL vaper and are looking for a smaller portable device, I highly recommend giving this a go!
I advise you to head on over to Okino's site and take a look around. For now, I only see this available on Innokin's site found here. As of the posting of this review, the price is $16.99 and 100% worth it. I am not blowing smoke up your booty hole, this is definitely a winner!
Again, I want to thank @Innokin_timmy for providing this product for review. It's very much been a treat. I encourage you folks at Innokin to adopt the OK coils into one of your atomizers! Maybe a top airflow?
That's all I got for you folks. Thanks for reading, and I hope to catch you around in the next review.
Hello I have a smock scar 18 mod that I've had for roughly about a year I had to send in my drawer and then all of a sudden I want to use it and I get the low battery with fully charged batteries. I've used multiple sets of 18650 batteries so it's not the batteries. Any suggestions on what I could do to fix it
The Vandy Vape Requiem box mod is a transparent mod that requires the installation of a 21700/20700/18650 battery max 95w output wattage.High strength transparent materials make it high value,and the mod design of the curve to make the product more excellent ergonomic grip.make it lightweight and corrosion resistant, and perfect to match the rad/rta diameter in 28mm.
Features:
1. Classic Requiem series
2. High strength transparent materials
3. Excellent ergonomic grip
4. Lightweight and corrosion resistant
5. Integration up to 28mm
Is support for the upcoming Lost Vape Grus (Quest chipset) a possibility? Seems like a solid device and there aren't a lot of decent, single 21700 mods...
nfeteam.org
Russian reviewer/modder modding the firmware on a Centaurus BF. Apologies for only being available in Russian, but it at least goes through the process and shows what can be achieved.
Crafted with precision, this dovpo odin v2 mod boasts a lightweight aluminium alloy construction, weighing in at just 273g. Its sleek design and solid build quality make it a pleasure to hold and use.
Powered by 2x 21700 batteries or 18650 batteries (not included), the Odin V2 offers extended battery life for uninterrupted vaping sessions. The slider battery compartment provides easy access and ensures a secure fit.
Equipped with a USB Type-C charging port, this mod offers convenient charging options with a 5V/2A charging rate. No more waiting around for hours to get back to vaping!
With a power output ranging from 5 to 200 Watts, the dovpo uk odin v2 delivers an impressive performance to cater to all vaping preferences. It supports a resistance range of 0.07 to 3.5 ohms, allowing for a wide variety of compatible atomizers.
Featuring multiple steam modes such as VW (Variable Wattage), VV (Variable Voltage), and TC (Temperature Control) for Nickel, Stainless Steel, and Titanium coils, the Odin V2 provides a customizable vaping experience to suit your preferences.
The mod features a vibrant and user-friendly 0.96-inch TFT colour display, offering clear visibility and intuitive navigation. With seven display colour schemes to choose from, you can personalize the mod to match your style.
The cushioned 510 connection ensures seamless compatibility with a maximum diameter of 30mm RDA/RTA/Sub Ohm tanks, allowing you to pair the Odin V2 with your favourite atomizers.
If you are interested in this kind of vape mod, you can visit our online vape store to learn more.
Happy to inform you all! Funcky republic fi3000 will be on sale soon. It adopts SPCC Metallic Side Cover, and the product parameters are engraved on the surface of the shell in an on-screen display style. Such a one-piece design not only makes the product more textured, but also enhances the resistance to impact and durability.
The more important product parameters are as follows. Fi3000 disposable vape is pre-filled with 5ml of e-liquid, which contains 5% nicotine salt, and can provide about 3000puffs. It is equipped with 800mah rechargeable battery and QUAQ tech mesh coil, which fully guarantees that you can enjoy a smooth and wonderful vaping experience as soon as you inhale.
Last but not least, the fi3000 is rich in flavors and the funky republic brand is guaranteed. If you have any questions, you can contact the online vape store customer service at any time for solutions.
Hello
Im trying to import Rove cartridges into costa rica and customs is asking for the data sheet for them.
Looked all over and cant seem to find it anywhere.
Any help is greatly appreciated
Innokin & Aquios Labs | Aquios Bar Hello! Today we're going to be taking a look at a collaborative disposable that Innokin has worked with Aquios Labs on. What makes this device especially unique is that it's almost entirely recyclable. On...
Hello! Today we're going to be taking a look at a collaborative disposable that Innokin has worked with Aquios Labs on. What makes this device especially unique is that it's almost entirely recyclable. On top of that, we have Aquios Labs' AQ30 e-juice that's comprised of 30% water and has already proven to output a stellar vape also seen in a previous review of the Innokin Innobar C1.
I appreciate @Innokin_timmy for reaching out to do this review. Innokin's products are a delight to test out because like their company name, they thrive on innovation and that is always great to see as a reviewer. This critique will be conducted in a fair, unbias, and honest manner.
I recommend checking out Aqiuos Lab's page here for more info. I will highlight some of the features before sharing my thoughts on the Aquios Bar.
→ OVERVIEW ←
Flavors:
From top left to bottom right, we have: > Peach Ice
> Blueberry Ice
> Iced Cosmic
> Grape Ice
> Tropical Blue Ice
> Watermelon Ice
> Blueberry Bubble Gum
> Mango Passion Ice
> Sour Apple
> Sunrise Ice
Key Features:
As mentioned in the intro, the uniqueness of this device is due to: > AQ30 water-based vape juice
> Nearly 100% recyclable
Specs:
The big things to pull from the specs are the size, estimated puff life, and the nic strength (2% or 20mg/mL).
→ Test Results & Observations ←
Intro:
The Aquios Bar comes individually packaged in brightly colored boxes relative to the flavor profile with everything you need to know on the outside of it. Inside of each box there's an Aquios Bar, and a folded pamphlet with direction on how to disassemble it for recycling once it's been fully utilized.
The size of this device is extremely petite. At 17 by 97mm, this little guy is a centimeter and a half wide which almost half as wide as most pod devices. You may want to say that bigger is better when it comes to disposables, but think about it - have you ever really gotten to 6000 puffs, or even 3000 puffs from one of the big ones? Also, when it comes to pocket-friendly devices, this one takes the cake. For those looking for a super small device without fear of any leakage, the Aquios Bar fits almost too perfectly inside your pocket or purse. By too perfectly, I mean that it's almost easy to forget you have it in your pocket.
As a restricted-direct-lung (RDL) vaper myself, I'm quite picky about disposables and even pod devices because the airflow is often too restrictive. On the other hand, mouth-to-lung devices (MTL) I try to vape in RDL often end up burning the coils, as they're not meant to be vaped that way. The Aquios Bar has an airflow restriction similar to that of a lightly packed cigarette, and I'd classify it in the slightly loose MTL range. If you're a previous smoker, you should know how this draw feels. I've vaped all of the four samples I received almost exclusively in RDL, and there hasn't been a hint of any burnt flavor which I'm very delighted to see.
The Aquios Bar:
The Aquios Bar itself is quite simple. The outer shell is composed of cardboard material with the cap and bottom made out of silicone. The writing on the outside notes the flavor of the device with Aquios Labs' trademark AQ30 water-based eliquid logo.
I can't say I've ever vaped a product with a silicone mouthpiece before, but it's quite pleasant. There's a softness when putting your lips to it that hard plastic simply doesn't have. You can even bite down on it which is kind of an odd thing to say while I'm rereading this (lol), but it feels nice between the lips.
The bottom of the device has two very tiny holes however only one of them creates the slightly loose MTL draw. The other hole leads to a blue LED that lights up when taking a puff. You can cover the airflow hole slightly with your finger if you want to tighten the draw, but do this at your own risk. While I've tested this out to confirm that it does in fact work, I'm not entirely sure how it will affect the overall lifespan of the product.
Both the silicone mouthpiece and buttom cap can easily be removed to expose the innards of the device for recycling.
It should be noted that not every flavor has the word "ice" in it to denote that it contains mint or menthol, but the Blueberry Bubble Gum and Sour Apple that I received did indeed have mint in them. However, the "ice" is very subtle and more reminiscent of a candy cane flavored mint which still gives you that cooling sensation, but it doesn't overpower the entire flavor profile. If you're a disposable user, in the past I'm quite sure you've taken a few puffs from a device and ended up with what feels like brain freeze? Yeah, that's not a good feeling, and something I'd prefer not to experience from vaping. The Aquios Bar does a great job of providing the cooling sensation that disposables have, while not destroying the entire flavor with it.
Almost Entirely Recyclable:
Nearly everything about the Aquios Bar is recyclable. The packaging, the wrapper, the protective silicone plug/cap, and the Aquios Bar itself, other than the juice reservoir, can be disassembled and recycled. This is a big win in my book.
The folded up pamphlet you will find in every package shows the directions on how to disassemble and dispose of each component. Please remember that lithium-ion batteries and silicone are not recyclable in the same way that we normally recycle paper and plastics. In the US, please check your local recycling policies on how to discard these parts properly.
Flavor Profiles:
- Blueberry Bubble Gum -
90% - Blueberry
5% - Sweetener
5% - Candy Cane
One of the best blueberry flavors I've ever tasted in any e-liquid. Before this, my favorite blueberry juice was a blueberry streusel. If you're a fan of blueberry, this is definitely be a great choice.
Certainly one of the best pure watermelon flavors I've ever vaped. The flavor is extremely moist and saturated.
- Sour Apple -
95% - Sour (tart) Apple
5% - Candy Cane
They captured the tartness of a freshly picked apple almost perfectly in this one. If you like tart flavored e-juices, this one is definitely a great choice.
A very good mango! The 10% Passion Fruit captures the citrus flavor quite well. It's reminiscent of an orange, but is a great blend with the mango. The citrus is very faint, and really brings out the flavor in the mango.
→ Conclusion ←
Aquios Labs' AQ30 water-based e-liquid is a game changer and for me, the new standard to compare other disposables against. There's something about the water that truly brings out the flavor in each of their flavor profiles. I don't quite know how to describe it, so I'll give an example. Popping a watermelon candy in your mouth lacks the juiciness we can smell when cutting open a perfectly ripened watermelon. Biting into that center piece and being overwhelmed with watermelon juice is nowhere near the same as biting into a watermelon candy. The Aquios Bar Watermelon Ice does capture a bit of this. It isn't obviously the same, but it's a much more authentic experience than previous iterations of watermelon flavored e-juice that I've tried in the past. The same can be said about the Blueberry Bubble Gum, Sour Apple, and Mango Passion Ice. If you're a fan of saturated vapes with a tiny bit of mint, the Aquios Bar is a must try.
++ Pros ++
> Very small
> Spectacular vape
> 600 puffs is a decent expectation
> Almost entirely recyclable
> Easy to understand recycling instructions
> Very easy to disassemble
> Comfortable silicone mouthpiece
> 10 flavor options
- - Cons - -
> None
+- Considerations -+
> 2% nic concentration
> Non-rechargeable
For those that are unaware, Innokin constantly strives for new ideas while also being environmentally conscientious. For the dozen or so reviews I've written for them, their products have always used recycled packaging. In terms of recyclable products, this is something we haven't seen with disposables or anything vape related up until now, as far as I know. Disposables cause a much great concern than the standard box mod and atomizer, or even pod devices because they lack reusability. Instead of tossing a coil head or a cotton wick away, another piece of plastic with a lithium-ion battery in it lands on the ground somewhere on our planet. While many people don't seem to care all that much about this, it's a problem that future generations are going to have to face at one point or another. I'm asking anyone that reads this, to please take this into consideration when you purchase your vape products. Be part of the solution, not the problem.
That being said, I appreciate everyone that stuck with me through the entirety of this review. If you're a disposable vaper and you're looking for something new and refreshing, give the Aquios Bar a try. If you're a smoker and you're looking for harm reduction alternatives, look no further. If you're looking for a solid product as a simple on-the-go vape solution, this or the Innokin Innobar C1 are great options. If you're environmentally conscientious, this is about the only solution to fulfill that niche. There really aren't any negatives to give here. Truthfully, Innokin and Aquios Labs have hit it out of the park with this one.
As a side note, I need to stop vaping these before they taint the rest of my vapes, lol.
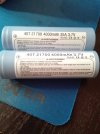
I dont like to mismatch batteries...
Anyway today i bought 2 40T samsung batteries for my mod came from the same shop but the sticker on the battery is not the same its slightly different from eachother, also the serial mumber on the case it comes in IS the same tho.. so same battery?
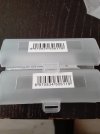
I made some pictures here
These are same right ? Cause of serialthe on the case? Just slightly diff sticker no biggie and is fine as a pair/married?
This site uses cookies to help personalise content, tailor your experience and to keep you logged in if you register.
By continuing to use this site, you are consenting to our use of cookies.