
You are using an out of date browser. It may not display this or other websites correctly.
You should upgrade or use an alternative browser.
You should upgrade or use an alternative browser.
Latest activity
Filters
Show only:
VapeSourcing UK Coupons Deals October (DAILY UPDATED)
- VapesourcingUK
- 15 Replies
VOOPOO Drag X3 Vape Mod Kit 80W
RRP: £25.99
Deal price: £18.99
Discount code: VDX3
Begins: 2025/10/09
Ends: 2026/1/31
VOOPOO Drag S3 Pod Mod Kit 60W
RRP: £24.99
Deal price: £18.59
Discount code: VDS3
Begins: 2025/10/09
Ends: 2026/1/31
Geekvape Aegis Hero Empty Pod Cartridge 6.5ml (New Version)
RRP: £4.99
Deal price: £2.99
Discount code: GAHP
Begins: 2025/10/09
Ends: 2026/1/31
GEEK BAR UP 10000 Prefilled Pod Kit
RRP: £9.99
Deal price: £6.99
Discount code: GBUP
Begins: 2025/10/09
Ends: 2026/1/31
Joyetech Exceed PCC Full Kit
RRP: £24.99
Deal price: £15.99
Discount code: JEPCC
Begins: 2025/10/09
Ends: 2026/1/31
Vaporesso Eco One Replacement Pod Cartridge (4pcs/pack)
RRP: £8.99
Deal price: £5.99
Discount code: VEOP
Begins: 2025/10/09
Ends: 2026/1/31
Back from Holiday | XO Style Aluminium Boro Tank for SXK BB
- Minecig
- 0 Replies
our team is finally back from the holiday! To kick things off, we’ve got something new in stock — XO Style Aluminium Boro Tank for SXK BB Billet AIO Box Mod Kit.
Made of lightweight aluminium, it’s durable, clean-looking, and fits perfectly with your SXK BB setup. Available now in Black Blue.
Weight: 40g
Material: Aluminium
Fresh stock just landed — check it out while it lasts!


Made of lightweight aluminium, it’s durable, clean-looking, and fits perfectly with your SXK BB setup. Available now in Black Blue.
Weight: 40g
Material: Aluminium
Fresh stock just landed — check it out while it lasts!
Lost Vape Orion Bar 50K New Version – A Fresh Upgrade to a Fan Favorite
- By Verashu
- Vapesourcing
- 0 Replies
The Lost Vape Orion Bar 50K New Version is here, and it’s easily one of the best vapes to buy online right now.

Building on the massive success of the original Orion Bar series, Lost Vape has refined both the look and performance of this upgraded edition, making it perfect for those who demand top-tier flavor, long-lasting use, and cutting-edge design.
The Lost Vape Orion Bar 50K New Version pod comes with an impressive 18mL pre-filled capacity and can deliver up to 50,000 puffs, ensuring an incredibly extended lifespan for a disposable. Powered by an upgraded smart chipset, this device automatically adjusts power output to deliver consistent flavor and vapor production throughout its use.
Whether you’re chasing bold flavor, massive vapor, or sheer convenience, the Lost Vape Orion Bar 50K New Version hits every mark. It’s proof that Lost Vape continues to lead the disposable scene with premium craftsmanship and innovation.
If you’re hunting for reliability, style, and performance, this new Orion Bar 50K upgrade is hands down one of the best vapes to buy online today.
Other kits you may prefer:
Lost Mary Nera Fullview 70K
Adjust Myrusher 40K Disposable Vape
Can the Hayati Solix 30K Handle Daily Heavy Vaping?
- VapesourcingUK
- 0 Replies
Hayati Solix 30000 Prefilled Kit, the perfect combination of durability, performance, and simplicity. Designed for both casual and heavy vapers, this device delivers a massive 30,000 puffs — giving you days of consistent, flavorful vaping without the hassle of constant refills or complicated settings.
The Hayati Solix 30000 features an ergonomic, compact design that fits comfortably in your hand and pocket, making it ideal for vaping on the go. Its high-capacity battery ensures long-lasting power, so you can enjoy your sessions without interruption. The draw-activated system makes it incredibly easy to use — simply inhale and let the device do the work. No buttons, no mess, just pure satisfaction.

Each prefilled pod is loaded with vibrant, smooth flavours that stay rich and consistent from the first puff to the last. Whether you prefer fruity, menthol, or dessert-inspired blends, the Hayati Solix ensures a premium taste experience every time. Built with high-quality materials and precise engineering, it delivers smooth vapor and dependable performance that truly lasts.
To get started, simply remove the device from its packaging, take off the mouthpiece cap, and inhale gently to activate. When the flavour starts to fade or you’ve reached the puff limit, dispose of it responsibly.
You can check out more details or grab yours at the vape online store uk for the best deals and latest releases.
Explore more exciting vapes:
drag x3 voopoo
voopoo vmate i3 kit
The Hayati Solix 30000 features an ergonomic, compact design that fits comfortably in your hand and pocket, making it ideal for vaping on the go. Its high-capacity battery ensures long-lasting power, so you can enjoy your sessions without interruption. The draw-activated system makes it incredibly easy to use — simply inhale and let the device do the work. No buttons, no mess, just pure satisfaction.
Each prefilled pod is loaded with vibrant, smooth flavours that stay rich and consistent from the first puff to the last. Whether you prefer fruity, menthol, or dessert-inspired blends, the Hayati Solix ensures a premium taste experience every time. Built with high-quality materials and precise engineering, it delivers smooth vapor and dependable performance that truly lasts.
To get started, simply remove the device from its packaging, take off the mouthpiece cap, and inhale gently to activate. When the flavour starts to fade or you’ve reached the puff limit, dispose of it responsibly.
You can check out more details or grab yours at the vape online store uk for the best deals and latest releases.
Explore more exciting vapes:
drag x3 voopoo
voopoo vmate i3 kit
The Latest: Pulse Liq Strawberry Banana Salt 30ml E-Juice
- Ecig Mafia
- 0 Replies
Buy Now: Pulse Liq Strawberry Banana Salt 30ml E-Juice
Pulse Liq Strawberry Banana Salt 30ml E-Juice delivers a smooth, fruity blend perfect for vape enthusiasts who crave a balanced flavor. This nicotine salt e-liquid combines the sweetness of ripe strawberries with the creamy smoothness of fresh bananas, creating a rich and satisfying vaping experience. With each inhale, you'll enjoy a burst of strawberry followed by a mellow banana finish. Ideal for use with low-wattage pod systems, the 30ml bottle offers a convenient and long-lasting supply. Pulse Liq ensures high-quality ingredients and a smooth throat hit, making this an excellent choice for those seeking a flavorful, all-day vape.
Features:
- Brand: Pulse Liq
- Flavor: Strawberry Banana
- Bottle Size: 30ml
- Nicotine Levels: 30mg / 50mg
- VG/PG: 50/50
Our Brands
Vaporesso Armour Ultra Box Mod: Strength Meets Intelligence
- By Morevaping
- Morevaping
- 0 Replies
Vaporesso Armour Ultra Box Mod is designed for those who take vaping seriously — built like a tank yet engineered with refined precision. This device doesn’t just look durable; it is durable. With IP68, IP69K, and MIL-STD-810H certifications, it stands firm against dust, water, and accidental drops. The compact design conceals a powerful 5500mAh integrated battery that delivers consistent performance for up to three days on a single charge, ensuring reliability even for the most demanding vapers.

One of its standout advantages is its seamless compatibility with Vaporesso iTank T, enhancing flavor delivery and vapor output while maintaining airflow smoothness. The AXON chip inside provides intelligent output control with multiple modes — Eco, Boost, Turbo, and TC — adapting effortlessly to different vaping styles. The 0.96-inch TFT color screen adds a modern touch, displaying puff count, wattage, battery level, coil resistance, and more. Every operation is waterproof, and a slide-lock feature secures the mod in just one second, reflecting Vaporesso’s thoughtful approach to safety and convenience.
For vapers seeking power, protection, and performance in one solid build, the Vaporesso Armour Ultra Box Mod is the device that truly delivers. It’s a balance of strength and sophistication, ready to elevate any vaping experience. You can buy vape online at Morevaping and experience the new standard in reliability and innovation.
Quick links:
olit hookalit mega 150k
lost mary nera pureview
Hyper Bar BE 70K: Extended Enjoyment with Premium Control
- By Morevaping
- Morevaping
- 0 Replies
Hyper Bar BE 70K represents a blend of power and refinement, built for users who appreciate long-lasting performance and smooth delivery. With a generous 30ml of pre-filled e-liquid and a powerful 1200mAh rechargeable battery, this device provides the freedom to enjoy extended vaping sessions without constant refills or recharging. The sleek and compact design makes it ideal for everyday use, offering comfort and portability without sacrificing output quality.

What makes the Hyper Bar BE 70K remarkable is its impressive puff capacity—up to 70,000 puffs. Designed with a 0.4-ohm dual mesh coil and adjustable wattage ranging from 15W to 30W, it ensures balanced vapor production and rich flavor consistency. Adjustable airflow allows users to fine-tune the draw for their preferred MTL experience. As one of the most reliable options in the market, it competes strongly with other cheap disposable vapes while maintaining a distinctly premium feel.
The Hyper Bar BE 70K offers convenience, customization, and endurance in one elegant device. It’s made for vapers who expect both performance and satisfaction from their setup. Those looking to buy vapes online often choose Morevaping, where authenticity, value, and service combine to create a trustworthy and enjoyable shopping experience.
Quick view:
hookalit vape
lost mary mt35000 turbo
VOOPOO Drag X3 Pod Mod Kit | VOOPOO Drag S3 Pod Mod Kit
- By Ema
- Sourcemore
- 0 Replies
VOOPOO Drag X3 Pod Mod Kit
VOOPOO Drag X3 is compatible with single 18650/21700 battery (not included) and PnP X platform. It is designed with 1.66 inch touch screen, features 5-80W output and capacitive unlock sensor.
Details:
1. Compatible with 18650/21700 battery
2. 1.66 inch touch screen
3. Capacitive Unlock sensor
4. Compatible with PnP X Platform
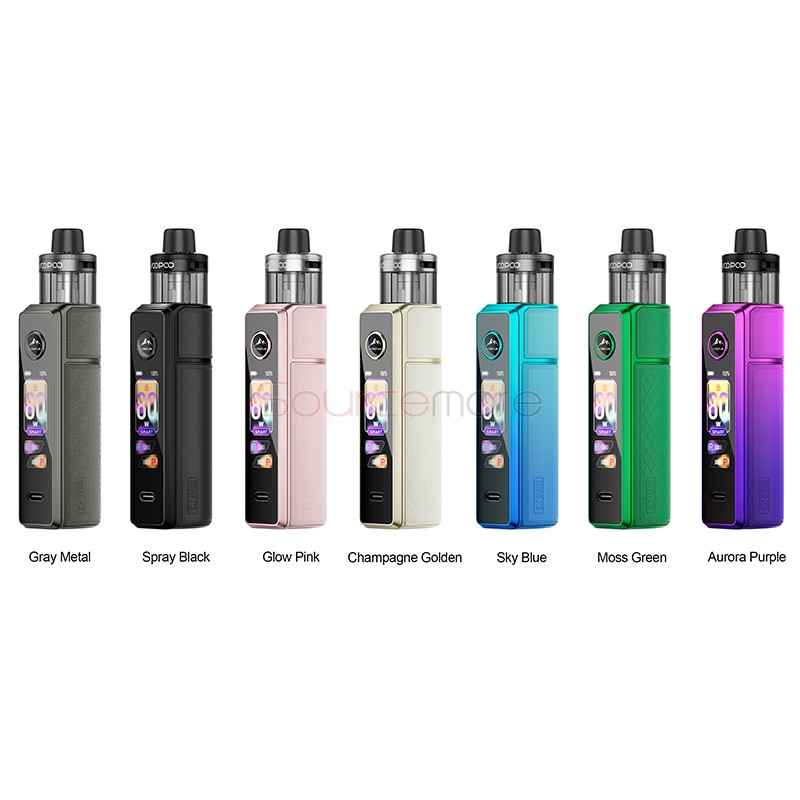
VOOPOO Drag S3 Pod Mod Kit
VOOPOO Drag S3 Pod Mod System Kit is built with 3000mAh large battery, providing 5-60W output power. It comes with 5ml PnP X Cartridge MTL, is compatible with PnP X platform. VOOPOO Drag S3 features 0.96 inch TFT screen, side filling system.
Details:
1. 3000mAh large battery
2. Capacitive unlock sensor
3. Compatible with PnP X Coils
4. 0.96 inch TFT screen

VOOPOO Drag X3 is compatible with single 18650/21700 battery (not included) and PnP X platform. It is designed with 1.66 inch touch screen, features 5-80W output and capacitive unlock sensor.
Details:
1. Compatible with 18650/21700 battery
2. 1.66 inch touch screen
3. Capacitive Unlock sensor
4. Compatible with PnP X Platform
VOOPOO Drag S3 Pod Mod Kit
VOOPOO Drag S3 Pod Mod System Kit is built with 3000mAh large battery, providing 5-60W output power. It comes with 5ml PnP X Cartridge MTL, is compatible with PnP X platform. VOOPOO Drag S3 features 0.96 inch TFT screen, side filling system.
Details:
1. 3000mAh large battery
2. Capacitive unlock sensor
3. Compatible with PnP X Coils
4. 0.96 inch TFT screen
petition needs your signature
- By FlamingoTutu
- General Vaping Discussion
- 13634 Replies
Let's see you do it. ")

Shinyitis Support Group
- By englishmick
- General Vaping Discussion
- 148834 Replies
When I lived in London my sister came back from a year in Germany and moved in with me for a while. The first night she was there my cat left a headless rat outside her bedroom door as a welcome gift.
When I moved into my wife's house in the US I brought my cat. Wife had a poodle. We got back one day and the poodle was missing. We eventually found her hiding under the covers on the bed shaking. Then we went in the living room and found the dismembered remains of a bird scattered around. We reckon she saw the murder and figured she might be next.
Magic Bar Ultimate 15000: The Ultimate DTL Experience, Now Disposable
- Decentvape
- 0 Replies
Are you tired of weak, unsatisfying disposables that just can't keep up? The era of compromise is over. The Magic Bar Ultimate 15000 is engineered for true cloud chasers and flavor connoisseurs, merging pure DTL (Direct-to-Lung) performance with the absolute convenience of a disposable device. This isn't just a vape; it's your new benchmark for power.

If you are looking for a true DTL disposable and a genuine big cloud disposable vape, then your ultimate search is finally over.
Don't just vape—dominate. Experience the peak of disposable DTL performance. Get your Magic Bar Ultimate 15000 at DecentVape today!
A DTL Core Built for Peak Performance
At the heart of the Magic Bar Ultimate is a powerful 0.5-ohm sub-ohm mesh coil. This isn't just a technical spec; it's the engine of your ultimate DTL experience. It heats e-liquid with incredible speed and uniformity, instantly unleashing massive, dense clouds that standard disposables can't possibly replicate. At the same time, it renders every flavor note with precision, delivering a rich and full-bodied impact with every puff."Ultimate" Isn't Just a Name—It's a Promise:
- Epic 15,000 Puff Capacity: A massive 22ml e-liquid reservoir means you can forget about frequent replacements. Enjoy weeks of uninterrupted vaping pleasure.
- True Sub-Ohm DTL Coil: The 0.5Ω mesh coil is specifically designed for huge vapor production, ensuring every hit is a powerful and satisfying DTL draw.
- Precision Airflow, Total Control: Take command of your vape with the fully adjustable airflow system. Whether you prefer a slightly restricted, flavor-dense draw or a wide-open inhale for maximum clouds, a simple twist is all it takes to customize your experience.
- All-Day Power on Demand: A robust 650mAh rechargeable battery combined with an efficient Type-C charging port ensures you have the power to vape through all 22ml of e-liquid to the very last drop.
- Thoughtful Dust-Proof Design: We know hygiene is crucial. The integrated dust-proof feature keeps your mouthpiece clean and ready, ensuring every puff is as pure as the first.
- Perfectly Balanced Nicotine: The 2% nicotine strength delivers a smooth yet satisfying throat hit that perfectly complements the powerful DTL experience without being harsh.
Conclusion
The Magic Bar Ultimate 15000 is not for those who settle for mediocrity. It's for the dedicated vaper who craves uncompromising clouds, intense flavor, and custom control, all in a hassle-free disposable format.If you are looking for a true DTL disposable and a genuine big cloud disposable vape, then your ultimate search is finally over.
Don't just vape—dominate. Experience the peak of disposable DTL performance. Get your Magic Bar Ultimate 15000 at DecentVape today!
For Sale A BUNCH OF VAPING STUFF
- By GeekyGeezer
- Member Classifieds and Swaps
- 12 Replies
Sent PMhave black note 12mg about 8 bottles 10ml variety of there tobacco's,also have 0mg and 12mg 60ml of both vanilla custard and coffee caramel,vapetasia killler custard about 100ml 6mg,royalty 6mg 30ml,80ml candy king lemon drops
Vapesourcing Coupon Deals October 2025 (Daily Updated)
- By Verashu
- Vapesourcing
- 14 Replies
Come and take a look at what we have to offer! Special offers
> Lost Vape Orion Bar 50K New Version Disposable Vape 28ml 5%
Coupon Code: LVOBN
Coupon Price: $12.59
Discount: 30.02% off
> Olit Hookalit Mega 150K Disposable Hookah Head 80ml 0.35%
Coupon Code: OHMD
Coupon Price: $21.99
Discount: 26.68% off
> Lost Vape Orion Bar 50K New Version Disposable Vape 28ml 5%
Coupon Code: LVOBN
Coupon Price: $12.59
Discount: 30.02% off
> Olit Hookalit Mega 150K Disposable Hookah Head 80ml 0.35%
Coupon Code: OHMD
Coupon Price: $21.99
Discount: 26.68% off
Shinyitis Support Group
- By Letitia
- General Vaping Discussion
- 148834 Replies
Happy Wednesday Shiny's
Load more