-
Locked
HELLVAPE DEAD RABBIT MAX RDA review by hittman
- By hittman
- Tank Reviews
- 8 Replies
I’m glad to be back today with yet another review for Hellvape. I know it may get a little confusing with all of the Dead Rabbit and Fat Rabbit rdas and rtas available from Hellvape but I’m here today to talk about yet another RDA called the Dead Rabbit Max Rda. The first thing that sets this apart from previous rdas that I’ve reviewed from them is that this one has a 28mm base. Thus the Max name. This is designed to be a dual coil rda with the dual post build deck. The rabbit ear posts are elevated enough that you can trim the coil legs underneath if you have the right cutters. I have seen a lot of rdas lately with honeycomb airflow design but this one is different where it has two X shaped cutouts on each side that bring airflow hitting the sides of the coils. One other thing that is different on this one is that it is the deepest juice well that I’ve seen on an rda at 7mm in depth. It does include a BF pin for squonking if you so choose to install it.


WHAT’S IN THE BOX?
1 Dead Rabbit MAX RDA
2 0.2ohm Ni80 Clapton Coils
2 Shoelace Cotton
1 Coil Cutting Tool
1 BF Pin
1 Accessory Bag
1 User Manual

SPECIFICATIONS:

FEATURES:
28mm Diameter
7mm Deep Juice Wells
Superior Stainless Steel Construction
Elevated Dual Post, Quad Terminal Design
Two Terminals Per Post
Top Side Secured via Flathead Screws
Dual Coil Configuration
Dual X-Shaped Airflow Control System
810 Wide bore Drip Tip
Threaded 510 BF Connection
Available in SS, Black Red, Full Black, Gunmetal, Army Green, Red, Gold


INITIAL THOUGHTS:
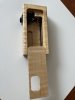
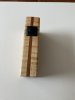
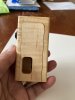
The packaging for the Hellvape Dead Rabbit Max is the usual red box with black writing that I have become accustomed to seeing from them. On the front is the Hellvape name with a clear window that the rda can be seen through along with the Dead Rabbit logo, the Max name, and 28mm indicating that the base is 28mm in diameter. On the top edge is the slogan “evoke your vaping genius”. The back side of the box has the usual features, package contents list and company information.


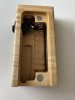
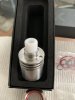
Most of the Hellvape tanks I’ve reviewed have come with plenty of accessories to get the user started and this one is no different. Besides the rda itself, included in the contents are two coils, two cotton threads, extra grub screws and o rings, screwdriver for posts, allen wrench to install the included BF squonk pin, coil measuring tool, and user manual.

As usual, the first thing I do when I get a new tank is clean it. I had not seen the Max RDA anywhere before receiving it so wasn’t exactly sure how it came apart due to the precision machining of this rda. I knew that there would be airflow adjustment so there had to be an inner and outer barrel assembly. It was a very tight fit but was able to get it apart for cleaning.

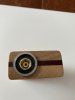
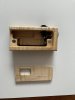
As you can see above, I received the gold version. Wouldn’t have been my first choice but it’s nice none the less. The 810 drip tip has no o rings on it as the o ring is inside the top cap. The outer barrel has two rabbit ears engraved in it on each side with two X openings that represent the eyes and are also the airflow control openings. This is a bit different from the previous rdas I’ve reviewed and was concerned that I would not be able to properly adjust the airflow where I would like it due to becoming used to the honeycomb airflow design that I have become fond of. I was pleased though to find that I liked the airflow set with one X open and one closed for a slightly restricted DTL at 55-60 watts with the included coils. The airflow hits the coils horizontally and goes up to the top. The deck posts are rounded to help minimize airflow turbulence just like the Dead Rabbit 3 did. I found the airflow adjustment to be slightly difficult due to how tight the cap is. You can see in the second picture below that there are notches inside the inner barrel assembly that allow it to lock onto the base.


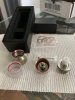
Now on to the build deck. Not only is this the largest build deck in the Dead Rabbit series that I am aware of at 28mm but also has a 7mm deep juice well which allows more vaping time between having to drip or squonk. It’s almost to the point of having a reservoir like an rdta. The posts are raised and rounded to help smooth out airflow compared to a square post design. The grub screws are slotted and really a nice size compared to some I’ve seen which makes it that much easier to see when building.

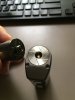
Normally I wouldn’t build this low but felt it was necessary to test the Max with the included coils. The included coils are .2 ohm Ni80 which brings the reading on my Thelema 200 to .11 ohms once installed. Normally I’d use a couple .4 ohm coils to come out around .2 ohms for a final result. The coils were very easy to install, straighten, and wick. I was able to use one of the included cotton threads to wick both coils.


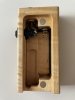
You can see in the picture above that there are two o rings on the base that seal the deck once the barrel is installed. It makes a good seal. I probable cut my cotton a little long but wanted to make sure that it reached the bottom of the deep juice well. The bottom of the deck has the Hellvape logo and the Dead Rabbit Max RDA name. It comes with the standard 510 center pin that is gold plated. It uses the included allen wrench to remove it so the squonk pin can be installed. I chose not to install the squonk pin on this one since the juice well was so deep. I wanted to see how long I could go without dripping. I probably don’t run the output as high as some do but found that I was able to take several puffs without having to drip while set at 57 watts.

FINAL THOUGHTS:
Overall I was rather pleased with the ease of use and flavor/vapor production from the Hellvape Dead Rabbit Max. Having received the gold version, the rabbit ears engraved in the sides of the outer barrel are a little difficult to see but there is no branding on the outside of the rda. I don’t know if it would have looked funny or not but kind of wish the outline of the ears had been highlighted in a different color.
I very much liked the ease of building on the deck due to the positioning of the posts and the size of the grub screws. I didn’t try it but you might be able to trim the coil legs after installing them into the deck if you have a skinny set of cutters. The deep juice well will be a much appreciated feature by those that choose to drip.
Some might ask if they already have the Dead Rabbit 3 if this one is worth getting or if the flavor is better. I don’t think it’s necessarily better in the flavor department but seems about as good but it’s different due to the different design of the airflow using the two X openings instead of the honeycomb airflow of the DR3.
So, would I recommend the Dead Rabbit Max for you? Well, if you like large dual coil rdas that provide pretty darn good flavor and large amounts of vapor then this would be a good fit for you. Thanks goes out to Hellvape and Dani for sending the Hellvape Dead Rabbit Max RDA for this review and a big thanks to the readers. Below is a link to the website for your viewing pleasure.
Dead Rabbit Max RDA -Hellvape - The DIY atomizer leading brand

WHAT’S IN THE BOX?
1 Dead Rabbit MAX RDA
2 0.2ohm Ni80 Clapton Coils
2 Shoelace Cotton
1 Coil Cutting Tool
1 BF Pin
1 Accessory Bag
1 User Manual
SPECIFICATIONS:
FEATURES:
28mm Diameter
7mm Deep Juice Wells
Superior Stainless Steel Construction
Elevated Dual Post, Quad Terminal Design
Two Terminals Per Post
Top Side Secured via Flathead Screws
Dual Coil Configuration
Dual X-Shaped Airflow Control System
810 Wide bore Drip Tip
Threaded 510 BF Connection
Available in SS, Black Red, Full Black, Gunmetal, Army Green, Red, Gold
INITIAL THOUGHTS:
The packaging for the Hellvape Dead Rabbit Max is the usual red box with black writing that I have become accustomed to seeing from them. On the front is the Hellvape name with a clear window that the rda can be seen through along with the Dead Rabbit logo, the Max name, and 28mm indicating that the base is 28mm in diameter. On the top edge is the slogan “evoke your vaping genius”. The back side of the box has the usual features, package contents list and company information.
Most of the Hellvape tanks I’ve reviewed have come with plenty of accessories to get the user started and this one is no different. Besides the rda itself, included in the contents are two coils, two cotton threads, extra grub screws and o rings, screwdriver for posts, allen wrench to install the included BF squonk pin, coil measuring tool, and user manual.
As usual, the first thing I do when I get a new tank is clean it. I had not seen the Max RDA anywhere before receiving it so wasn’t exactly sure how it came apart due to the precision machining of this rda. I knew that there would be airflow adjustment so there had to be an inner and outer barrel assembly. It was a very tight fit but was able to get it apart for cleaning.
As you can see above, I received the gold version. Wouldn’t have been my first choice but it’s nice none the less. The 810 drip tip has no o rings on it as the o ring is inside the top cap. The outer barrel has two rabbit ears engraved in it on each side with two X openings that represent the eyes and are also the airflow control openings. This is a bit different from the previous rdas I’ve reviewed and was concerned that I would not be able to properly adjust the airflow where I would like it due to becoming used to the honeycomb airflow design that I have become fond of. I was pleased though to find that I liked the airflow set with one X open and one closed for a slightly restricted DTL at 55-60 watts with the included coils. The airflow hits the coils horizontally and goes up to the top. The deck posts are rounded to help minimize airflow turbulence just like the Dead Rabbit 3 did. I found the airflow adjustment to be slightly difficult due to how tight the cap is. You can see in the second picture below that there are notches inside the inner barrel assembly that allow it to lock onto the base.
Now on to the build deck. Not only is this the largest build deck in the Dead Rabbit series that I am aware of at 28mm but also has a 7mm deep juice well which allows more vaping time between having to drip or squonk. It’s almost to the point of having a reservoir like an rdta. The posts are raised and rounded to help smooth out airflow compared to a square post design. The grub screws are slotted and really a nice size compared to some I’ve seen which makes it that much easier to see when building.
Normally I wouldn’t build this low but felt it was necessary to test the Max with the included coils. The included coils are .2 ohm Ni80 which brings the reading on my Thelema 200 to .11 ohms once installed. Normally I’d use a couple .4 ohm coils to come out around .2 ohms for a final result. The coils were very easy to install, straighten, and wick. I was able to use one of the included cotton threads to wick both coils.
You can see in the picture above that there are two o rings on the base that seal the deck once the barrel is installed. It makes a good seal. I probable cut my cotton a little long but wanted to make sure that it reached the bottom of the deep juice well. The bottom of the deck has the Hellvape logo and the Dead Rabbit Max RDA name. It comes with the standard 510 center pin that is gold plated. It uses the included allen wrench to remove it so the squonk pin can be installed. I chose not to install the squonk pin on this one since the juice well was so deep. I wanted to see how long I could go without dripping. I probably don’t run the output as high as some do but found that I was able to take several puffs without having to drip while set at 57 watts.
FINAL THOUGHTS:
Overall I was rather pleased with the ease of use and flavor/vapor production from the Hellvape Dead Rabbit Max. Having received the gold version, the rabbit ears engraved in the sides of the outer barrel are a little difficult to see but there is no branding on the outside of the rda. I don’t know if it would have looked funny or not but kind of wish the outline of the ears had been highlighted in a different color.
I very much liked the ease of building on the deck due to the positioning of the posts and the size of the grub screws. I didn’t try it but you might be able to trim the coil legs after installing them into the deck if you have a skinny set of cutters. The deep juice well will be a much appreciated feature by those that choose to drip.
Some might ask if they already have the Dead Rabbit 3 if this one is worth getting or if the flavor is better. I don’t think it’s necessarily better in the flavor department but seems about as good but it’s different due to the different design of the airflow using the two X openings instead of the honeycomb airflow of the DR3.
So, would I recommend the Dead Rabbit Max for you? Well, if you like large dual coil rdas that provide pretty darn good flavor and large amounts of vapor then this would be a good fit for you. Thanks goes out to Hellvape and Dani for sending the Hellvape Dead Rabbit Max RDA for this review and a big thanks to the readers. Below is a link to the website for your viewing pleasure.
Dead Rabbit Max RDA -Hellvape - The DIY atomizer leading brand