DNA charger / case thickness

Status
Not open for further replies.

westy78

Senior Member
ECF Veteran
Verified Member
Feb 4, 2013
122
83
Colorado
Howdy y'all,

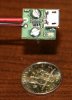
I want to use a dna charger in my mod, but the case is wood with 1/8" wall thickness. I am concerned that the case wall will be too thick and the male plug body will bottom out on the outside of my box before making good contact in the receptacle.

See how the tip doesn't extend too far beyond the board? Looks perfect if you're using a thin-walled metal box or an acrylic face but maybe not with wood. Can anyone who's used one of these chargers offer some guidance?
 

Attachments

  • image.jpg
    image.jpg
    22.9 KB · Views: 38

asdaq

Vaping Master
ECF Veteran
Verified Member
Feb 23, 2010
4,570
1,845
poland, and the brassy lands of google
My phone has micro-USB so I just checked the male end. The metal part is 5mm long and the pins start very close to the end. The connector on the DNA charger looks to prutrude 1mm, so you should have 3mm of net distance for contact. While you are building it would be good to test the fit of everything, but I think it should work. Many times in mods you see the slot is dremeled and not always even, especially with plastic, but with wood it is more manageable. If you are finding the plug is not fitting with the 1/8" wall, countersinking with a larger bit would be the way to go as a thinner wall by a hole would not compromise strength and you can still use most every cable.

edit: Last summer I had to reiforce the connections on the male end of a cheap car charger and as you can see here there is not much more plug to be had in the plastic housing:

600_microusb.jpg
 
Last edited:

westy78

Senior Member
ECF Veteran
Verified Member
Feb 4, 2013
122
83
Colorado
asdaq--thanks for the measurement! It sounds like this may not be a problem after all. I was holding back ordering the charger until I could figure out a way to make the wall thinner but I think I'll go ahead and get it.

mre--I have been scratching my head figuring out how to do just what you suggested. That may be the ticket. I missed your charger when I looked through your thread. Good to know it can be done.

Here is an image of my wood "tube." The charger is a little tough to see but it's in line with the screen and off to the left. The tube is made in one piece unlike most of the wood boxes I have seen. It may be tricky to freehand rout the back side of the charger slot where I have it positioned--may need to move it closer to the end. Guess I'll find out if I end up having to cross that bridge.

image.jpg
 

asdaq

Vaping Master
ECF Veteran
Verified Member
Feb 23, 2010
4,570
1,845
poland, and the brassy lands of google
No worries, the ruler was right on my desk inches from my charged phone. :)

That does look challenging to work from the inside, could you move the charger to the bottom plate? BTW, how are you keeping the plates on if I may ask? You will like the shape and feel of that mod, I can guarantee.
 

mre777

Super Member
ECF Veteran
Verified Member
Nov 4, 2012
460
365
Daytona Beach
If you have your heart set on that position for the charger its going to be tough to make a recessed slot for it, you may need to try small wood chisels and make a grooved channel from the bottom kind of like a partial dado all the way to the spot you want it to poke through. It may be easier to just make it come out of the bottom.
 

westy78

Senior Member
ECF Veteran
Verified Member
Feb 4, 2013
122
83
Colorado
BTW, how are you keeping the plates on if I may ask?

Good question... What's missing in the image above is an inner cap of wood (epoxied to the outer cap) for a friction fit inside the tube. It was a quick modification of an earlier version of the pic, and I accidentally deleted the inner 'plug.' Earlier version with inner cap/plug shown here...

As for the *ahem* ".... plug," hmm... I need to give the location some more thought. I'd like to be able to stand it up while charging. Hadn't thought too much about puffing while charging.

I usually vape right-handed. I've gone back and forth about button locations (thumb vs. index finger side) but this is currently how I'm thinking I want it to fit in hand. I think the current charger location might work while vaping. My hope is that the mass of the batt plus the weight of a Terminator (or whatever tank) would keep it from tipping. What do you think?

image.jpg

Not sure if this sketch conveys the size I'm going for-- 3.5"x1.75"x1". I hope the rounded shape makes it feel slimmer/smaller.
 
Last edited:

asdaq

Vaping Master
ECF Veteran
Verified Member
Feb 23, 2010
4,570
1,845
poland, and the brassy lands of google
I had forgotten about the inner caps, that would make it harder to get the charger socket in there, but that also seems like a good spot for the free space. I see also that you are planning on using foam to divide the inner chamber, but have you considered dual holes with wood in between? It is easier to drill, has more structural strength and you have two round compartments friendly for a battery and the electronics. You would have a ~3" x 3/4" hole to fit the DNA, the charger and buttons plus wires and 510. That really is a lot of room for all that.

The center of gravity is good for the battery, but the tank is set higher so will have more leverage. Tipping front to back won't happen, but side to side it can still tip. Also it balances on one point.

Now don't laugh, but have you considered cork for the inner plugs? Not where the 510 goes but the other 3 locations would do well with this. Wine bottle fit well in 3/4" holes and are made for friction fitting.
 

westy78

Senior Member
ECF Veteran
Verified Member
Feb 4, 2013
122
83
Colorado
This mod uses the DNA12.....but looks similar to your design...

Just when I thought I had an original idea...:glare:

I had considered using two simple bores without opening up the entire tube. Initially, I ruled it out because I wanted plenty of room for wiring. But the main reason is that I wanted to get the display on the flat part of the body. I plan to fill the display hole in the wood with acrylic so that it fits flush with the surface and I didn't want to get into sanding the acrylic insert to conform to the curve, then polishing it to restore a clear view.

However... I'm reconsidering this. I could keep two separate bores and still get the screen over far enough by squaring out one corner of one of the circles using a hollow-chisel mortiser. I like keeping two separate chambers; I was already thinking of gluing a divider in and now I won't have to.

image.jpg

Cork is a great idea! I made a mockup using a wood plug but I was concerned that seasonal movement of the wood might split the case. Cork seems better. I think it might even work at the 510 as well if the connector is well-epoxied to the metal cap and not relying on the cork for support. Cork is basically an insulator (right?) so no worries about contact with the 510 body. Thank you asdaq!
 

asdaq

Vaping Master
ECF Veteran
Verified Member
Feb 23, 2010
4,570
1,845
poland, and the brassy lands of google
Cork would be decent for keeping the ends on. I use spring loaded spines for keeping the ends on, but need them to not slide or shift, so for this I lately have been using self adhesive felt furniture pads that are to be had in a variety of diameters and thicknesses. The thicker ones are 3-5mm, but are likely too soft to keep ends held on.
 

fourtytwo

Ultra Member
ECF Veteran
Verified Member
Apr 8, 2012
1,471
1,182
Toronto
Cork would work but a rubber stopper or bung might be more durable.

Keeping it as two separate bores with the central wall would also give you a lot more strength. 1/8" might be a bit thin for something that will be handled as often as a mod.

Have you considered epoxying in a thin walled metal tube to line each chamber?
 

westy78

Senior Member
ECF Veteran
Verified Member
Feb 4, 2013
122
83
Colorado
Cork would work but a rubber stopper or bung might be more durable.

Keeping it as two separate bores with the central wall would also give you a lot more strength. 1/8" might be a bit thin for something that will be handled as often as a mod.

Have you considered epoxying in a thin walled metal tube to line each chamber?

Fourtytwo--I'm responding to your post over here. (Just trying to consolidate things related to this design in one thread...sorry if that's bad form :unsure:)
 
Status
Not open for further replies.

Users who are viewing this thread