Whew, I read through the whole thread before posting. Big ups to ThePuck for the awesome inspiration. I started out with a 4AAA puck with the Radio Shack coax connector and loved it. I work with a bunch of electronics nerds so it always started conversations. Then I made a 4AA puck. Here there are, side-by-side:

The AA unit has a adapter from V2 Cigs as the 808 connector. They're cheaper than the proper 808 connectors and work just fine. Recently, I got into tanks and large clearomizers, which sit awfully tall on my pucks, especially with a 510 adapter:

So I thought about Puck's "Puck II" design and figured I could incorporate something like that into my existing AA puck. Well that I did, using part of a cheap truck stop e-cig charger and an 808-510 adapter because it fit really well into the housing:

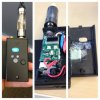
In the process, I also added the Madvapes voltage display and upgraded to two LEDs positioned next to the tank so they'd illuminate the juice in low light:

So there you have it, folks. I'm pretty much out of room on this mod, so I guess I have to build another one. What a hard life.
The AA unit has a adapter from V2 Cigs as the 808 connector. They're cheaper than the proper 808 connectors and work just fine. Recently, I got into tanks and large clearomizers, which sit awfully tall on my pucks, especially with a 510 adapter:
So I thought about Puck's "Puck II" design and figured I could incorporate something like that into my existing AA puck. Well that I did, using part of a cheap truck stop e-cig charger and an 808-510 adapter because it fit really well into the housing:
In the process, I also added the Madvapes voltage display and upgraded to two LEDs positioned next to the tank so they'd illuminate the juice in low light:
So there you have it, folks. I'm pretty much out of room on this mod, so I guess I have to build another one. What a hard life.
Last edited:
")