How to: Build the Puck

Status
Not open for further replies.

thenn

Senior Member
ECF Veteran
Oct 2, 2011
92
71
PA
Shot with ss Ming from Cherry vape and 510 atty.
 

Attachments

  • ImageUploadedByTapatalk1331350448.533722.jpg
    ImageUploadedByTapatalk1331350448.533722.jpg
    22 KB · Views: 48

ThePuck

Super Member
ECF Veteran
Feb 3, 2010
412
80
Hillsboro, Ohio USA
puckecig.com
Had to put he washer on the button side super tight fit.
Also I can't solder so I used a creme brûlée torch. Melted a lot of plastic.
Button was from goodprophet. Concave style

Even the swtich from Radio Shack needs to have the nut screwed on to the bottom before installing to elevate it a bit. Not many switches are short enough by themselves and I have tried a lot :).

Since it works, that's all that counts. :)
 
First and foremost:

THANKS TO ThePuck FOR THE GREAT TUTORIAL !!! A good deal of work putting that together I'm sure!

Here's some things I thought I should pass on from my experience building my first Puck. I'm going to make a separate post next about batteries.

- You really do want that T-handle reamer. I got the one for $3.49 from harbor freight tools. I lets you slowly get exactly the hole diameter needed. I use a CE2 clearo and that plastic tube needs a pretty big hole, not leaving much plastic of the battery box on either side. I don't think I could have done it right with a drill bit. Maybe a rat-tail file, but it's hard to get a truly round hole with those. The reamer is a great tool. Sears had one in stock for around $9, but it wasn't craftsman, so probably Chinese just like the one from harbor freight.

- QuikSteel is awesome! I'm sure that made putting the coax jack in way easier since it's putty and you can form just the right thickness and shape. Seems like it would have been harder to get enough epoxy in place. My wallymart had it in automotive, they have a little section for adhesives there. It was not in the main adhesives section in hardware. I put some in the slot and pressed the jack (with the carto on it to make sure it's aligned right) down into it. Then I molded some more over the top and over the sides of the walls. Test fit the jack / carto first and have it already in there before you mix up the QuikSteel, it hardens fast. Also, don't make it too thick on top of the jack, there's not that much clearance to the cover. I noticed I had too much and sliced some off with a sharp knife before it completely hardened, luckily. That jack is not going anywhere! Great stuff.

- An alternative to the solder bridge. I failed at this on my first try. I thought I had it, it tested good for resistance with the meter, but I think I actually had a cold solder. I had a lot of solder go though the opening and end up inside the jack too. I may have melted some of the plastic that the metal "ring" part of the jack is over into the connection. It failed once I had it in place with QuickSteel and it had hardened (no going back from that point!). Probably came loose with a little pressure on the jack since I didn't have a good solder. So back to RS for another battery box and jack (luckily I had not epoxied the switch and LED in yet). I had two ideas for the second try. First, sort of like I've done on a circuit board where a section of the trace is damaged and missing - bridge with some bare wire. I'd use some fat 16 ga maybe and tin the whole piece first. Then solder to each part and then put more solder on the whole wire. But looking at the jack some more I decided on a different route. I got that tab (which in actual use with a power plug makes contact to the outside of the plug) out from under the "ring" and soldered it to to the outside - metal to metal. First I took a small flat screwdriver and pressed the end of the tab towards the center post of the jack to make it bow as much as possible, press down towards the bottom of the jack a little as you do that. Now you need to get under the tab where it runs in the channel in the black plastic. There's a ridge of plastic on each side you can cut down some which helps. I had to start with a knife and bowed it up a little and then got the small flat screwdriver under it. Then I pried it up, bowing it more and got the tab end completely out from under the ring. Next I formed the tab some with needle nose pliers to make a good flat area where it will contact the metal ring. Also, the tab extends past the ring over the threads of the jack now. If you've bent that end in towards the threads too much it might get in the way of the carto - so screw on a carto and press the tab down onto the ring (where it will be once you solder it) and make sure there is clearance for the carto. I bent the very end of the tab up (away from the jack), but you could also snip a little off the end I guess. Spend some time getting the shape of the tab right. I also bent it back into the jack in the middle of the tab, like back into the channel, reversing the bow that was made getting it out. To solder, hold the jack with the screwdriver though the three bottom tabs as in the tutorial. Hold the soldering iron in the same direction as the tab to be soldered (I had the tip of the iron pointing towards the bottom end of the jack). Angle the iron up from the jack so the bevel of the tip is flat on the tab (like 30 deg or so on mine) and on the part of the tab that contacts the ring. Press down, which presses the tab to the ring and heats both up. Put solder on both sides and over the tab. I got a good flow over the tab and out on both sides on the ring. I pressed down on the lower part of the tab with a screwdriver before I pulled the iron away so the tab could not come up before the solder hardened (so with the iron still pressed down on the tab, drop the solder and grab the screwdriver with your other hand). It worked, solid connection. So that's another way this can be done.

- (minor thing) I did drill the hole for the LED not in the center of that channel but more towards the inside side wall, a little farther from the outside edge of the battery box. I noticed on my first one that once I had the hole big enough for the LED holder it was very close to the outside edge of the battery box.

Great first-time mod! If you're thinking about building this I recommend that you do. It works great and I think you'll feel a satisfaction from having made it yourself.

Thanks again to ThePuck!
 
One of the great things about the Puck is of course that you can use good 'ol, much safer, NiMH batts. I think I came across the Puck searching ECF for "NiMH" in the first place. I've already been using AA NiMH's in my digital camera for some time. I'll leave those in the charger overnight - I wouldn't go to bed with the LI's in the charger. I was really curious to see how NiMH's would do for vaping - one of the reasons I built the Puck. The answer is - quite well, actually. The set of 4ea AAA's lasts just about a full day even on the weekend (when I probably vape a little more) and give more power to the coil than the 3.7V 808 and E-power single LI cells I've been using.

A big advancement in NiMH's was the Low Self-Discharge (LS-D) type which holds most of the charge for over a year.
(ed. funny, it edits out the three-letter acronym for Low Self-Discharge, I get it, so I'm using "LS-D")
I remember the ones before that would be almost gone in a week - pretty useless if you wanted to pull the camera out a month later and have it work. The Sanyo Eneloop was apparently the first out in 2005 and others have followed. The first ones I bought were Maha "PowerEx". At that time the LS-D type had a little less capacity than non-LS-D's, however. The Eneloop AA's were 2000 mAh I think and the PowerEx 2100. Non-LS-D's were available over 2500 mAh in comparison. But LS-D's are catching up in capacity, available now up to 2500 mAh. The non-LS-D's are still (at least advertised) higher, up to 2900 mAh and if you're going to use them right off the charger they might last a little longer. But my memory of non-LS-D's was that they lost some even by the next day, so if you start to use them just a day or two after charging, the LS-D might win even though they have little lower mAh rating. Another important parameter, especially for vaping where we have low resistances and high currents, is the internal resistance of the battery.

In AAA's the differences between the standard and LS-D types are even smaller than in AA it appears.

So off I went to RS and wallymart for the parts and supplies for my Puck, including NiMH batts. I've had good luck with Rayovac batts. They are generally cheaper and appear to be just as good as the two big-name brands. But when I get to the batteries, I find Rayovac has two LS-D AAA's out. By the way, if it says "pre-charged" or talks about the charge lasting for months or years, that's an LS-D type. The one 4-pk is $8. The other is the "Platinum" for $10. I didn't see any listing of the mAh's on the package (turns out it is on the batteries in very small print), so I buy the $8 pack. Oops, I check the Rayovac site later to find out the $8 ones are 650 mAh and the Platinum $10 are 800 mAh - should have known... OK, return the regulars and get the Platinum, for $2 I want the better ones. My Puck is built - so how do they do?

Right off - great. I expected that. NiMH's are rated at 1.2V and we have 4 in series for the 4.8V. And I know from experience with AA's that you get even more than 1.2V right after charging. Definitely hotter on my carto's which are usually 2.6 to 2.9 ohm than with the LI 3.7V batts. I also know that LI's under load, through most of the middle of the usable charge are more like 3.5V, even big 18650's. I've been wanting more power to these carto's and these AAA's are giving it. Now what do they actually measure on the meter?

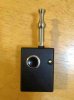
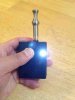
One nice thing about the Puck is that you can easily make measurements 
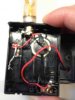
at the batteries. Slide the cover off the battery pack. The bottom of the left battery is the positive end of the stack and the bottom of the right battery is negative end. The red and black wires are attached to these terminals respectively. Put the leads from the meter to these two points and you are reading what the 4 batteries do. If you have resistance between these battery points and the actual carto connector, the coax jack, due to bad solders etc. and / or resistance from that to the carto, you'll have less voltage at the coil than at the batts. But that's a separate issue, let's see what the batts can do (plus you can open the control case and measure at the jack tabs to see if that is significantly lower, meaning you have resistance in the path).

First, I want to know what resistance the batts are driving. Take out the left and right batts. Put both leads to one of the open terminal plates but not touching each other. I get 0.2 ohms. That's for my leads and maybe some in connecting to the plate. Now leave one lead at the left (red wire) plate the other on the right bottom (black wire) plate. Carto connected, press the switch. I get 3.0 ohms. The leads were 0.2, so the actual resistance, what the batteries see, is 2.8 ohms. That's what I expect the carto to be so it looks like I don't have significant unwanted resistance in the Puck. Batteries back in, leads to the same places. I put these on the charger last night and started using them this morning (they actually charged in 2hrs according to the charger, then had trickle). I'm about 1/2 way though a day of vaping. Unloaded (open circuit, switch not pressed, nothing connected to the batts): 5.14V. That's an average of 1.285V each batt, still above the rated 1.2V. Now press the switch (nice sizzling sound here): About 4.4V. Wait! What happened to 4.8V? Don't worry, it's all good:

Current, "I" is 4.4V / 2.8 ohm = 1.57 Amps. That's almost 2C ("C" is the current in mA, 1570, divided by the mAh rating of the batts, 800). That's a good draw from any batt.

Power, "P" is 4.4V x 4.4V / 2.8 ohm = 6.9 Watts. That's not bad at all.
Consider that at 3.5V from my LI this carto would get 3.5 x 3.5 / 2.8 = 4.375 W. The Puck is 58% hotter - 58% more power. The "heat" is proportional to the power.

What's with the drop from 5.14V open to 4.4V under load? Internal resistance of the batteries. There was a drop of 5.14V - 4.4V = .74V under load. We rearrange Ohm's law (V = IR) to V/I = R. So here it is 0.74V / 1.57A = .478 ohms. That seems high even for a AAA. Ah! That's the total internal resistance for the 4 batteries (resistances add in series and that's what the batteries are). .478 ohms / 4 = .12 ohms average per battery. OK.

Summary: The 4 batts total 5.14V open. That 5.14V "sees" a total resistance of 2.8 ohm (the carto and wiring to it) plus the .478 ohm internal battery resistance = 3.278 ohms. The current produced is 5.14V / 3.278 ohm = 1.57A. Of the 5.14V that the NiMH itself produces, .74V drops on the internal resistance in the batteries leaving 4.4V for the carto.

This morning, with not much use after they left the charger I had about 5.7V open and 4.9V under load. That's over 8.5 Watts with the 2.8 ohm carto. Hot. But it drops pretty quickly to more like what I have now. So I'd say with these batts and a 2.8 ohm carto a good 6.5 Watts vaping through much of the day.

Are these the best AAA NiMH's out there? Looks like they may not be the very best:

MAHA / POWEREX 950mAh 4-Pack AAA IMEDION "Ready When You Are!" Rechargeables

Back to PowerEx - 950mAh's. Nice. Can't find PowerEx locally. $12.95 on Amazon. But googling for them I found this:

http://www.ebay.com/itm/PowerEx-IMEDION-950-AAA-NiMH-Precharged-Rechargeable-Battery-Maha

I have no info on or experience with this seller, just found this page searching on Google for these batts. Scroll down the page to all the tests they've done. Very interesting. Previously I went looking for NiMH test data, but all I found was stuff 10yrs old and the batts have improved since then. Then I found this where they've tested some of the latest NiMH's, each on 4 different chargers (all of which can also analyze). I have the MH-C900, had it several years for my camera AA's, does AAA's too. I like it a lot. (How come $50 LI chargers don't have all this good stuff anyway?).

- The Rayovac AAA Platinums came in right about on the spec of 800 mAh.
- The high spec'ed non-LS-D AA's didn't really show much better than the best LS-D in mAh, the Eneloop XX, Sanyo's latest.
- In AAA, the PowerEx 950's were right up there with the best non-LS-D's.
(Sanyo does not show the Eneloop XX in AAA (yet?), but I suspect that the PowerEx 950 is what that would be).
- The BC-700 charger usually gave the highest result, but they used 350mA rate with that one, all the others 500mA.

Further down, they measured Internal Resistance. Note, they give it in "m" and the Omega symbol, that's milliohms. 100 milliohms is 0.1 Ohms.

- Now you see how AA's can give more punch. Internal resistance is about 1/2 that of AAA's. In our our low-resistance vaping application that internal resistance can eat up a significant amount of the voltage / current / power that could be delivered from the nominal 1.2V NiMH - and even more so in our case of 4 in series.
- Non-LS-D's win here, but not by too much.
- (Figures) the one batt they don't have the values for is the Platinum. But my measurement of .12 ohm (120 milliohms) looks to be in the ballpark compared to others there.

So it appears that out of these batts the Accupower 1200 could have the edge with the lowest resistance, at least right off the charger. But it's non-LS-D, so the next day or day after?

A NiMH (non-Puck) thing I'm curious about is this, a number of ecig vendors have them, here's one:

http://eliquidplanet.com/4-8-volt-nimh-battery-cell.html

That apparently is a 17650 size and could go in a (tube) that takes an 18650. That's 4 cells stacked, shorter and wider than AAA's, but the same idea. Internal resistance? LS-D? Might give a decent (although shorter time and heavier) vape in many existing PV's without, you know, the kaboom thing. I didn't find too much on it in the forum.

Final summary: The Puck is easy to build with all parts locally available. It gives a great all-day vape with more punch than a standard 3.7V PV using batts that reduce the risk. It's great! Some of the batts here that you probably won't find locally might kick it up a little, but the Rayovac's you can get locally already do a great job.

p.s. it's now 9:15pm, finally got back to finish and post this thing. The Rayovacs are still going strong with 4.4V / 6.9 Watts to the carto!

Thanks again to ThePuck for the great tutorial !!
 

Stubby

Ultra Member
ECF Veteran
Apr 22, 2009
2,104
1,992
Madison, WI USA
Thanks for the good numbers on the batteries. I was thinking that was a subject that needed to be covered and you did it well.

No doubt good quality batteries will make a difference and I'm glad you got into that. One thing that bothered me a bit with the original postings about the Puck is the use of cheap batteries and 15 minutes chargers. You diffidently do not want to do that with an LS-D type NiMh. With a good La Crosse BC-700 charger and high quality LS-D NiHm your set for years. The new eneloops are rated at 1500 charges, and unlike lithium with last for years. Lithium last no more then a few years, and with heavy use a good deal less then that. I have eneloops that are going strong after over 5 years in my well used camera.

I would guess from your numbers that a four AA set up with VV could very well handle everything from LR to SR devices with no problems considering that AA's have about 150% more mAh then AAA's. Of course even the AAA's have plenty of kick.

Now I just want to see someone make NiHm based electronic cigarettes available on a consumer level for those of us that are mod challenged.
 

Stosh

Vaping Master
ECF Veteran
Oct 2, 2010
8,921
16,789
74
Nevada
Terrific write up Colokarl !!! I've been using my Pucks for months (usually at 2.6-3.0 ohms) and loving it, much better hit than a lithium 3.7v mod of any kind.

If you want to up the voltage some for the dual coil cartos, the NiZn 1.6v are wonderful, about 7.6v off the charger with no load, and with a 2.0 ohm (4.0 ohm per coil) they drop to about 6.5v. But across a 4 ohm coil you still get the watts for a big warm vape....:)
 

thenn

Senior Member
ECF Veteran
Oct 2, 2011
92
71
PA
Learned my lesson the hard way, soldering with a creme brulee torch is not a good idea. First button popped right off. Second one, I decided to use a hair dryer + shrink wrap tubing to connect to the contacts.

You can probably construct the entire mod with shrink wrap tubing, a hair dryer, scissors, 5/32 drill, ss safety pin, in addition to the parts listed by thepuck.
 

Attachments

  • ImageUploadedByTapatalk1331836964.339072.jpg
    ImageUploadedByTapatalk1331836964.339072.jpg
    22.5 KB · Views: 73

ThePuck

Super Member
ECF Veteran
Feb 3, 2010
412
80
Hillsboro, Ohio USA
puckecig.com
Final summary: The Puck is easy to build with all parts locally available. It gives a great all-day vape with more punch than a standard 3.7V PV using batts that reduce the risk. It's great! Some of the batts here that you probably won't find locally might kick it up a little, but the Rayovac's you can get locally already do a great job.

p.s. it's now 9:15pm, finally got back to finish and post this thing. The Rayovacs are still going strong with 4.4V / 6.9 Watts to the carto!

Thanks again to ThePuck for the great tutorial !!

And thanks to you for all of the research that proves that the Puck works. There have been a lot of people that say it couldn't but your research proves them wrong. This info gives the Puck users some amunition to fire back at them :). Okay, maybe that was a bit too strong. How about,... this gives useful and proven numbers to show anyone that has questions about the performance of the Puck and/or NiMH batteries under ecigarette load conditions that it is proven to work and work well.
... or something like that.

Really though, thanks for doing this. This is something I would have liked to have done but am having a hard time finding time for anything right now. The internal battery resistance is the part I find most interesting of the research you have done and is useful info a long with the best NiMH batteries.
 

ThePuck

Super Member
ECF Veteran
Feb 3, 2010
412
80
Hillsboro, Ohio USA
puckecig.com
Wow, nice books... um, I mean posts colokarl :)

I just wanted to pop in and thank thepuck for all that he has done for the vaping community as far as inspiring first time modders to give it shot!

Thanks, I really appreciate that.

I just wanted normal people to know that an ecig is just bascially a glorified flashlight. The coil of the atty is bascially the filament of a light bulb. Once you think of it that way, it's pretty easy. A power source (batteries), light bulb (atty) , on off switch and some wires. You don't need to have complicated microprocessor based circuits or protection if you use things that don't require it. You don't even need to know electronics.

That's the reason for the tutorial, so anyone can build something to vape, which works very well and not have to worry about if it is going to blow up eventually.
 

Stubby

Ultra Member
ECF Veteran
Apr 22, 2009
2,104
1,992
Madison, WI USA
Thanks, I really appreciate that.

I just wanted normal people to know that an ecig is just bascially a glorified flashlight. The coil of the atty is bascially the filament of a light bulb. Once you think of it that way, it's pretty easy. A power source (batteries), light bulb (atty) , on off switch and some wires. You don't need to have complicated microprocessor based circuits or protection if you use things that don't require it. You don't even need to know electronics.

That's the reason for the tutorial, so anyone can build something to vape, which works very well and not have to worry about if it is going to blow up eventually.

Well..... not everyone. Many of us simple don't want to mess around with building our own, and that would include me. I would much rather pay the money and have a professionally built Ni-Hm based PV. Perhaps something designed with a bit more staying power then a plastic Radio Shack battery holder put together with gum and glue..... well..... that's what mine would be put together with as I don't even own, or want to own a soldering gun.

Just saying.....
 

ThePuck

Super Member
ECF Veteran
Feb 3, 2010
412
80
Hillsboro, Ohio USA
puckecig.com
i built mine using your tutorial but i used 4 AA/NIMH, the vapor production amazing and tastes good, today my first day using this mod, its now 12 hours of vaping and the batteries still in good condition, the size annoying me a little ill try to customize it again, thank you

I also have an AA version on my website with a tank. I built this for people who camp or travel a lot and don't hvae time to charge batteries. Depending on the ohms your atty is running, you can get days out of AA batteries.
 
Status
Not open for further replies.

Users who are viewing this thread