
You are using an out of date browser. It may not display this or other websites correctly.
You should upgrade or use an alternative browser.
You should upgrade or use an alternative browser.
Joyetech eGrip - I am loving this thing!
- Thread starter Vicky
- Start date
- th_trl_thread_readers 0
- Status
- Not open for further replies.
And gents, too - I hung out for an hour or so at the Addison, IL shop with Dennis today - very cool dude....Cignot's customer service is over the top outstanding! You Ladies rock!
Picked up RBAs for my two eGrips! Really looking forward to the airflow. Got a DiGiornio in the oven, a Jack n Coke right here, and will start building after I eat. Will report later tonight with my first noob experience doing an RBA. Should be fun (the Jack is for steady hands)!

My night is cheap champagne and the egrip
10 Chicken Wangs and a Bottle of DomMy night is cheap champagne and the egrip

OK, maybe I do like to futz with stuff
And boy what a difference airflow makes. Even with the airflow screw removed, I was sometimes drawing on the eGrip long enough to set off the 10 second shutdown, and it would have to be a mouth to lung hit. Now, 5 seconds and I get a great lung hit - and FLAVOR. Dang that's nice.
And duh - I didn't need to build or re-build anything right off the bat - the coil and wick are pre-installed. But, I noticed a few things that are mentioned below.
Tips for new folks who want to take advantage of the RBA base, from a new vaper messing with it for the first time:
1) As a precaution, shut down your eGrip with the five clicks of the fire button before messing with the atomizer in any fashion - this was mentioned earlier in the thread.
2) Check the tightness of the screws holding down the pre-installed coil - I found one loose, and indeed it felt like it's stripped - I probably shouldn't have, but I pulled the loose screw, replaced it with one of the spares out of the bag, and gave it some force to seat it - not much cuz they're tiny. Even then, I still felt it turning, so we'll see how that plays out when I go to replace the pre-installed coil. This was just one of the four screws, though (two per base, I bought two RBAs as I have two eGrips). The other three tightened up nicely - I can't imagine robots are putting these together at the factory, so there's going to be some error.
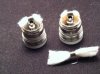
3) Check the pre-installed wick for length - both of mine had super short wicks, but the two factory-wound replacement coils in each RBA kit had longer ones (and you will be cutting your own in the future, so take note). If you look at the first attached pic with the two bases, the base on the left is the way it came out of the box - that wick is way too short to tuck down into the base (even as a new vaper, I know this).
I pulled a longer wick from one of the replacement coils (shown), and re-wicked the pre-installed coil (the base on the right - note the length tucked down and around into the base, and that wick is also primed with fluid, which you'll want to do before installing the base in the eGrip). I also took a second pic to show the wick lengths, the short one and the more ideal one above it.
4) Installing the base in the eGrip, there will be a point where it feels like it's starting to seat - but if you look at the bottom of the base compared with the bottom plate of the body, you'll see the base still protrudes a hair (enough that the eGrip won't sit level on a surface). Keep tightening past that point - you want the base to seat fully, and to be flush with the bottom plate, if not countersunk a bit from a bit more tightening. The RBA base does seem to be milled a tiny bit differently from the stock atomizer base, so there's some tolerances to consider.
A couple questions:
1) Can someone advise what the spare O-rings are for? Are they for the one in the RBA base where I have the spare centered over it in the second pic? The spares seem kinda small for that, but then again they're that stretchy clear silicone.
2) See third pic - there is a second, smaller slot in the air hole in the base - is this an adjustment? Before installing the base in the body, I backed this out fully to see what it was, but got the idea if it wasn't tightened all the way, the tank would leak. I tightened both before installation, no leaks, but don't want to mess with it until I know what it is / what it's for. Shoulda taken a pic while I had them apart, but hey that's the Jack for ya
So yeah - powered both up, some crackling still, but a big, beautiful, easy-pulling, flavorful vape out of both units. I believe the term is "happy camper"!
Attachments
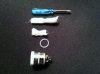
The spare O rings that come with the RBA are in case the one already installed breaks.
Yes, that other screw in the RBA base should be tight - if you take it out you'll see what it does.
You're right that the RBA base needs to be so tight it's almost countersunk. Otherwise it gurgles!
Yes, that other screw in the RBA base should be tight - if you take it out you'll see what it does.
You're right that the RBA base needs to be so tight it's almost countersunk. Otherwise it gurgles!
The spare O rings that come with the RBA are in case the one already installed breaks.
Yes, that other screw in the RBA base should be tight - if you take it out you'll see what it does.
You're right that the RBA base needs to be so tight it's almost countersunk. Otherwise it gurgles!
Dig it - thank you!
I am not sure who we talk to at joyetech but we have had there stuff since our shop opened in 2011. I sent a email to them also a few days ago just asking for a part number on the USB just so I can fix the broken ones I have for our customers. I am just a sales person for the shop but I work on the egrips for FREE on my off time from work. I didn't send joyetech a bad letter I just really want to know where I can get the usb's at. Since the last time I checked the forum I got 6 more in that I have to fix and 3 of them are missing usb internals.
I meant my experience with Joyetech not with the eGrips. I think we all got about 30-40% bad ports in that first run. Who is your sales person there? I have dealt with them for 6 years and am pretty familiar with the team. I am puzzled that you are getting a different response than I am.
I rlly like the adj. Airflow. My last vape was that simple 25 dollar tank pen style. Still was ok. But now sometimes i can adjust the air to nothing barely and hit it real good. Only takes a few.
Last edited:
Wow I have 0 respect for joyetech now. They responded to one of my emails about the USB ports. All they told me was to contact China. If you think I'm lieing I can screen shot it.
If I contacted Joyetech US they would tell me to contact Joyetech China too. I have to go directly to the salesperson I make my purchases from for warranty issues.
Wow I have 0 respect for joyetech now. They responded to one of my emails about the USB ports. All they told me was to contact China. If you think I'm lieing I can screen shot it.
A lot of people are asking how to tell the difference between the various iterations of this device. I purchased one of the original ones, and have just received an additional new one. Note that I have not had a USB problem with either of my two.
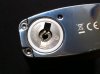
The original eGrip had numbers on the dial. The new one has dots. Personally, I prefer the dots over the numbers as they are easier to see.
The original eGrip had a flat, clear fire button. The new one has a domed button, that has a chrome coating on it. I prefer the flat clear button. The new, domed button does not fit as well, and moves around in the socket. This causes some "rattling" of the switch cover as the eGrip is moved around. It does not bother me, but I can see where it can disturb some people as it is not as "clean" as the older flat clear button.
Both devices have the problem with turning off and on. Trying to judge the speed of the 5 switch presses is NOT intuitive. I had the same problem with other mods by Joyetech (i.e. eVic) as well so I see that as a "feature" of their electronics.
What does bother me (a little, not enough to cause me not to use the device) is the connection for a drip tip. The Joyetech drip tip that comes with the complete eGrip makes use of a non-standard sealing ring. (I specifically avoided the use of the word o-ring, as it is not an o-ring.) Drip tips with a standard o-ring will be wobbly on this device. I would recommend the use of double o-ring drip tips. This will stabilize the drip tip.
I do not have leaking from either of my devices, once I get past the original installation. The act of pre-moistening the wick cause my RBAs to leak a drop of liquid from the air hole. Again, this is not a deal breaker, just something to be aware of.
Note, I purchased the original mod as a "stealth" mod. However, the amount of vapor produced by this device, when equipped with the RBA, negates this concept. It is a most convenient on the go device, however.
A lot of people are asking how to tell the difference between the various iterations of this device. I purchased one of the original ones, and have just received an additional new one. Note that I have not had a USB problem with either of my two.
The original eGrip had numbers on the dial. The new one has dots. Personally, I prefer the dots over the numbers as they are easier to see.
The original eGrip had a flat, clear fire button. The new one has a domed button, that has a chrome coating on it. I prefer the flat clear button. The new, domed button does not fit as well, and moves around in the socket. This causes some "rattling" of the switch cover as the eGrip is moved around. It does not bother me, but I can see where it can disturb some people as it is not as "clean" as the older flat clear button.
Mine has numbers and dots on the dial, a domed button that doesn't rattle and a bad usb. Apparently Jtech has gone through a very progressive revision program with this device. Still no way to tell by looking at it whether or not the usb will last.
For what it's worth department: One of the first things I did with mine was try several different drip tips on it and had no significant problems with the fit of any of them. They all fit what I would call dead on to maybe a little snug. Didn't seem to matter how different they were - jade (real jade), ceramic or stainless from all different places - they all fit fine.
I have never seen one with a clear button! So here is the thing.... each and every component to build the device has to be specked and then made or procured. Perhaps the purchase of screws is 1mm and perhaps the purchase of the buttons are in 100K increments, the batteries, the wire, the bodies and x number are painted this way and that way and of course the motherboard... then all the components are assembled and tested. The port issue was a motherboard problem and was rectified, but there would be no reason to toss all the buttons and screws and painted bodies. So there is no clean revision break and to my knowledge no way of telling unless of course you could inspect the motherboard which is not accessible without dis assembly. The port issue seems to be running at 30-40% of that original run and the problem has been solved, but I do not know of any way to know if you will have that port issue until it happens. If your unit is eligible for Joyetech support then you have no worries as you will just get a new one.
A lot of people are asking how to tell the difference between the various iterations of this device. I purchased one of the original ones, and have just received an additional new one. Note that I have not had a USB problem with either of my two.
The original eGrip had numbers on the dial. The new one has dots. Personally, I prefer the dots over the numbers as they are easier to see.
The original eGrip had a flat, clear fire button. The new one has a domed button, that has a chrome coating on it. I prefer the flat clear button. The new, domed button does not fit as well, and moves around in the socket. This causes some "rattling" of the switch cover as the eGrip is moved around. It does not bother me, but I can see where it can disturb some people as it is not as "clean" as the older flat clear button.
Both devices have the problem with turning off and on. Trying to judge the speed of the 5 switch presses is NOT intuitive. I had the same problem with other mods by Joyetech (i.e. eVic) as well so I see that as a "feature" of their electronics.
What does bother me (a little, not enough to cause me not to use the device) is the connection for a drip tip. The Joyetech drip tip that comes with the complete eGrip makes use of a non-standard sealing ring. (I specifically avoided the use of the word o-ring, as it is not an o-ring.) Drip tips with a standard o-ring will be wobbly on this device. I would recommend the use of double o-ring drip tips. This will stabilize the drip tip.
I do not have leaking from either of my devices, once I get past the original installation. The act of pre-moistening the wick cause my RBAs to leak a drop of liquid from the air hole. Again, this is not a deal breaker, just something to be aware of.
Note, I purchased the original mod as a "stealth" mod. However, the amount of vapor produced by this device, when equipped with the RBA, negates this concept. It is a most convenient on the go device, however.
You know, I talk to Joyetech all the time and have done warranty support in the US for them. Email me ok? vicki@cignot.com and let's see if I can't take care of this for you. I will need the serial numbers so I can make sure the units are supported.
Wow I have 0 respect for joyetech now. They responded to one of my emails about the USB ports. All they told me was to contact China. If you think I'm lieing I can screen shot it.
For what it's worth department: One of the first things I did with mine was try several different drip tips on it and had no significant problems with the fit of any of them. They all fit what I would call dead on to maybe a little snug. Didn't seem to matter how different they were - jade (real jade), ceramic or stainless from all different places - they all fit fine.
Same here, tried a bunch of them at my local b&m. No probs with any of them. Settled on this one from vapelyfe.

For what it's worth department: One of the first things I did with mine was try several different drip tips on it and had no significant problems with the fit of any of them. They all fit what I would call dead on to maybe a little snug. Didn't seem to matter how different they were - jade (real jade), ceramic or stainless from all different places - they all fit fine.
Same here. My usual wooden wide bore drip tip fit just fine (it's snug in my GDC tank and rattles a little in my Orchids) and I tried several the other day at my B&M and they all fit fine too. I am currently using a slightly shorter than the stock drip-tip copper and white brass wide bore, with only one o-ring, and it's snug even when I shove the whole device in my front pants pocket and do stuff.
Drip tips: Admittedly, I haven't been in this long and didn't try many - I settled on a chromed shorty in the Cignot store that felt right / looked cool when I bought the first eGrip, but found a tiny bit wobbly during use the first few days.
Easy fix: a visit to the local mom n pop hardware store for some trial and error o-rings. Bought a couple extra which came in handy when I bought the second eGrip body with an identical tip. Wondering if the tiny bit of extra tolerance is to accommodate whatever zillion drip tips are out there.
Dial markings: I think there's versions out there with progressive lines too, instead of dots.
5 clicks off / on: I noticed this too, the difference between the cadence used for the eGo and the eGrip. The eGo likes faster clicks, the eGrip, slower and more deliberate. Like me
RBAs: So I'm a couple days into having RBAs on mine and both are gurgling a bit (at least what I think is gurgling) - nothing serious, just at the beginning of each draw. No leaks, but I fill mine using the fill hatch with the base / bottom of the unit angled up anyway. Kinda don't want to mess with things until I have to, but wondering: what causes the gurgling? Don't think that was touched on earlier in the thread, apologies if it's addressed elsewhere.
Last edited:
Make sure your base is screwed all the way in.RBAs: So I'm a couple days into having RBAs on mine and both are gurgling a bit (at least what I think is gurgling) - nothing serious, just at the beginning of each draw. No leaks, but I fill mine using the fill hatch with the base / bottom of the unit angled up anyway. Kinda don't want to mess with things until I have to, but wondering: what causes the gurgling? Don't think that was touched on earlier in the thread, apologies if it's addressed elsewhere.
Drip tips: Admittedly, I haven't been in this long and didn't try many - I settled on a chromed shorty in the Cignot store that felt right / looked cool when I bought the first eGrip, but found a tiny bit wobbly during use the first few days.
Easy fix: a visit to the local mom n pop hardware store for some trial and error o-rings. Bought a couple extra which came in handy when I bought the second eGrip body with an identical tip. Wondering if the tiny bit of extra tolerance is to accommodate whatever zillion drip tips are out there.
Dial markings: I think there's versions out there with progressive lines too, instead of dots.
5 clicks off / on: I noticed this too, the difference between the cadence used for the eGo and the eGrip. The eGo likes faster clicks, the eGrip, slower and more deliberate. Like me
RBAs: So I'm a couple days into having RBAs on mine and both are gurgling a bit (at least what I think is gurgling) - nothing serious, just at the beginning of each draw. No leaks, but I fill mine using the fill hatch with the base / bottom of the unit angled up anyway. Kinda don't want to mess with things until I have to, but wondering: what causes the gurgling? Don't think that was touched on earlier in the thread, apologies if it's addressed elsewhere.
I've only had mine gurgle once, and that was because the top part that screws down on top of the rba base wasn't tight. At least, I think that's what it was…I noticed it when I was refilling, tightened it up, and no more gurgle.
After using mine these last few days, I'll be ordering another one from Cignot when my paycheck hits the bank tomorrow morning. Quit smoking and start vaping, they said. You'll save so much money, they said…lol. I'm finding that the rba in the egrip has ruined me for my regular out and about tanks, though…and I'm going to Disney in ten days and need something to travel with that I don't have to fuss with.
- Status
- Not open for further replies.
Similar threads
- Replies
- 3
- Views
- 711
- Replies
- 0
- Views
- 991
- Replies
- 0
- Views
- 926
Users who are viewing this thread
Total: 3 (members: 0, guests: 3)