Multi-Battery charging station

Status
Not open for further replies.

Ripley

Senior Member
ECF Veteran
Dec 10, 2008
98
2
Dallas Metro, TX
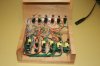
This configuration can save some space and electrical outlets.

Tools used: Roto-tool (dremel), saw, drill, glue-gun, soldering iron.

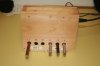
I used a roto-tool to remove the plastic covers from the wall chargers. I only had 6 so that's why there are 6 ports.
Cat-5 cable for thin wire for led and port extensions.
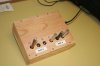
Scrap wood for the box (this is cedar)

Not difficult but definitely time consuming.
 

Attachments

  • IMG_0248.jpg
    IMG_0248.jpg
    20.2 KB · Views: 341
  • IMG_0249.jpg
    IMG_0249.jpg
    19.4 KB · Views: 268
  • IMG_0250.jpg
    IMG_0250.jpg
    22.4 KB · Views: 338

Ripley

Senior Member
ECF Veteran
Dec 10, 2008
98
2
Dallas Metro, TX
You really should look into battery modding. :lol:

LOL Bastage, thanks, but I've already built 4 of Maddog's magnum mods (2x 901 2x 801), and a few USB passthroughs. I had my first 801 battery die this week, so I ripped it apart and tried to use the vaccum switch to build a switch-activated passthrough.
What a B*%#H! All those titty-bitty wires are a bugger to solder. I finally gave up after I got it all back together and couldn't get enough vaccum to activate the darn thing. Tore it all apart again, soldered a manual switch on and threw it back together.. 10 minutes versus 4 hours. I'll probably try again since I'm a die-hard and hate it when I can't get something working the way I think it should.
 
Status
Not open for further replies.

Users who are viewing this thread