
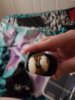
So I did a single coil build on my wolverine rda for the second time today and it tastes great! I think I know where I went wrong: I didn't raise the coil from the build deck and there was a small hotspot on the coil which burned the wick. Thanks to the people who helped me out ye are too sweet .
You are using an out of date browser. It may not display this or other websites correctly.
You should upgrade or use an alternative browser.
You should upgrade or use an alternative browser.
- Status
- Not open for further replies.
Good stuff!
I really don't spend time on trying to make my rda builds look cool, because you know, but... air flow is key and it can take some experimenting before you find the best coil placement for each RDA you use. Once you get that nailed, what works on that RDA, tons of flavor, and going back to tanks feels like a waste of time")
The best thing is it's so inexpensive to refresh the wick.
I really don't spend time on trying to make my rda builds look cool, because you know, but... air flow is key and it can take some experimenting before you find the best coil placement for each RDA you use. Once you get that nailed, what works on that RDA, tons of flavor, and going back to tanks feels like a waste of time
The best thing is it's so inexpensive to refresh the wick.
Good stuff!
I really don't spend time on trying to make my RDA builds look cool, because you know, but... air flow is key and it can take some experimenting before you find the best coil placement for each RDA you use. Once you get that nailed, what works on that RDA, tons of flavor, and going back to tanks feels like a waste of time
The best thing is it's so inexpensive to refresh the wick.
Agree. At first I was intimidated by every RBA being built differently to get the best out of it.
And that is true, but it’s not all that difficult. You’ll soon be able to just look at their air flow and know where the coil ought to be, how big a coil it’ll fit, how much cotton, and what your preference of coil is.
It’s like driving different cars, each is a little different but once you can drive, none are that hard to figure out.
Good morning Rachel, congrats. Post a pic of your near misses and successes. Helps us all and particularly those teetering on the edge of is it worth it.
Good luck.


Good luck.
So I did a single coil build on my wolverine rda for the second time today and it tastes great! I think I know where I went wrong: I didn't raise the coil from the build deck and there was a small hotspot on the coil which burned the wick. Thanks to the people who helped me out ye are too sweet .
Congrats! Once you've done a few they are pretty much all the same from an operational standpoint. Cotton expands and Rayon shrinks. That's a piece of valuable info. Knowing the nature of the wicking and learning by experience how to make and install a coil is something you learn by doing. Once you have that, you have most of what you need to be able to repeat the process and know that it will work. The perfect coil is one that touches the coil with full contact, and is tight enough to maintain that contact once it has heated and produced vapor. Too tight and you get dry hits. Too loose and you get hot spots and burned flavor.
You've passed a milestone!
Agree. At first I was intimidated by every RBA being built differently to get the best out of it.
And that is true, but it’s not all that difficult. You’ll soon be able to just look at their air flow and know where the coil ought to be, how big a coil it’ll fit, how much cotton, and what your preference of coil is.
It’s like driving different cars, each is a little different but once you can drive, none are that hard to figure out.
This is a great analogy. There is some fiddling required, but the same with driving manual transmission cars. It doesn't take long to get over those little differences, but it can be mildly intimating. It's worth the minimal effort.
Thanks would you have to replace the wick if you want to change flavour? Or how long would one wick last?Good stuff!
I really don't spend time on trying to make my RDA builds look cool, because you know, but... air flow is key and it can take some experimenting before you find the best coil placement for each RDA you use. Once you get that nailed, what works on that RDA, tons of flavor, and going back to tanks feels like a waste of time
The best thing is it's so inexpensive to refresh the wick.
Way to go Rachel!So I did a single coil build on my wolverine rda for the second time today and it tastes great! I think I know where I went wrong: I didn't raise the coil from the build deck and there was a small hotspot on the coil which burned the wick. Thanks to the people who helped me out ye are too sweet .
That is up to you. With RDAs you can switch flavors quickly without changing the wick, but it depends on the flavor, and how they clash or merge for you.
Whatever works for you, and how different your flavors are. What I do like about RDAs is a few puffs, and the previous flavor mostly disappears, but whatever works for you.
A wick swap is only a few pennies of cotton, you'll know what your preferences are. Cotton is cheap and only takes a minute to swap, or don't
Cool beans you tried out an RDA!
Update: my coils went a bit mental lol. The ohms reading kept rising till it was at 9.99 ohm and my mod told me to remove the tank! What could of happened? There was a bit of spitback and the vapour production wasn't great, bit it was better than my first coil lol. Posted some pick of the build before I saturated the wick
Attachments
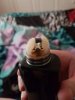
The resistance will jump around when you first install a coil. You often have to re-tighten the post screws after it heats up. Be sure to do a proper burn-in. And be sure it's not touching anything it shouldn't. You may also find the spacing the wraps will help, and it looks like you've got plenty of room for that.Update: my coils went a bit mental lol. The ohms reading kept rising till it was at 9.99 ohm and my mod told me to remove the tank! What could of happened? There was a bit of spitback and the vapour production wasn't great, bit it was better than my first coil lol. Posted some pick of the build before I saturated the wick
I will try that thank you!!The resistance will jump around when you first install a coil. You often have to re-tighten the post screws after it heats up. Be sure to do a proper burn-in. And be sure it's not touching anything it shouldn't. You may also find the spacing the wraps will help, and it looks like you've got plenty of room for that.
First off, that is one TALL coil. As for the Ohm's raising, my guess is the leg got hot, how does the coil look after?Update: my coils went a bit mental lol. The ohms reading kept rising till it was at 9.99 ohm and my mod told me to remove the tank! What could of happened? There was a bit of spitback and the vapour production wasn't great, bit it was better than my first coil lol. Posted some pick of the build before I saturated the wick
Lol yeah I didn't want it to be near the build deck, so I went a bit mad with the length , I'll show you nowFirst off, that is one TALL coil. As for the Ohm's raising, my guess is the leg got hot, how does the coil look after?
Attachments
Rachel, go in some dim light like a bathroom. Check if any of the leads or turns are overheating. Remove the wick. Check again for inconsistencies like gray parts of a segment (or turn). If the coil is not uniform it may exhibit a difference in resistance and perform like a failing bulb, either too hot or too cold. Important to check first that your connections are solid. Not too tight as this may actually cut through wire, but firm. If the wind's bad don't sweat it. They're easy enough to re-create and worth the effort in a great vape.
Good luck.
p.s. Just saw your pic and realized you're using multi-wire. These must be thoroughly burned in if it's Kanthal and this will require some tweaking and experience. I'm sure you will see variations in dim light.
Good luck.
p.s. Just saw your pic and realized you're using multi-wire. These must be thoroughly burned in if it's Kanthal and this will require some tweaking and experience. I'm sure you will see variations in dim light.
Yes it is desirable to trim the legs as short as possible, usually less than 0.8cm from the bottom of the wraps. Somebody even invented a template "Coily" to make it easier. Home Page - CoilyTool
Also check out this video of a professional installing a coil properly. Pay particular attention to the second half where he methodically works out the hot spots.
Also check out this video of a professional installing a coil properly. Pay particular attention to the second half where he methodically works out the hot spots.
Last edited:
Hello @Rachel271, can you turn the barrel of your RDA round a bit so that the air hits the sides of the coil?
As the air is supposed to hit the coil and not the wicking, it may help things even further.
As the air is supposed to hit the coil and not the wicking, it may help things even further.
It try that thanksHello @Rachel271, can you turn the barrel of your RDA round a bit so that the air hits the sides of the coil?
As the air is supposed to hit the coil and not the wicking, it may help things even further.
Let us know how you get on.It try that thanks
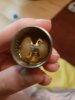
First here's a terrible picture.

The arrows show where the air should come from and hit the coil, and the dotted lines in the bottom image are around where the air should hit the bottom/side of the coil. So you need the air to hit the bottom half of the coil, you'll have to play a little to find the optimal position.
Hopefully you'll find this useful somewhat, good luck.
- Status
- Not open for further replies.
Similar threads
- Replies
- 0
- Views
- 831
- Locked
- Replies
- 1
- Views
- 685
- Replies
- 2
- Views
- 740
- Replies
- 0
- Views
- 617
Users who are viewing this thread
Total: 2 (members: 0, guests: 2)