View attachment 201926View attachment 201927View attachment 201928
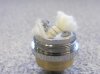
One of the things about the Reomizer 2, or RM2, is that the ceramic base almost seems to be made for stainless steel mesh wicks: it allows them to be used without having to oxidize them first.
The procedure is almost identical to what superxdrifter is doing, except that you wrap an insanely small (2mm x 4mmm) amount of mesh around your drill bit and coil that.
It's worth trying SS mesh, besides the fact that the RM2 can easily handle it: a) It doesn't scorch as easily as silica or cotton; b) this method leaves a hollow core to easily conduct juice to the coil; and (perhaps most importantly) c) once it's oxidized after a few vapes, it's one of the best methods for getting all of the flavor out of your juice. Just as cotton fanatics claim that silica mutes their flavors more, SS aficionados claim the same thing about cotton (though I don't think it's as drastic as going from silica to cotton).
I'd also say it's an even draw for long term ease of use. Yes, it's possible to re wick cotton but it can be difficult for the sight challenged to do it, and SS setups last longer. It boils down to personal preferences.
If you're an old hand, you've probably got some lying around (Hell, when I reorganized my vaping supplies, I still had blue foam left!), so why not give it a try?
And next coil setup, superx, I'm going to try your touching multi-coil method. Might even do it this morning if time (and the wife) allows.
I've got a few sheets of it, and some more 30 ga kanthal on the way, so I'll gladly coil you up if you're attending the Re(o)gional meet on May 4th in glorious Lake Murray, Oklahoma.


")