The buck and boost circuits are factory set (based on the circuit components) to provide a "working voltage" that the device will use in the square wave being applied to the atomizer. In other words, the buck and boost circuit outputs aren't "variable" so to speak, so in that sense, the buck and boost voltages will only change as a direct result of battery sag or if the atomizer resistance changes varying the voltage drop across it. The sigelei is designed to only vary the duty cycle to maintain a constant output, and as far as I can tell, does nothing to the buck or boost circuit outputs.
The buck circuit is only used when stacked, and the boost circuit is only used with a single battery (never both circuits at the same time). The buck circuit reduces the available battery voltage with the benefit of increasing the available current, whereas the boost circuit increases the battery voltage "at the expense" of the available battery current. In that respect, you can see how using the buck circuit is the way to go if you're looking to draw increased currents over time.
The buck circuit is only used when stacked, and the boost circuit is only used with a single battery (never both circuits at the same time). The buck circuit reduces the available battery voltage with the benefit of increasing the available current, whereas the boost circuit increases the battery voltage "at the expense" of the available battery current. In that respect, you can see how using the buck circuit is the way to go if you're looking to draw increased currents over time.
Last edited:
")
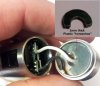
 ) and they said that the top cap has threads.