I received my Sit and Go Passthrough and 510 to 901 adapter and I would like to tell you a little bit about them.
510 Sit and Go USB Passthrough
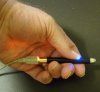
The Sit and Go Passthrough is a very innovative creation and I believe is reasonably priced at $13.99 from madvapes. Although not 5 volts it is a full 3.7 volts or more depending on its state of charge. Its basic construction is a 150mAh battery with a USB mini connector on the end where the “in use” LED usually is. Generally it’s a passthrough but by unplugging the USB cable it also becomes a regular 150mAh battery, thus, you can “Sit” and “Go”.
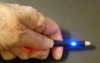
The LED that’s usually at the end of the battery has been moved under a white, translucent button and glows blue when pressed. You might think your finger would cover the glow of the LED when lit, but in fact it is quite visible. However, if you totally cover the button with the pad of your thumb or finger it becomes stealthy.
On the end of the passthrough where the “in use” LED is on regular batteries and under the USB connector on the Sit and Go there is a red LED. This LED turns on when the USB cable is plugged in and indicates that the battery is charging. Once the battery is fully charged the LED turns off. When you vape, the LED will turn on again indicating the cartridge/cartomizer is drawing its power from the battery and not via the USB port. Therefor the USB port is only for charging the battery and not powering the cartridge/cartomizer. The red LED does nothing when the USB cable is not plugged in.
I’ve not used the Sit and Go Passthrough as just a battery for long enough to see how long it will last, but with it being 150mAh its charge life should be just a little less than the 180mAh (or maybe it's 150mAh, I'm getting conflicting reports) of a regular 510 battery. However, this should be long enough to be able to carry it around for a couple of hours.
Connecting it up presented a minor, but not unsolvable, problem. My computer is on the left side of my desk and I’m right handed and I didn’t want the cord draped across my lap when I vaped, so I plugged an AC Adapter/Charger into a power strip that’s on the floor to my right. However, the USB cable that came with the Sit and Go Passthrough is 30” (76.2cm) and is a bit short so I found a gray one in my spare parts drawer that’s 48” (122cm) and it’s just long enough so I don’t have to bend over any when I vape.
The USB cable that came with it is very substantial, although a bit short unless you have a desktop computer, but finding a replacement is very easy since it uses a standard size plug on the computer end and a mini plug on the passthrough end.
Along with the Sit and Go Passthrough I purchased a 510 to 901 adapter so I could use my 901 atomizers with it. This is working out quite well. One thing I did find out on the MadVapes web site is this adapter can be adjusted on the 901 end using a screwdriver. This adjustment will raise and lower the center post of the adapter making it so the atomizer can be adjusted to eliminate any gaps between the atomizer and adapter.
One thing I found out, though, is an 808 cartomizer doesn’t seem to work with the adapter. Although there are air holes just under the threads in the adapter just like there are in the KR8 battery for some reason there is no airflow. This could be due to the adjustment I made so my 901 atomizer would fit tight against the adapter but I’m not going to change the adjustment just to find out. By the way, the 901 atomizer has its own air hole so the holes under the threads on the adapter used for airflow for cartomizers aren’t used with the 901 atomizer.
In conclusion I believe this is a well-made passthrough and I highly recommend it if you’re not looking for a 5-volt model. It’s very convenient to just unplug the USB cable from the back of the passthrough and carry the e-cig around with you for a short time without having the cord and battery-type wire trailing behind or replacing the passthrough with a regular battery.
The images pretty well show the Sit and Go Passthrough in action, and since I haven’t figured out how to add captions to the images, if it can even be done, I’ll just describe them by number.
(It looks like I can only post 5 images per post, so I’ll make two posts with 4 images in each.)
Images 1 through 4:
1) The Sit and Go Passthrough in pieces as I use it. The adapter in the middle did not come with it, I added that myself.
2) The Sit and Go put together and ready to go in battery mode.
3) The Sit and Go put together and ready to go in passthrough mode.
4) The Sit & Go with charging LED On.
510 Sit and Go USB Passthrough
The Sit and Go Passthrough is a very innovative creation and I believe is reasonably priced at $13.99 from madvapes. Although not 5 volts it is a full 3.7 volts or more depending on its state of charge. Its basic construction is a 150mAh battery with a USB mini connector on the end where the “in use” LED usually is. Generally it’s a passthrough but by unplugging the USB cable it also becomes a regular 150mAh battery, thus, you can “Sit” and “Go”.
The LED that’s usually at the end of the battery has been moved under a white, translucent button and glows blue when pressed. You might think your finger would cover the glow of the LED when lit, but in fact it is quite visible. However, if you totally cover the button with the pad of your thumb or finger it becomes stealthy.
On the end of the passthrough where the “in use” LED is on regular batteries and under the USB connector on the Sit and Go there is a red LED. This LED turns on when the USB cable is plugged in and indicates that the battery is charging. Once the battery is fully charged the LED turns off. When you vape, the LED will turn on again indicating the cartridge/cartomizer is drawing its power from the battery and not via the USB port. Therefor the USB port is only for charging the battery and not powering the cartridge/cartomizer. The red LED does nothing when the USB cable is not plugged in.
I’ve not used the Sit and Go Passthrough as just a battery for long enough to see how long it will last, but with it being 150mAh its charge life should be just a little less than the 180mAh (or maybe it's 150mAh, I'm getting conflicting reports) of a regular 510 battery. However, this should be long enough to be able to carry it around for a couple of hours.
Connecting it up presented a minor, but not unsolvable, problem. My computer is on the left side of my desk and I’m right handed and I didn’t want the cord draped across my lap when I vaped, so I plugged an AC Adapter/Charger into a power strip that’s on the floor to my right. However, the USB cable that came with the Sit and Go Passthrough is 30” (76.2cm) and is a bit short so I found a gray one in my spare parts drawer that’s 48” (122cm) and it’s just long enough so I don’t have to bend over any when I vape.
The USB cable that came with it is very substantial, although a bit short unless you have a desktop computer, but finding a replacement is very easy since it uses a standard size plug on the computer end and a mini plug on the passthrough end.
Along with the Sit and Go Passthrough I purchased a 510 to 901 adapter so I could use my 901 atomizers with it. This is working out quite well. One thing I did find out on the MadVapes web site is this adapter can be adjusted on the 901 end using a screwdriver. This adjustment will raise and lower the center post of the adapter making it so the atomizer can be adjusted to eliminate any gaps between the atomizer and adapter.
One thing I found out, though, is an 808 cartomizer doesn’t seem to work with the adapter. Although there are air holes just under the threads in the adapter just like there are in the KR8 battery for some reason there is no airflow. This could be due to the adjustment I made so my 901 atomizer would fit tight against the adapter but I’m not going to change the adjustment just to find out. By the way, the 901 atomizer has its own air hole so the holes under the threads on the adapter used for airflow for cartomizers aren’t used with the 901 atomizer.
In conclusion I believe this is a well-made passthrough and I highly recommend it if you’re not looking for a 5-volt model. It’s very convenient to just unplug the USB cable from the back of the passthrough and carry the e-cig around with you for a short time without having the cord and battery-type wire trailing behind or replacing the passthrough with a regular battery.
The images pretty well show the Sit and Go Passthrough in action, and since I haven’t figured out how to add captions to the images, if it can even be done, I’ll just describe them by number.
(It looks like I can only post 5 images per post, so I’ll make two posts with 4 images in each.)
Images 1 through 4:
1) The Sit and Go Passthrough in pieces as I use it. The adapter in the middle did not come with it, I added that myself.
2) The Sit and Go put together and ready to go in battery mode.
3) The Sit and Go put together and ready to go in passthrough mode.
4) The Sit & Go with charging LED On.
Attachments

Last edited: