Hey everyone, I was tired of manual switches and constantly replacing them... so I made a nice little USB passthru with a touch switch.
Here is the parts list:
(1) USB Cable (old mouse)
(1) Old 510 atty connector
(1) New 510 battery connector $1.99:
510 Battery Connector, Gold, Large Hole
(1) MOSFET part number IRF8736TRPBFCT-ND 1.28 (AKA IRF8736PbF) $1.28:
Digi-Key - IRF8736TRPBFCT-ND (Manufacturer - IRF8736TRPBF)
(1) 100M SMD resistor $5.27:
Digi-Key - HVCB2512FKC100MCT-ND (Manufacturer - HVCB2512FKC100M)
(1) 47k SMD resistor $1.10:
Digi-Key - 541-47KPACT-ND (Manufacturer - CRCW201047K0JNEFHP)
(1) AAA Battery Box $1.99 :
Enclosed AAA Battery Holder : Battery Holders | RadioShack.com

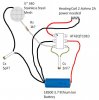
The only trick is the SMD resistors, soldering them is a pain. The MOSFET switch I cut legs 2 and 3 off, only needed 1 and 4 on the left side. Pin 1 is by the dot and is battery in, pin 4 in the picture is in the lower right corner. Legs 1 and 4 you have to straighten and spread out a bit to be able to solder to the 100M resistor. The 47k resistor is solders directly to the 100M resistor and the (-) touch contact is soldered there. Pins 5-8 are for (-) out to the ATTY.

I used a 510 atty connector and the touch contact point and it works great. Power in from the USB goes direct to the ATTY center, and then runs onto the center touch point.

I drilled out a rough hold an continually checked the hole against the atty connector until I could screw it into the hole.

Once I had the height I wanted I screwed it all the way in, put a drop of super glue on the threads and backed it up to the height I wanted. Then I just let it dry. Do this AFTER you have soldered the wires to it. It will melt the plastic otherwise.

Last thing was a heat shrink to cover the electronics and a little Quick Steel Plastic Repair around the ATTY connector to help keep it solid.
Here is a quick video showing its operation. It works with completely dry fingers, so no worrying about moisture.
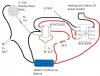
The nice thing is this setup can be incorporated in just about anything, just wire it inline where the (-) goes to the atty connector and run (+) wire from the Atty connector to the (+) touch point.
This MOSFET switch will handle up to 18v at 30A so it can be used in HV PV's.
Hope yall like it...
Dan
Here is the parts list:
(1) USB Cable (old mouse)
(1) Old 510 atty connector
(1) New 510 battery connector $1.99:
510 Battery Connector, Gold, Large Hole
(1) MOSFET part number IRF8736TRPBFCT-ND 1.28 (AKA IRF8736PbF) $1.28:
Digi-Key - IRF8736TRPBFCT-ND (Manufacturer - IRF8736TRPBF)
(1) 100M SMD resistor $5.27:
Digi-Key - HVCB2512FKC100MCT-ND (Manufacturer - HVCB2512FKC100M)
(1) 47k SMD resistor $1.10:
Digi-Key - 541-47KPACT-ND (Manufacturer - CRCW201047K0JNEFHP)
(1) AAA Battery Box $1.99 :
Enclosed AAA Battery Holder : Battery Holders | RadioShack.com
The only trick is the SMD resistors, soldering them is a pain. The MOSFET switch I cut legs 2 and 3 off, only needed 1 and 4 on the left side. Pin 1 is by the dot and is battery in, pin 4 in the picture is in the lower right corner. Legs 1 and 4 you have to straighten and spread out a bit to be able to solder to the 100M resistor. The 47k resistor is solders directly to the 100M resistor and the (-) touch contact is soldered there. Pins 5-8 are for (-) out to the ATTY.
I used a 510 atty connector and the touch contact point and it works great. Power in from the USB goes direct to the ATTY center, and then runs onto the center touch point.
I drilled out a rough hold an continually checked the hole against the atty connector until I could screw it into the hole.
Once I had the height I wanted I screwed it all the way in, put a drop of super glue on the threads and backed it up to the height I wanted. Then I just let it dry. Do this AFTER you have soldered the wires to it. It will melt the plastic otherwise.
Last thing was a heat shrink to cover the electronics and a little Quick Steel Plastic Repair around the ATTY connector to help keep it solid.
Here is a quick video showing its operation. It works with completely dry fingers, so no worrying about moisture.
The nice thing is this setup can be incorporated in just about anything, just wire it inline where the (-) goes to the atty connector and run (+) wire from the Atty connector to the (+) touch point.
This MOSFET switch will handle up to 18v at 30A so it can be used in HV PV's.
Hope yall like it...
Dan
Last edited:
")