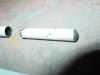
The purpose of this mod is to triple juice capacity by bypassing the cartridge with a high capacity tank inside a lengthened atty. A scrap 801 atty lengthens the body and a shortened scrap battery tube becomes the tank. Ventilation that normally occurs in the groove of the cart occurs in the space around the tank.
It's been enjoyable reading through all the mod posts and the interest in making the experience of vaping the most pleasurable. As I read through the brass screen mod page and users were commenting that the resevoir of fluid behind the screen was being held back rather than leaking through due to the surface tension of the liquid and yet being able to draw it due to the capillary action in contact with the bridge, it got my mind working. It seems we've got battery life, voltage, cart filler and technique dialed in. What's lagging is the capacity of the cart. I got these ideas of maybe a hole in the cart with specially designed juice bottle nozzles for rapid filling (don't know about you, but nothing worse than having to refill every 20-30 minutes) or maybe a bottle and hose outside of the unit. Then I thought, well wait, what if the atty were bigger? We could increase the cartridge size. Mind you, this isn't something you'd use for a night on the town, but for someone like me who drives truck and likes to be able to drive nonstop for 8 hours plus, a mod where you can plug in your passthrough and not have to do anything for more than an hour or two would be welcome. I thought of designing something from scratch, but in appreciation of the modders here and their ingenuity, I decided to utilize a do-it-yourself solution that can kill two birds with one stone- increase the juice capacity AND use all those spare parts I keep hearing everyone has laying around. Without wasting more time, i'll get to it!
For my mod, i'm using a dse801 from "HG" which is an SLB stamped unit. I started by stripping a battery and atty of their insides. You may want to soak them in acetone to loosen up the glue holding them together. I lucked out and had one a friend had broken by sitting on it.
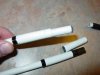
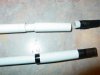
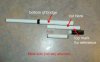
In photo 1 you can see the size difference and photo 2 has everything laid out for you to see.
1 Soak a scrap 801 atty and battery in alcohol overnight or acetone 10 minutes, loosening the glue. Remove the brass connectors, electronics and clean the insides. Save the plastic LED cap, you will use this.
2 Assemble the scrap atty on your working one (notice the tube is tapered) and mark the battery tube for cutting, as in photo 4. If you put the batt tube in and find the bottom, mark the top edge and lay it next to the mod unit.
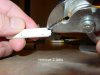
3 Remove the inside of a cartridge and with a scissors or dremel, cut the white plastic down to approximately 1/4" exposed. Line the lip up to your top line on the batt tube and make a mark about 3/32" below where the bottom of the plastic would fall (to allow room for the LED cap).
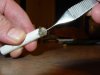
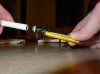
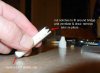
4 Using a dremel cutting wheel or hacksaw, place the marked battery tube in a vise (you might want to wrap with a piece of rubber to prevent chafe marks like you see here) and make your final cut. File or sand the cut to remove rough edges.
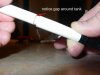
5 Make 3-4 crosscuts in the end of the tube, cutting to a depth mirroring the height of your bridge. In this case, I cut to a depth of about 3/16". This produces the capillary draw across the element producing vapor.
It's been enjoyable reading through all the mod posts and the interest in making the experience of vaping the most pleasurable. As I read through the brass screen mod page and users were commenting that the resevoir of fluid behind the screen was being held back rather than leaking through due to the surface tension of the liquid and yet being able to draw it due to the capillary action in contact with the bridge, it got my mind working. It seems we've got battery life, voltage, cart filler and technique dialed in. What's lagging is the capacity of the cart. I got these ideas of maybe a hole in the cart with specially designed juice bottle nozzles for rapid filling (don't know about you, but nothing worse than having to refill every 20-30 minutes) or maybe a bottle and hose outside of the unit. Then I thought, well wait, what if the atty were bigger? We could increase the cartridge size. Mind you, this isn't something you'd use for a night on the town, but for someone like me who drives truck and likes to be able to drive nonstop for 8 hours plus, a mod where you can plug in your passthrough and not have to do anything for more than an hour or two would be welcome. I thought of designing something from scratch, but in appreciation of the modders here and their ingenuity, I decided to utilize a do-it-yourself solution that can kill two birds with one stone- increase the juice capacity AND use all those spare parts I keep hearing everyone has laying around. Without wasting more time, i'll get to it!
For my mod, i'm using a dse801 from "HG" which is an SLB stamped unit. I started by stripping a battery and atty of their insides. You may want to soak them in acetone to loosen up the glue holding them together. I lucked out and had one a friend had broken by sitting on it.
In photo 1 you can see the size difference and photo 2 has everything laid out for you to see.
1 Soak a scrap 801 atty and battery in alcohol overnight or acetone 10 minutes, loosening the glue. Remove the brass connectors, electronics and clean the insides. Save the plastic LED cap, you will use this.
2 Assemble the scrap atty on your working one (notice the tube is tapered) and mark the battery tube for cutting, as in photo 4. If you put the batt tube in and find the bottom, mark the top edge and lay it next to the mod unit.
3 Remove the inside of a cartridge and with a scissors or dremel, cut the white plastic down to approximately 1/4" exposed. Line the lip up to your top line on the batt tube and make a mark about 3/32" below where the bottom of the plastic would fall (to allow room for the LED cap).
4 Using a dremel cutting wheel or hacksaw, place the marked battery tube in a vise (you might want to wrap with a piece of rubber to prevent chafe marks like you see here) and make your final cut. File or sand the cut to remove rough edges.
5 Make 3-4 crosscuts in the end of the tube, cutting to a depth mirroring the height of your bridge. In this case, I cut to a depth of about 3/16". This produces the capillary draw across the element producing vapor.
Attachments

Last edited: