Launcher Mini Tank MTL By Wirice & HellVape.
The sister brand of Hellvape or: Shenzhen Wirice Technology Co. Ltd is focused on the intelligent innovation of vaping devices, the goal is to provide quality products, ensuring interaction with users, simplicity, practicality and better performance in use of its products.
► Main features declared by the manufacturer:
• 1. Coil top positioning system makes installation and replacement easy
• 2. The Coil can be replaced even with the tank full and without liquid leaks
• 3. The T3-01 and T3-02 Coils offer a premium MTL experience and extreme flavor
• 4. Bottom adjustable AFC system offers multiple MTL / RDL adjustment options.
• 5. The knurled handle to remove the top cap allows for easy refilling with e-liquid
► Packaging:
The Launcher Mini Tank By Wirice & HellVape packaging shows the front; the image of the product, the identification writings and the initials TLC (Top Loading Coil) all on a black background.
On the back are listed the features, parameters, content, logos & brands and the words "Powered By Hellvape".
Laterally we find; the indication to the Wirice website, the name of the product, an adhesive label containing a serial number, the bar code and color indications.
The scratch & check and the QR Code are also present.
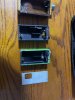
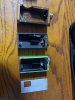
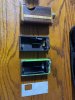
► Packing list:
• 1 * Launcher Mini from Wirice
• 1 * Extra Glass Tube
• 1 * Coil: T301 Ka1 Meshed Coil 0.7Ω (14-18W)
• 1 * Coil: T302 Ka1 Regular Coil 1.2Ω (8-13W)
• 1 * Bag of accessories
• 1 * User Manual
► Specifications:
• Dimensions: 23x55.85mm
• Weight: 55g
• Material: SUS304 and Pyrex glass
• Capacity: 3ml
• AFC adjustable from below: φ 0.8mm, φ 1.0mm, φ1.2mm, φ1.5mm, φ1.7 + slot 6.2mm
• Thread: 510
► Color Range:
• Matte Black, SS, Gun Metal, Blue, Gold, Rainbow.
► First impressions:
Launcher Tank: Launcher Tank By Wirice & HellVape for RDL / DL vaping was the forerunner of this new quick resistance change technology from above leak-proof, even with a tank full of liquid! Today what I find in my hands is the Launcher Mini version which is dedicated to MTL / RDL. I was favorably impressed the first time and I must say that I was expecting this MTL product from Wirice / Hellvape with this innovation. For the occasion of this test I have been sent two specimens, one in Gunmetal and the other SS together with a couple of 0.7 and 1.2Ω Coil packs. Thank you! My two Arez 120 Mod By HellVape will be dedicated exclusively to the use of Launcer & Launcer Mini.
► TLC System:
According to a lot of feedback collected by the two companies through its customers, it would turn out that a boring problem for those who use tanks with replaceable heads is to install and replace the coil. For this reason, Wirice, taking a cue from the previous Launcher Sub-ohm Tank, has developed the new "Initiative Top Loading Coil System" (TLC) for the Launche Mini MTL version, which changes the initials compared to before, but not the ingenious concept that remains. unchanged.
After removing the Top-Cap, just unscrew the base of the Drip-Tip and turn the Tank over, letting the coil come out directly, even with the tank full of liquid and without spilling a drop.
Then all you have to do is drop the new Coil directly into the Launcher Mini Tank from above, this makes operations easier and faster than ever. The inside of the Tank is spring loaded and this mechanism (when the base of the Drip-Tip is unscrewed) activates some bulkheads that close the Tank's feed holes, preventing any loss of liquid. Then with a slight pressure we can insert the resistance from the narrowest side, with the widest part facing upwards and simply screw the knurled pin to stop the Coil.