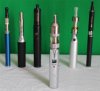
Received my AGA-T rba from Dennis at Mountain Vapor yesterday and wanted to share my initial impression. This was the first time I ever placed an order with them. Shipping was very fast and I received my order in two business days. I was quite impressed with the excellent build quality and weight of the unit. It has a very solid feel to it with a superb fit and finish. It looks great too and it comes with an assortment of extra parts like screws, o-rings, etc. I was excited to put it together and see how it vapes. I watched the video Dennis has on his website showing how he put his together and then I got started on mine.
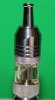
I have to say that it was an easy, simple build and I was up and running in about ten minutes. Wrapped the included coil and wick, attached it, filled the tank, drenched the coil and wick with a few more drops and I was done! It fired up on the first try and measured in at around 2.9 ohms with a 5/6 coil. So how does it vape?
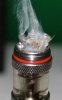
First 5 minutes: "HOLY SMOKES/VAPOR BATMAN!!!!" This thing vapes like a steam train! Massive clouds of thick vapor immediately. I wasn't too happy with the flavor that was coming through at first because it tasted somewhat burnt and the tank was leaking ever so slightly from one of the wick holes. I suspected the wick to be responsible for both issues but the vapor production was still great.
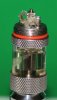
Took it apart and wrapped the coil around one of my own thicker wicks and put it back together. Again, fired up on the first try. Still great vapor production but this time no leaks and better flavor starting to come through. The thicker wick did the trick. NO LEAKS at all. I could still sense the burnt taste but not as much as before. I was hoping it would diminish after some break in time and I was right. It has almost completely disappeared within the first day. I have some SS mesh and more wire on the way. Going to try a mesh setup with a lower resistance as that seems to be the preferred method for best taste.
I feel like I should also mention the conversation I had with Dennis. I called him after I put the AGA-T together to get his opinion and ask if he had any suggestions to avoid the burnt taste in the future. Dennis was very friendly, extremely helpful and he seems like a really nice guy. It was a pleasure speaking with him and I will happily buy from him again with confidence. In addition to the great service, he currently has the AGA-T listed at only $19.00 which is substantially less expensive than anywhere else as I've seen it listed as high as $30.00 or more.
So if you've been undecided about the AGA-T or rebuildable atomizers in general, try this one out. I think it's a great way to start with rebuildables. You'll be pleased at the relatively easy build, the great vapor production and the option to try a variety of different setups for a fraction of the price of a Genesis.
I have to say that it was an easy, simple build and I was up and running in about ten minutes. Wrapped the included coil and wick, attached it, filled the tank, drenched the coil and wick with a few more drops and I was done! It fired up on the first try and measured in at around 2.9 ohms with a 5/6 coil. So how does it vape?
First 5 minutes: "HOLY SMOKES/VAPOR BATMAN!!!!" This thing vapes like a steam train! Massive clouds of thick vapor immediately. I wasn't too happy with the flavor that was coming through at first because it tasted somewhat burnt and the tank was leaking ever so slightly from one of the wick holes. I suspected the wick to be responsible for both issues but the vapor production was still great.
Took it apart and wrapped the coil around one of my own thicker wicks and put it back together. Again, fired up on the first try. Still great vapor production but this time no leaks and better flavor starting to come through. The thicker wick did the trick. NO LEAKS at all. I could still sense the burnt taste but not as much as before. I was hoping it would diminish after some break in time and I was right. It has almost completely disappeared within the first day. I have some SS mesh and more wire on the way. Going to try a mesh setup with a lower resistance as that seems to be the preferred method for best taste.
I feel like I should also mention the conversation I had with Dennis. I called him after I put the AGA-T together to get his opinion and ask if he had any suggestions to avoid the burnt taste in the future. Dennis was very friendly, extremely helpful and he seems like a really nice guy. It was a pleasure speaking with him and I will happily buy from him again with confidence. In addition to the great service, he currently has the AGA-T listed at only $19.00 which is substantially less expensive than anywhere else as I've seen it listed as high as $30.00 or more.
So if you've been undecided about the AGA-T or rebuildable atomizers in general, try this one out. I think it's a great way to start with rebuildables. You'll be pleased at the relatively easy build, the great vapor production and the option to try a variety of different setups for a fraction of the price of a Genesis.