
From my best experience, pls check : when you replace airhole pin pls be very very VERY careful there is a very small and thin insulator on the upper part (the insulator like ring is to keep airhole pin became positive) I think you are miss that thing so it shorted.I installed the smaller pin and I am getting a message that it shorted on one mod and when I screw the atty onto a different mod, the message is that the atomizer is low. I did not lose the positive post insulator this time, but it won't vape. I've got to have done something wrong, but I can't figure out what it might be. I'm off to watch some videos you guys posted for me the last time I screwed this up.
You are using an out of date browser. It may not display this or other websites correctly.
You should upgrade or use an alternative browser.
You should upgrade or use an alternative browser.
Hussar RTA single coil deck (attack of the clones)
- Thread starter rifky
- Start date
- th_trl_thread_readers 0
- Status
- Not open for further replies.
From my best experience, pls check : when you replace airhole pin pls be very very VERY careful there is a very small and thin insulator on the upper part (the insulator like ring is to keep airhole pin became positive) I think you are miss that thing so it shorted.
Thanks Rifky. If I can't figure this out, I'll take some photos and post them so y'all can help me figure out what I did wrong.
I just hope that when you do get your Hussar up and running, that you aren't so tired of messing around with it that you feel like just throwing it thru a window JW.") I could understand it if you did though.
I could understand it if you did though.
I could understand it if you did though.I just hope that when you do get your Hussar up and running, that you aren't so tired of messing around with it that you feel like just throwing it thru a window JW.
That's pretty much where I am right now. I'll feel better in a few days and I'll watch the videos and try to figure it out. I am wayyyy to aggravated to work on it now.
I think that I would be too JW. You have had just an awful bad run of luck with yours. Please excuse that double negative in the sentence above. 
I was struggling with the JFC on this one big time and I did a few things that fixed it right up for me:

- Lubed the crap out of the o-ring on the chimney where the bottom of the JFC connects
- Do NOT screw the top cap down tight, just barely (and I mean barely) snug
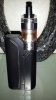
- I put a tiny mark on one of the "chads" on the tank JFC area to mark it for me so I can tell when open and when closed. This was one of the biggest challenges for me (see pic below)
Another way is to not do that and remember clockwise = open, bubbles should come up too.
The authentic tank fitted and turned much better but seeing as how they don't sell the ultem ones separately, I'm super glad ft has clear ones that fit it.
The authentic tank fitted and turned much better but seeing as how they don't sell the ultem ones separately, I'm super glad ft has clear ones that fit it.
I put a tiny mark on one of the "chads" on the tank JFC area to mark it for me so I can tell when open and when closed. This was one of the biggest challenges for me (see pic below)
Yes, That's how I managed to dump 1 and ½ tank fulls when I first got mine
 . Righty Tighty, Lefty Lousy, as they say, but somehow I messed that up. Yes, that top cap demands a very light touch when tightening doesn't it, I also found that out the hard (pun intended) way.
Last edited:
Yes also good to remember when you put the cap back on try not to twist it, or if you do, do it clockwise. Make sure the top deal is on tight too if you twisted the top cap to get it off. If you turn it counterclockwise you could end up with juice spilling everywhere when you try to fill it.
I twist the cap off clockwise and twist it back on clockwise as well but that's bc my o-rings are old and swelled. You should be able to just pull it off and push it back on, on a new one.
On my clone clear tanks they don't turn as smoothly so I don't crank it down hard like I did with the authentic ultem one, I just turn it with the top cap on till it starts to spin. Thank glob for ft selling those btw, as well as the mtl reducer that I've wanted forever but not been able to find.
Last edited:
Mine is working so good with the 2mm center post/air tube and just closing down the air flow ring that I can easily live with what I got in the box from Coppervape initially (and I like a really tight draw too), but will get the smaller tank/1.3mm center tube, just cause. NO gurgles, seeps, leaks, or even condensation from this Hussar and that is the real surprise for me. If I had the $$$ I would surely get the Authentic, for sure.
It's so much better though when you get the exact size you want and can leave that airflow all the way open.
I've always disliked air flow rings when they're going into a fixed size tube bc when you close the ring all they do is slow down the air hitting the coil.
The authentic version of the hussar uses an ultem tank which is better than glass, unfortunately mine is somewhere in missing luggage land & they don't sell it separately, you have to buy the whole micro or nano assembly for $50... here's hoping that Coppervape will clone it, for now I got a bunch of the clear ones and they fit just fine for $1 each or w/e they are. You have to force them on at first but after that they're fine.
I've always disliked air flow rings when they're going into a fixed size tube bc when you close the ring all they do is slow down the air hitting the coil.
For this tank it's obvious, the JFC configuration would be very difficult if not imposable to do in Glass
I like everyone prefer Glass
Back just not to long a go a K-F was 200$ & had a plastic tank section.
Today I only have 2 the Hussar & Rose V3, Both really good tanks!
The authentic version of the hussar uses an ultem tank which is better than glass, unfortunately mine is somewhere in missing luggage land & they don't sell it separately, you have to buy the whole micro or nano assembly for $50... here's hoping that Coppervape will clone it, for now I got a bunch of the clear ones and they fit just fine for $1 each or w/e they are. You have to force them on at first but after that they're fine.
Last edited:
Is that a Siren Drip Tip I see there bob ??
Edit: on closer inspection, maybe not. My bifocals and that line, ya know. That's what I also do, a Sliver of air open.
Edit: on closer inspection, maybe not. My bifocals and that line, ya know. That's what I also do, a Sliver of air open.
Last edited:
No just a just a tip out of my stash 52.Is that a Siren Drip Tip I see there bob ??
Edit: on closer inspection, maybe not. My bifocals and that line, ya know. That's what I also do, a Sliver of air open.
I could never do that, the crushing throat hit and the coil gets extremely hot. I'm very paranoid about carcinogens over 450F so I prefer just selecting my preferred size tube, use TC and leave it all the way open, that way the air is hitting the coil at the right velocity to not kill my throat and I know I'm below the temps where the I'm producing any extra nasties.
That is if you believe the study, I do personally, but mike did prove the more mtl you go the hotter the coil gets... I was vaping TC-only before, mainly out of convenience, but since then I've also taken my temps down to below 410F as well, which, as long as I build for the right heat flux, I don't notice any difference.
That is if you believe the study, I do personally, but mike did prove the more mtl you go the hotter the coil gets... I was vaping TC-only before, mainly out of convenience, but since then I've also taken my temps down to below 410F as well, which, as long as I build for the right heat flux, I don't notice any difference.
Last edited:
As far as perceived vape heat goes, there's a lot that goes into the perception of a hot coil. Is the atomizer chamber small or big, is the chimney long or short, is your coil over the juice or juice over the coil, long drip tip or short, good wicking or bad, and the length of draw (time drawing). Each of those questions could have different answers even with the exact same build/temp/power settings. I completely understand where you are coming from though, as I try to build to the minimum, as in minimum power needed to vape, minimum temp settings to vape.
Yeah, it's impossible to quantify all the variables, every person probably vapes at least a little different from the next but for me, all I can do is interpret the data and try to vape in a way that i believe to be safest for myself...
It looks like vg/pg start to give off aldehydes at around 410F, and Mike showed w/ a thermocouple that a subtank or rba in wattage mode can easily get up to 500F, I was already TC-only so that just means I need to drop my temp 10-20 degrees.
But one thing I've learned from this, you don't necessarily need a higher temp, if I build for the right heat flux, 390F is a perfectly adequate vape on both dtl and mtl atty's.
And now back to the Hussar
I was struggling with the JFC on this one big time and I did a few things that fixed it right up for me:
Running like a champ now and the JFC is easy to set
- Lubed the crap out of the o-ring on the chimney where the bottom of the JFC connects
- Do NOT screw the top cap down tight, just barely (and I mean barely) snug
- I put a tiny mark on one of the "chads" on the tank JFC area to mark it for me so I can tell when open and when closed. This was one of the biggest challenges for me (see pic below)
View attachment 658539
Just out of curiosity, what did you use to mark your JFC Toolman ?
Permanent markerJust out of curiosity, what did you use to mark your JFC Toolman ?
- Status
- Not open for further replies.
Similar threads
- Replies
- 996
- Views
- 56K
- Replies
- 36
- Views
- 5K
- Replies
- 0
- Views
- 921
Users who are viewing this thread
Total: 2 (members: 0, guests: 2)