601 E-pipe rebuild

Status
Not open for further replies.
Great job Carlos49!! I know what it is like to wrap that tiny little %$#*ing wire around the wick...and then solder it... I gave up.
Anyway, on anything other than a pipe, or an experimental mod, it's just not worth it...I know the pipe atty's are pricey.

Hey, could you measure the outside diameter of the atty while you have it out? Just short tube of the atty, not the long tube. It looks a lot like a 801 atty with that tall bridge. 801's are .4xx (don't remember exactly). That is the first pipe atty I've seen, and I'm bettin' it's the same as a 801. If it is, it would be a lot easier to buy a new 801 atty and...


Canyonrunner:
You are correct the attys are the same size in the 601 and the M201 pen style. Like you said it would be alot cheaper, easier, to get a 801 or M201 and replace it, if you didn't want to do the rebuild.
 

Vaporer

Ultra Member
ECF Veteran
Jun 23, 2009
1,767
22
Away..
Great info as always Carlos.

Thats 2 for 2 on the pipes since the Mini Pipe (Lady Pipe) also fits an 801 atty!
I almost have my 601 bowl out! woo hoo
Mine wasn't silicone. It's more like the clear varnish they used to paint the bowl with.
It held my upper ring too.
That thing is going to have a manual switch and be reassembeled so its much easier to maintain or one of us is leaving.
Hope no one asks my wife her choice. lol

Vaporer
 
Last edited:
Great info as always Carlos.

Thats 2 for 2 on the pipes since the Mini Pipe (Lady Pipe) also fits an 801 atty!
I almost have my 601 bowl out! woo hoo
Mine wasn't silicone. It's more like the clear varnish they used to paint the bowl with.
It held my upper ring too.
That thing is going to have a manual switch and be reassembeled so its much easier to maintain or one of us is leaving.
Hope no one asks my wife her choice. lol

Vaporer

LMAO I know what you mean my wife is not too happy when I start doing mods because I take over one of the two dinning areas, since I don't have a workshop any more.
I'm glad yours didn't have any Silicone. Did it pop out easy after you broke loose the varnish?
 

Vaporer

Ultra Member
ECF Veteran
Jun 23, 2009
1,767
22
Away..
I had virtually no gap. It was like a press fit. I started with a .010 near the LED.
Managed to get it worked to the bottom. When trying to start working around the bowl it was to stiff and tried to dig into the wood. I went down to a .007 (James Bond Tool lol) and it was better some but I'm now using a .005. It flexes around the bowl.
I'm about 80% done.

The collars are off the tube and its next. Need to look for some stock or a drill to fit the ID of the tube. Those 2 small brittle tabs inside Carlos mentioned are to make sure the cart goes in flat side up. Since the flat cart side is the air feed to the mouth piece, any condensate that formed should run back down to the cart edge and rewick back in?

Vaporer
 
Carlos49 - I'm really impressed by your building a new coil !

That silica rope used for the coil - what is that exactly? Have a link?

Sorry if I missed it, very tired at the moment.

Well done :)


Kina
After much looking I finally found the site for the Silica rope here it is. A word of advise if anyone is interested, get the loosley knitted type it's a lot easier to unknit without it breakinginto little pieces. I tried to send you a PM but your box is full!!
McMaster-Carr
 
Last edited:

Vaporer

Ultra Member
ECF Veteran
Jun 23, 2009
1,767
22
Away..
Well, my 601 is officially rebuilt into a manual. Carlos's tips among others here were very helpful. Thank you all. I hope this long post and pics helps someone else.

1st is removing the rings on the stem. Wrap them with bicycle inner tube rubber and twist with pliers. They can be worked off by hand once loose.
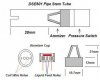
I found that a 1/2" drill will slide down the tube and the drill flutes will pass the tabs.:thumbs: I used a strip of bicycle inner tube rubber and made one wrap around the tube as close as I could to the drills end. The drill didnt touch the atomizer. Then if you look, you can see where to grab the tube that the drill OD is. Its abt 1 mm smaller than the tube. Used standard gas pliers, not the flat faced ones, so it grips in an arc around the tube. A good twist and it breaks free and then just twist back and forth and pull. It didn't deform the tube either. It gives a little when you grip to touch the flutes of the drill but leaves no permanent dent. There's wires going in the tube and you won't want to twist these off. You will only have abt 3/8"-1/2" max of freedom when its loose so go slowly. Since my circuit was bad I cut the wires lose to remove the bowl. If you want to save the pressure switch or need to remove the atomizer, remove the glue at the end of the tube and then the atomizer and pressure switch can be pushed out from the other end. Don't push out touching the bridge top or where it meets the atomizer body. It will crush the metal foam and result in poor wicking. I used 2 popsicle sticks , cut flat and keepin them against the tube walls parallel to the bridge it pushed right out.
The atomizer has a silicone boot on it.

Next is removing the bowl. The upper threaded ring can be pryed up and out with a screwdriver carefully and be sure to protect the rim so you don't dent the wood. Bicycle inner tube rubber again here! Unlike Carlos's silicone, mine was a friction fit and appeared the varnish/urethane coating ran down the walls for a perfect seal.
When working around the bowl to loosen the glue, I'd recommend bending the feelers gage in an arc to match the bowl. If left flat, its easy to gouge the upper rim of the bowl. I made it abt 75% down the side and it was not progressing at all. I slide a large flat tipped screwdriver down the neck, under the bowl, and with a slight twist it popped right up and slid out.:w00t:

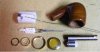
Since this was being converted to a manual I removed everything from the bowl except the battery retaining arm and spring. It has the solder point you need at the bottom of the screw.;) I used a tact switch, measured everything out and drilled a 1mm hole in the bowl for my switch stem to go through. The stem is a 1mm carbon fiber rod with a plastic disk drilled and glued into it. That face touches the tact switch. Then I made a small plastic "button top" and drilled it 3/4th thru and glued it on. I tried it prior to see the amount of travel it needed and trimmed the length just a little long.

I wired it all up with the green 26ga enamel-covered solid wire from Rat Shack. It's the 3 spool pack. The red 30ga would have been easier to push back down the tube. Polairty doesn't matter to the atomizer so I soldered the positive wire to go to the atomizer and the negative activated by the switch.
Feed them down the bowl and out the neck and slide the bowl back in positioning the switch for the switch stem. The switch stem goes in first from the inside and make sure the bowl will clear it! I dremeled my wood out a little for clearence.

If you've changed or rebuilt the atomizer now it goes back in the tube. I coated the tube and silicone boot with PG and worked it in till it was just flush with the tube end. Then I pushed it into place with the pressure switch.
The top of the bridge was 28mm from the end of the tube. That allows abt 1/4" to go into the cart material. I removed the pressure switch, soldered the wires, heat shrink and slide the tube back onto the neck.
I've never reglued my tube or bowl. Friction fit is holding fine and will be easy to remove later if needed.:D

My coil failed 2 days later. Easy now to take out and fix. I'll have a posting in the Atomizers Rebuilding thread on how I did it.

No more expensive paperweight!

Good Luck,

Vaporer
 

Attachments

  • ^01 Tube Atty Drawing.jpg
    ^01 Tube Atty Drawing.jpg
    18.7 KB · Views: 239
  • 1.jpg
    1.jpg
    19.3 KB · Views: 233
  • 2.jpg
    2.jpg
    16.9 KB · Views: 191
  • 4.jpg
    4.jpg
    14.5 KB · Views: 189
  • 5.JPG
    5.JPG
    13.6 KB · Views: 197

Vaporer

Ultra Member
ECF Veteran
Jun 23, 2009
1,767
22
Away..
Thanks Carlos,

I don't have the atomizer uploaded yet. The pic limit size got me (my 1st upload) on this one and I had to resize, flie size...blah blah. A couple more pics than 5 would have been better. Hard to decide what to upload with the description. I have other and full size pics I can email someone if they need them. I just hope the description was presented in such a way that others can benefit from it. Your posting was very good for me to get going.

Its a shame they didnt make the atty user replaceable. Its high quality all the way on the build and performance. Make the tube twist lock to come out, a slightly smaller dia silicone seal and then have pins to pull to release them from the tube. Flat plug on the atty and you're all set for user maint. Oh yea, a small "U" to push it all out! Geesh....

Many would have gladly paid 15-20 bucks for a replacement atty. They missed the boat on this one. As well as it vapes and produces fog and flavor I can't see many attys reaching 6 months with the best of juices. 4 would be my expectation and there is no way to clean it while it still in the tube. It would flood the presure switch and all the cleaning solution would be very hard to remove before reusing.

I'll try to get the atty posted this weekend. Next is a manual Mini Pipe! I have it ready, just waiting on switches to arrive.

Vaporer
 
Last edited:

bizzyb0t

Super Member
ECF Veteran
Mar 13, 2009
722
59
48
Denver CO, USA
twitter.com
Hey guys, very interesting thread.

I've got a DSE601 e-pipe that I've been using for the past month or so, and the draw is getting harder but it still puts out tons of vapor. I probably flooded it and the liquid inside is reducing and blocking the air passages. I was wondering if you guys knew enough about the pressure switch to know if I rinse the entire insides in alcohol (to clean the atty), if it'd affect the switch?

I've cleaned entire motherboards in ethyl alcohol, and nothing was damaged as long as I let it all evaporate, and was wondering if someone could post a pic of the insides of the pressure switch, because I'm wondering of some alcohol cleaning could clear up the clogging.

Also, it is possible to pull the atty out a bit, so maybe I could rinse just that? Is there enough play in the wires to accomplish something like this with out ripping out the solder joints?

Thanks guys!
 

Vaporer

Ultra Member
ECF Veteran
Jun 23, 2009
1,767
22
Away..
bizzyb0t,

The atty won't come out the top of the tube. You'll have remove the tube, then the glue at the end and slide the atty and pressure switch. I have that posted a few back. The wires for the atty go through the pressure switch body along the side but you won't find much slack. There is enough to soak the atty in a small pill bottle abt full if you are careful. I have never seen the inside of the pressure switch. The side facing the atty has a silicone membrane with 3 1.5mm holes in it and the other end has holes also so you can blow through it. Can it take an alcohol rinse? I don't know. You can check it though to see if its restricted. Airflow is easier sucking on the atty side than blowing through it when its normal. I have more pictures than I posted.
PM me with your email and I will send them to you so you can see what to expect.
My atty had a huge carbon deposit on the coil. It burnt up and I rebuilt it. Its in the atty rebuilder thread.
http://www.e-cigarette-forum.com/forum/atomizer-mods/23653-attn-atomizer-rebuilders-13.html post #128
I have been doing a diff over night soak in vinegar, hydrogen peroxide, phosphoric acid,
electronic tuner cleaner and now its in degreaser. So far not much dissolving it. It's a pretty big deposit for a months use with all factory juices. No DIY stuff was used in it. You may find the same thing where it grown towards the 2 inlet holes reducing the airflow.

I've cleaned attys before , but was able to do a burnoff cycle.
Pepsi has been mentioned as a good cleaner and I've done it, an alcohol rinse and then water with a burnoff. Pepsi has a high content of phosphoric acid, but without the burn off it may have removed 10% in the overnight soak.
 
Last edited:

kocmat

Full Member
Apr 17, 2009
10
3
Bulgaria
But that's not all!!!

This tread made me realize that Ruyan pipe, Ruyan cigar and Ruyan v8 are using the same switches and attys, obviously the v8 lacking in-atomizer switch. The DSE601 pipe, DSE701 cigar and DSE801 penstyle are copies of the corresponding Ruyan products. The difference is that the switch in DSE products is just a switch, in Ruyan products it's a reverse valve also. This valve makes the night and day difference between Ruyan and non-Ruyan product.

By the time (1.5 yr ago) I realized that $160 is dirt cheap for the Ruyan pipe - a device that doesn't leak, so it doesn’t flood the switch, etc. - it was available nowhere at this price.

Watching your thread I realized that the DSE products are almost exact copies including the dimensions of the internal parts. I disassembled a DSE601 pipe ($55) and a Ruyan cigar ($25) to find that the switch and atty have the same dimensions indeed.
So now I have my semi-Ruyan: DSE601 body->Ruyan cigar switch->DSE601 atty and plan to use DSE801 attys as spares (they are the same also - checked).

Gigantic Thank You!!!! :) :) :)
 
Status
Not open for further replies.

Users who are viewing this thread